- Table of Contents
-
- 06-Security Configuration Guide
- 00-Preface
- 01-AAA Configuration
- 02-802.1X Configuration
- 03-MAC Authentication Configuration
- 04-Triple Authentication Configuration
- 05-Port Security Configuration
- 06-User Profile Configuration
- 07-HABP Configuration
- 08-Public Key Configuration
- 09-PKI Configuration
- 10-SSH2.0 Configuration
- 11-SSL Configuration
- 12-TCP Attack Protection Configuration
- 13-IP Source Guard Configuration
- 14-ARP Attack Protection Configuration
- 15-ND Attack Defense Configuration
- Related Documents
-
| Title | Size | Download |
|---|---|---|
| 10-SSH2.0 Configuration | 346.65 KB |
Contents
Configuring the switch as an SSH server
SSH server configuration task list
Generating a DSA or RSA key pair
Enabling the SSH server function
Configuring the user interfaces for SSH clients
Configuring a client public key
Setting the SSH management parameters
Configuring the switch as an SSH client
SSH client configuration task list
Specifying a source IP address/interface for the SSH client
Configuring whether first-time authentication is supported
Establishing a connection between the SSH client and server
Displaying and maintaining SSH
SSH server configuration examples
When the switch acts as a server for password authentication
When switch acts as server for publickey authentication
SSH client configuration examples
When switch acts as client for password authentication
When switch acts as client for publickey authentication
Configuring the device as an SFTP server
Configuring the SFTP connection idle timeout period
Configuring the device an SFTP client
Specifying a source ip address or interface for the SFTP client
Establishing a connection to the SFTP server
Terminating the connection to the remote SFTP server
SFTP client configuration example
SFTP server configuration example
This chapter includes these sections:
· Configuring the switch as an SSH server
· Configuring the switch as an SSH client
· Displaying and maintaining SSH
· SSH server configuration examples
· SSH client configuration examples
|
|
NOTE: · The term "switch" or "device" in this chapter refers to the switching engine on a WX3000E wireless switch. · The WX3000E series comprises WX3024E and WX3010E wireless switches. · The port numbers in this chapter are for illustration only. |
SSH2.0 overview
Introduction to SSH2.0
Secure Shell (SSH) offers an approach to logging in to a remote device securely. By encryption and strong authentication, it protects devices against attacks such as IP spoofing and plain text password interception.
The device can not only work as an SSH server to support connections with SSH clients, but also work as an SSH client to allow users to establish SSH connections with a remote device acting as the SSH server.
|
|
NOTE: · When acting as an SSH server, the device supports SSH2.0 and SSH1. When acting as an SSH client, the device supports SSH2.0 only. · Unless otherwise noted, SSH in this document refers to SSH2.0. |
Operation of SSH
To establish an SSH connection and communicate with each other through the connection, an SSH client and the SSH server go through the stages listed in Table 1.
Table 1 Stages in session establishment and interaction between an SSH client and the server
|
Stages |
Description |
|
SSH1 and SSH2.0 are supported. The two parties negotiate a version to use. |
|
|
SSH supports multiple algorithms. The two parties negotiate algorithms for communication, and use the DH key exchange algorithm to generate the same session key and session ID. |
|
|
The SSH server authenticates the client in response to the client’s authentication request. |
|
|
After passing authentication, the client sends a session request to the server. |
|
|
After the server grants the request, the client and the server start to communicate with each other. |
Version negotiation
1. The server opens port 22 to listen to connection requests from clients.
2. The client sends a TCP connection request to the server.
3. After the TCP connection is established, the server sends a packet that carries a version information string to the client. The version information string is in the format SSH-<primary protocol version number>.<secondary protocol version number>-<software version number>. The primary and secondary protocol version numbers constitute the protocol version number. The software version number is used for debugging.
4. After receiving the packet, the client resolves the packet and compares the server’s protocol version number with that of its own. If the server’s protocol version is lower and supportable, the client uses the protocol version of the server; otherwise, the client uses its own protocol version. In either case, the client sends a packet to the server to notify the server of the protocol version that it decides to use.
5. The server compares the version number carried in the packet with that of its own. If the server supports the version, the negotiation succeeds and the server and the client proceed with key and algorithm negotiation. Otherwise, the negotiation fails, and the server breaks the TCP connection.
|
|
NOTE: All the packets involved in the preceding steps are transferred in plain text. |
Key and algorithm negotiation
The server and the client send algorithm negotiation packets to each other, notifying the peer of the supported public key algorithms, encryption algorithms, Message Authentication Code (MAC) algorithms, and compression algorithms.
Based on the received algorithm negotiation packets, the server and the client figure out the algorithms to be used. If the negotiation of any type of algorithm fails, the algorithm negotiation fails and the server tears down the connection with the client.
The server and the client use the DH key exchange algorithm and parameters such as the host key pair to generate the session key and session ID, and the client authenticates the identity of the server.
Through the steps, the server and the client get the same session key and session ID. The session key will be used to encrypt and decrypt data exchanged between the server and client later. The session ID will be used to identify the session established between the server and client and will be used in the authentication stage.
|
|
CAUTION: Before the key and algorithm negotiation, the server must have already generated a DSA or RSA key pair, which is not only used for generating the session key and session ID, but also used by the client to authenticate the identity of the server. For more information about DSA and RSA key pairs, see the chapter “Public key configuration.” |
Authentication
SSH supports the following authentication methods:
· Password authentication—The SSH server uses AAA for authentication of the client. During password authentication, the SSH client encrypts its username and password, encapsulates them into a password authentication request, and sends the request to the server. After receiving the request, the SSH server decrypts the username and password, checks the validity of the username and password locally or by a remote AAA server, and then informs the client of the authentication result. If the remote AAA server requires the user for a password re-authentication, it carries a prompt in the authentication response to send to the device. The prompt is transparently transmitted to the client, and displayed on the client to notify the user to enter a specified password. After the user enters the correct password and passes validity check by the remote AAA server, the device returns an authentication success message to the client.
· Publickey authentication—The server authenticates the client by the digital signature. During publickey authentication, the client sends the server a publickey authentication request that contains its username, public key, and publickey algorithm information. The server checks whether the public key is valid. If the public key is invalid, the authentication fails. Otherwise, the server authenticates the client by the digital signature. Finally, the server sends a message to the client to inform the authentication result. The device supports using the publickey algorithms RSA and DSA for digital signature.
An SSH2.0 server might require the client to pass both password authentication and publickey authentication or either of them. However, if the client is running SSH1, the client only needs to pass either authentication, regardless of the requirement of the server.
The following gives the steps of the authentication stage:
1. The client sends the server an authentication request, which includes the username, the authentication method, and the information related to the authentication method (for example, the password in the case of password authentication).
2. The server authenticates the client. If the authentication fails, the server informs the client by sending a message, which includes a list of available methods for re-authentication.
3. The client selects a method from the list to initiate another authentication.
4. The preceding process repeats until the authentication succeeds or the number of failed authentication attempts exceeds the maximum of authentication attempts. In the latter case, the server tears the session down.
|
|
NOTE: Only clients running SSH2.0 or a later version support password re-authentication that is initiated by the device acting as the SSH server. |
Session request
After passing authentication, the client sends a session request to the server, and the server listens to and processes the request from the client. If the server successfully processes the request, the server sends an SSH_SMSG_SUCCESS packet to the client and goes on to the interaction stage with the client. Otherwise, the server sends an SSH_SMSG_FAILURE packet to the client to indicate that the processing has failed or it cannot resolve the request.
Interaction
In this stage, the server and the client exchanges data as follows:
1. The client encrypts and sends the command to be executed to the server.
2. The server decrypts and executes the command, and then encrypts and sends the result to the client.
3. The client decrypts and displays the result on the terminal.
Configuring the switch as an SSH server
SSH server configuration task list
Complete the following tasks to configure an SSH server:
|
Task |
Remarks |
|
Required |
|
|
Required |
|
|
Required |
|
|
Required for publickey authentication users and optional for password authentication users |
|
|
Optional |
|
|
Optional |
Generating a DSA or RSA key pair
In the key and algorithm negotiation stage, the DSA or RSA key pair is required to generate the session key and session ID and for the client to authenticate the server.
Follow these steps to generate a DSA or RSA key pair on the SSH server:
|
To do… |
Use the command… |
Remarks |
|
Enter system view |
system-view |
— |
|
Generate a DSA or RSA key pair |
public-key local create { dsa | rsa } |
Required By default, neither DSA key pair nor RSA key pair exists. |
|
|
NOTE: · For more information about the public-key local create command, see the Security Command Reference. · To support SSH clients that use different types of key pairs, generate both DSA and RSA key pairs on the SSH server. · The public-key local create rsa command generates a server RSA key pair and a host RSA key pair. Each of the key pairs consists of a public key and a private key. The public key in the server key pair of the SSH server is used in SSH1 to encrypt the session key for secure transmission of the key. As SSH2.0 uses the DH algorithm to generate the session key on the SSH server and client respectively, no session key transmission is required in SSH2.0 and the server key pair is not used. · The length of the modulus of RSA server keys and host keys must be in the range 512 to 2048 bits. Some SSH2.0 clients require that the length of the key modulus be at least 768 bits on the SSH server side. · The public-key local create dsa command generates only the host key pair. SSH1 does not support the DSA algorithm. · The length of the modulus of DSA host keys must be in the range 512 to 2048 bits. Some SSH2.0 clients require that the length of the key modulus be at least 768 bits on the SSH server side. |
Enabling the SSH server function
Follow these steps to enable the SSH server function:
|
To do… |
Use the command… |
Remarks |
|
Enter system view |
system-view |
— |
|
Enable the SSH server function |
ssh server enable |
Required Disabled by default |
Configuring the user interfaces for SSH clients
An SSH client accesses the device through a VTY user interface. Therefore, you need to configure the user interfaces for SSH clients to allow SSH login. The configuration takes effect only for clients that log in after the configuration.
Follow these steps to configure the protocols for a user interface to support:
|
To do… |
Use the command… |
Remarks |
|
Enter system view |
system-view |
— |
|
Enter user interface view of one or more user interfaces |
user-interface vty number [ ending-number ] |
— |
|
Set the login authentication mode to scheme |
authentication-mode scheme |
Required By default, the authentication mode is password. |
|
Configure the user interface(s) to support SSH login |
protocol inbound { all | ssh } |
Optional All protocols are supported by default. |
|
|
CAUTION: · For more information about the authentication-mode and protocol inbound commands, see the Fundamentals Command Reference. · If you configure a user interface to support SSH, be sure to configure the corresponding authentication mode with the authentication-mode scheme command. · For a user interface configured to support SSH, you cannot change the authentication mode. To change the authentication mode, undo the SSH support configuration first. |
Configuring a client public key
|
|
NOTE: This configuration task is only necessary for SSH users using publickey authentication. |
To allow an SSH user to pass publickey authentication and log in to the server, you must configure the client’s DSA or RSA host public key on the server, and configure the client to use the corresponding host private key, so that the server uses the digital signature to authenticate the client.
You can manually configure the public key of an SSH client on the server, or import it from the public key file:
· Configure it manually. You can type or copy the public key to the SSH server. The public key must have not been converted and be in the Distinguished Encoding Rules (DER) encoding format.
· Import it from the public key file. During the import process, the server will automatically convert the public key in the public key file to a string in Public Key Cryptography Standards (PKCS) format, and save it locally. Before importing the public key, you must upload the public key file (in binary) to the server through FTP or TFTP.
|
|
NOTE: · H3C recommends you to configure a client public key by importing it from a public key file. · You can configure up to 20 client public keys on an SSH server. |
Configuring a client public key manually
Follow these steps to configure the client public key manually:
|
To do… |
Use the command… |
Remarks |
|
Enter system view |
system-view |
— |
|
Enter public key view |
public-key peer keyname |
— |
|
Enter public key code view |
public-key-code begin |
— |
|
Configure a client's host public key |
Enter the content of the host public key |
Required Spaces and carriage returns are allowed between characters. |
|
Return to public key view and save the configured host public key |
public-key-code end |
— When you exit public key code view, the system automatically saves the public key. |
|
Return to system view |
peer-public-key end |
— |
Importing a client public key from a public key file
Follow these steps to import a public key from a public key file:
|
To do… |
Use the command… |
Remarks |
|
Enter system view |
system-view |
— |
|
Import the public key from a public key file |
public-key peer keyname import sshkey filename |
Required |
|
|
NOTE: For more information about client public key configuration, see the chapter “Public key configuration.” |
Configuring an SSH user
This configuration task allows you to create an SSH user and specify the service type and authentication method.
An SSH user’s service type can be Secure Telnet (Stelnet) or Secure FTP (SFTP). For more information about Stelnet, see “SSH2.0 overview.“ For more information about SFTP, see “SFTP overview.”
Authentication methods include publickey authentication, password authentication, password-publickkey authentication—requiring both password and publickey authentication, and any authentication—requiring either of the password and publickey authentication.
Follow these steps to configure an SSH user and specify the service type and authentication method:
|
To do… |
Use the command… |
Remarks |
|
|
Enter system view |
system-view |
— |
|
|
Create an SSH user, and specify the service type and authentication method |
For Stelnet users |
ssh user username service-type stelnet authentication-type { password | { any | password-publickey | publickey } assign publickey keyname } |
Required Use either command. |
|
For all users or SFTP users |
ssh user username service-type { all | sftp } authentication-type { password | { any | password-publickey | publickey } assign publickey keyname work-directory directory-name } |
||
|
|
CAUTION: · A user without an SSH account can still pass password authentication and log in to the server through Stelnet or SFTP, as long as the user can pass AAA authentication and the service type is SSH. · For successful login through SFTP, you must set the user service type to sftp or all. · SSH1 does not support the service type sftp. If the client uses SSH1 to log in to the server, you must set the service type to stelnet or all on the server. · An SFTP user’s working folder depends on the authentication method. For a user using only password authentication, the working folder is the AAA authorized one. For a user using only publickey authentication or using both the publickey and password authentication methods, the working folder is the one set by using the ssh user command. · You can change the authentication method and public key of an SSH user when the user is communicating with the SSH server, but your changes take effect only after the user logs out and logs in again. |
Setting the SSH management parameters
SSH management includes:
· Enabling the SSH server to be compatible with SSH1 client
· Setting the RSA server key pair update interval, applicable to users using SSH1 client
· Setting the SSH user authentication timeout period
· Setting the maximum number of SSH authentication attempts
Setting these parameters can help avoid malicious guessing at and cracking of the keys and usernames, securing your SSH connections.
Follow these steps to set the SSH management parameters:
|
To do… |
Use the command… |
Remarks |
|
Enter system view |
system-view |
— |
|
Enable the SSH server to support SSH1 clients |
ssh server compatible-ssh1x enable |
Optional By default, the SSH server supports SSH1 clients. |
|
Set the RSA server key pair update interval |
ssh server rekey-interval hours |
Optional 0 by default. That is, the RSA server key pair is not updated. |
|
Set the SSH user authentication timeout period |
ssh server authentication-timeout time-out-value |
Optional 60 seconds by default |
|
Set the maximum number of SSH authentication attempts |
ssh server authentication-retries times |
Optional 3 by default |
|
|
NOTE: Authentication will fail if the number of authentication attempts (including both publickey and password authentication) exceeds that specified in the ssh server authentication-retries command. |
Configuring the switch as an SSH client
SSH client configuration task list
Complete the following tasks to configure an SSH client:
|
Task |
Remarks |
|
Optional |
|
|
Optional |
|
|
Required |
Specifying a source IP address/interface for the SSH client
This configuration task allows you to specify a source IP address or interface for the client to access the SSH server, improving service manageability.
|
To do… |
Use the command… |
Remarks |
|
|
Enter system view |
system-view |
— |
|
|
Specify a source IP address or interface for the SSH client |
Specify a source IPv4 address or interface for the SSH client |
ssh client source { ip ip-address | interface interface-type interface-number } |
Required Select either approach By default, an SSH client uses the IP address of the outbound interface that the route to the SSH server defines to access the SSH server. |
|
Specify a source IPv6 address or interface for the SSH client |
ssh client ipv6 source { ipv6 ipv6-address | interface interface-type interface-number } |
||
Configuring whether first-time authentication is supported
When the device connects to the SSH server as an SSH client, you can configure whether the device supports first-time authentication.
· With first-time authentication, when an SSH client not configured with the server host public key accesses the server for the first time, the user can continue accessing the server, and save the host public key on the client. When accessing the server again, the client will use the saved server host public key to authenticate the server.
· Without first-time authentication, a client not configured with the server host public key will refuse to access the server. To enable the client to access the server, you must configure the server host public key and specify the public key name for authentication on the client in advance.
Enable the device to support first-time authentication
Follow these steps to enable the device to support first-time authentication:
|
To do... |
Use the command… |
Remarks |
|
Enter system view |
system-view |
— |
|
Enable the device to support first-time authentication |
ssh client first-time enable |
Optional By default, first-time authentication is supported on a client. |
Disable first-time authentication
For successful authentication of an SSH client not supporting first-time authentication, the server host public key must be configured on the client and the public key name must be specified.
Follow these steps to disable first-time authentication:
|
To do... |
Use the command… |
Remarks |
|
Enter system view |
system-view |
— |
|
Disable first-time authentication support |
undo ssh client first-time |
Required By default, first-time authentication is supported on a client. |
|
Configure the server host public key |
Required The method for configuring the server host public key on the client is similar to that for configuring client public key on the server. |
|
|
Specify the host public key name of the server |
ssh client authentication server server assign publickey keyname |
Required |
Establishing a connection between the SSH client and server
Follow these steps to establish the connection between the SSH client and the server:
|
To do... |
Use the command… |
Remarks |
|
|
Establish a connection between the SSH client and the server, and specify the public key algorithm, preferred encryption algorithm, preferred HMAC algorithm and preferred key exchange algorithm |
For an IPv4 server |
ssh2 server [ port-number ] [ identity-key { dsa | rsa } | prefer-ctos-cipher { 3des | aes128 | des } | prefer-ctos-hmac { md5 | md5-96 | sha1 | sha1-96 } | prefer-kex { dh-group-exchange | dh-group1 | dh-group14 } | prefer-stoc-cipher { 3des | aes128 | des } | prefer-stoc-hmac { md5 | md5-96 | sha1 | sha1-96 } ] * |
Required Use either command in user view. |
|
For an IPv6 server |
ssh2 ipv6 server [ port-number ] [ identity-key { dsa | rsa } | prefer-ctos-cipher { 3des | aes128 | des } | prefer-ctos-hmac { md5 | md5-96 | sha1 | sha1-96 } | prefer-kex { dh-group-exchange | dh-group1 | dh-group14 } | prefer-stoc-cipher { 3des | aes128 | des } | prefer-stoc-hmac { md5 | md5-96 | sha1 | sha1-96 } ] * |
||
Displaying and maintaining SSH
|
To do… |
Use the command… |
Remarks |
|
Display the source IP address or interface currently set for the SFTP client |
display sftp client source [ | { begin | exclude | include } regular-expression ] |
Available in any view |
|
Display the source IP address or interface information on an SSH client |
display ssh client source [ | { begin | exclude | include } regular-expression ] |
Available in any view |
|
Display SSH server status information or session information on an SSH server |
display ssh server { status | session } [ | { begin | exclude | include } regular-expression ] |
Available in any view |
|
Display the mappings between SSH servers and their host public keys on an SSH client |
display ssh server-info [ | { begin | exclude | include } regular-expression ] |
Available in any view |
|
Display information about one or all SSH users on an SSH server |
display ssh user-information [ username ] [ | { begin | exclude | include } regular-expression ] |
Available in any view |
|
Display the public keys of the local key pairs |
display public-key local { dsa | rsa } public [ | { begin | exclude | include } regular-expression ] |
Available in any view |
|
Display the public keys of the SSH peers |
display public-key peer [ brief | name publickey-name ] [ | { begin | exclude | include } regular-expression ] |
Available in any view |
|
|
NOTE: For more information about the display public-key local and display public-key peer commands, see the Security Command Reference. |
SSH server configuration examples
When the switch acts as a server for password authentication
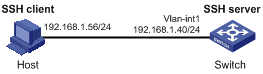
Network requirements
As shown in Figure 1, a host (the SSH client) and a switch (the SSH server) are directly connected. Configure an SSH user on the switch so that the host can securely log in to the switch after passing password authentication. Configure a username and password for the user on the switch.
Figure 1 Switch acts as server for password authentication
Configuration procedure
1. Configure the SSH server
# Generate the RSA key pairs.
<Switch> system-view
[Switch] public-key local create rsa
The range of public key size is (512 ~ 2048).
NOTES: If the key modulus is greater than 512,
It will take a few minutes.
Press CTRL+C to abort.
Input the bits of the modulus[default = 1024]:
Generating Keys...
++++++++
++++++++++++++
+++++
++++++++
# Generate a DSA key pair.
[Switch] public-key local create dsa
The range of public key size is (512 ~ 2048).
NOTES: If the key modulus is greater than 512,
It will take a few minutes.
Press CTRL+C to abort.
Input the bits of the modulus[default = 1024]:
Generating Keys...
++++++++++++++++++++++++++++++++++++++++++++++++++++++++++++++++++++++++++++++++
+++++++++++++++++++++++++++++++++++
# Enable the SSH server.
[Switch] ssh server enable
# Configure an IP address for VLAN-interface 1. This address will serve as the destination of the SSH connection.
[Switch] interface vlan-interface 1
[Switch-Vlan-interface1] ip address 192.168.1.40 255.255.255.0
[Switch-Vlan-interface1] quit
# Set the authentication mode for the user interfaces to AAA.
[Switch] user-interface vty 0 4
[Switch-ui-vty0-4] authentication-mode scheme
# Enable the user interfaces to support SSH.
[Switch-ui-vty0-4] protocol inbound ssh
[Switch-ui-vty0-4] quit
# Create local user client001, and set the user command privilege level to 3
[Switch] local-user client001
[Switch-luser-client001] password simple aabbcc
[Switch-luser-client001] service-type ssh
[Switch-luser-client001] authorization-attribute level 3
[Switch-luser-client001] quit
# Specify the service type for user client001 as Stelnet, and the authentication method as password. This step is optional.
[Switch] ssh user client001 service-type stelnet authentication-type password
2. Establish a connection between the SSH client and the SSH server
|
|
NOTE: The device supports a variety of SSH client software, such as PuTTY, and OpenSSH. The following is an example of configuring SSH client using PuTTY Version 0.58. |
# Establish a connection to the SSH server.
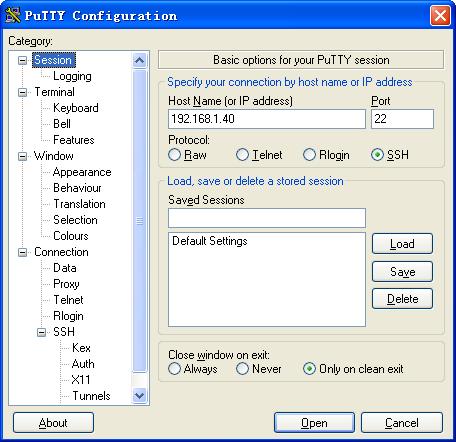
Launch PuTTY.exe to enter the following interface. In the Host Name (or IP address) text box, enter the IP address of the server (192.168.1.40).
Figure 2 SSH client configuration interface
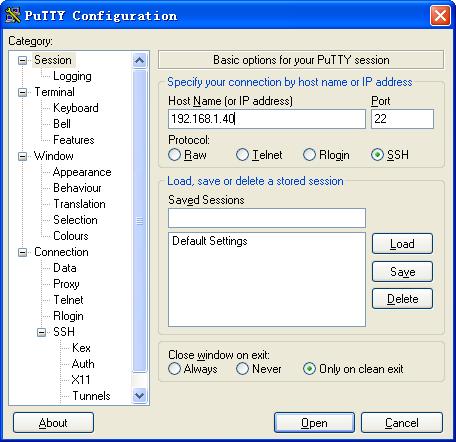
In the window shown in Figure 2, click Open to connect to the server. If the connection is normal, you will be prompted to enter the username and password. After entering the username (client001) and password (aabbcc), you can enter the configuration interface of the server.
When switch acts as server for publickey authentication
Network requirements
As shown in Figure 3, a host (the SSH client) and a switch (the SSH server) are directly connected. Configure an SSH user on the switch so that the host can securely log in to the switch after passing publickey authentication. Use the RSA public key algorithm.
Figure 3 Switch acts as server for publickey authentication
Configuration procedure
|
|
NOTE: During SSH server configuration, the client public key is required. Use the client software to generate RSA key pairs on the client before configuring the SSH server. |
1. Configure the SSH client
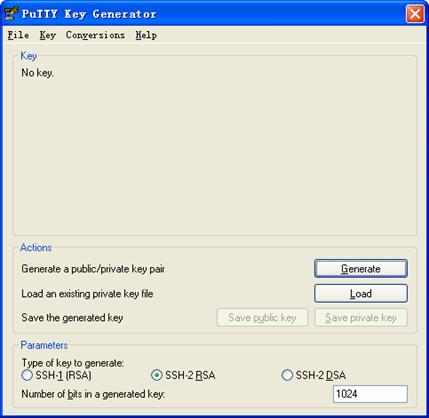
# Generate the RSA key pairs.
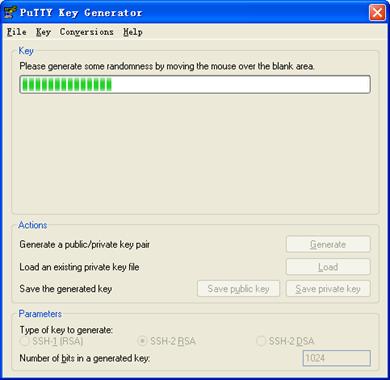
Run PuTTYGen.exe, select SSH-2 RSA and click Generate.
Figure 4 Generate a key pair on the client 1)
When the generator is generating the key pair, you must move the mouse continuously and keep the mouse off the green process bar shown in Figure 5. Otherwise, the process bar stops moving and the key pair generating process will be stopped.
Figure 5 Generate a key pair on the client 2)
After the key pair is generated, click Save public key and specify the file name as key.pub to save the public key.
Figure 6 Generate a key pair on the client 3)
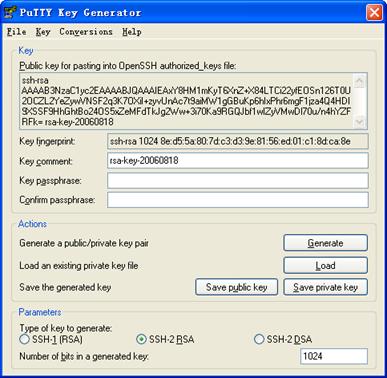
Likewise, to save the private key, click Save private key. A warning window pops up to prompt you whether to save the private key without any protection. Click Yes and enter the name of the file for saving the key (private in this case).
Figure 7 Save a key pair on the client 4)

Then, you need to transmit the public key file to the server through FTP or TFTP.
2. Configure the SSH server
# Generate the RSA key pairs.
<Switch> system-view
[Switch] public-key local create rsa
The range of public key size is (512 ~ 2048).
NOTES: If the key modulus is greater than 512,
It will take a few minutes.
Press CTRL+C to abort.
Input the bits of the modulus[default = 1024]:
Generating Keys...
++++++++
++++++++++++++
+++++
++++++++
# Generate a DSA key pair.
[Switch] public-key local create dsa
The range of public key size is (512 ~ 2048).
NOTES: If the key modulus is greater than 512,
It will take a few minutes.
Press CTRL+C to abort.
Input the bits of the modulus[default = 1024]:
Generating Keys...
++++++++++++++++++++++++++++++++++++++++++++++++++++++++++++++++++++++++++++++++
+++++++++++++++++++++++++++++++++++
# Enable the SSH server.
[Switch] ssh server enable
# Configure an IP address for VLAN-interface 1. This address will serve as the destination of the SSH connection.
[Switch] interface vlan-interface 1
[Switch-Vlan-interface1] ip address 192.168.1.40 255.255.255.0
[Switch-Vlan-interface1] quit
# Set the authentication mode for the user interfaces to AAA.
[Switch] user-interface vty 0 4
[Switch-ui-vty0-4] authentication-mode scheme
# Enable the user interfaces to support SSH.
[Switch-ui-vty0-4] protocol inbound ssh
# Set the user command privilege level to 3.
[Switch-ui-vty0-4] user privilege level 3
[Switch-ui-vty0-4] quit
# Import the client’s public key from file key.pub and name it Switch001.
[Switch] public-key peer Switch001 import sshkey key.pub
# Specify the authentication method for user client002 as publickey, and assign the public key Switch001 to the user.
[Switch] ssh user client002 service-type stelnet authentication-type publickey assign publickey Switch001
3. Establish a connection between the SSH client and the SSH server
# Specify the private key file and establish a connection to the SSH server
Launch PuTTY.exe to enter the following interface. In the Host Name (or IP address) text box, enter the IP address of the server (192.168.1.40).
Figure 8 SSH client configuration interface 1)
Select SSH > Auth from the navigation tree. The following window appears. Click Browse… to bring up the file selection window, navigate to the private key file (private) and click OK.
Figure 9 SSH client configuration interface 2)
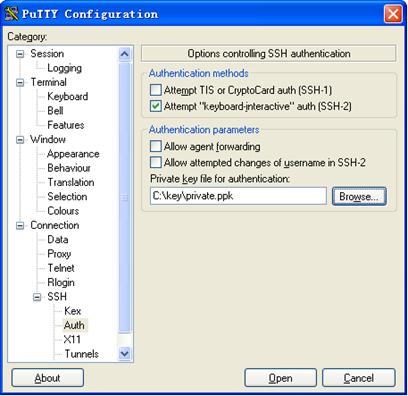
In the window shown in Figure 9, click Open to connect to the server. If the connection is normal, you will be prompted to enter the username. After entering the username (client002), you can enter the configuration interface of the server.
SSH client configuration examples
When switch acts as client for password authentication
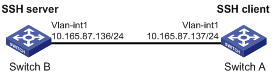
Network requirements
As shown in Figure 10, Switch A (the SSH client) must pass password authentication to log in to Switch B (the SSH server) through the SSH protocol. Configure the username client001 and the password aabbcc for the SSH client on Switch B.
Figure 10 Switch acts as client for password authentication
Configuration procedure
1. Configure the SSH server
# Generate the RSA key pairs.
<SwitchB> system-view
[SwitchB] public-key local create rsa
The range of public key size is (512 ~ 2048).
NOTES: If the key modulus is greater than 512,
It will take a few minutes.
Press CTRL+C to abort.
Input the bits of the modulus[default = 1024]:
Generating Keys...
++++++++
++++++++++++++
+++++
++++++++
# Generate a DSA key pair.
[SwitchB] public-key local create dsa
The range of public key size is (512 ~ 2048).
NOTES: If the key modulus is greater than 512,
It will take a few minutes.
Press CTRL+C to abort.
Input the bits of the modulus[default = 1024]:
Generating Keys...
++++++++++++++++++++++++++++++++++++++++++++++++++++++++++++++++++++++++++++++++
+++++++++++++++++++++++++++++++++++
# Enable the SSH server.
[SwitchB] ssh server enable
# Configure an IP address for VLAN-interface 1, which the SSH client will use as the destination for SSH connection.
[SwitchB] interface vlan-interface 1
[SwitchB-Vlan-interface1] ip address 10.165.87.136 255.255.255.0
[SwitchB-Vlan-interface1] quit
# Set the authentication mode for the user interfaces to AAA.
[SwitchB] user-interface vty 0 4
[SwitchB-ui-vty0-4] authentication-mode scheme
# Enable the user interfaces to support SSH.
[SwitchB-ui-vty0-4] protocol inbound ssh
[SwitchB-ui-vty0-4] quit
# Create local user client001.
[SwitchB] local-user client001
[SwitchB-luser-client001] password simple aabbcc
[SwitchB-luser-client001] service-type ssh
[SwitchB-luser-client001] authorization-attribute level 3
[SwitchB-luser-client001] quit
# Specify the service type for user client001 as Stelnet, and the authentication method as password. This step is optional.
[SwitchB] ssh user client001 service-type stelnet authentication-type password
2. Establish a connection between the SSH client and the SSH server
# Configure an IP address for VLAN-interface 1.
<SwitchA> system-view
[SwitchA] interface vlan-interface 1
[SwitchA-Vlan-interface1] ip address 10.165.87.137 255.255.255.0
[SwitchA-Vlan-interface1] quit
[SwitchA] quit
· If the client supports first-time authentication, you can directly establish a connection from the client to the server.
# Establish an SSH connection to server 10.165.87.136.
<SwitchA> ssh2 10.165.87.136
Username: client001
Trying 10.165.87.136 ...
Press CTRL+K to abort
Connected to 10.165.87.136 ...
The Server is not authenticated. Continue? [Y/N]:y
Do you want to save the server public key? [Y/N]:n
Enter password:
After you enter the correct password, you can log in to Switch B successfully.
· If the client does not support first-time authentication, you need to perform the following configurations.
# Disable first-time authentication.
[SwitchA] undo ssh client first-time
# Configure the host public key of the SSH server. You can get the server host public key by using the display public-key local dsa public command on the server.
[SwitchA] public-key peer key1
[SwitchA-pkey-public-key] public-key-code begin
[SwitchA-pkey-key-code]308201B73082012C06072A8648CE3804013082011F0281810
0D757262C4584C44C211F18BD96E5F0
[SwitchA-pkey-key-code]61C4F0A423F7FE6B6B85B34CEF72CE14A0D3A5222FE08CECE
65BE6C265854889DC1EDBD13EC8B274
[SwitchA-pkey-key-code]DA9F75BA26CCB987723602787E922BA84421F22C3C89CB9B0
6FD60FE01941DDD77FE6B12893DA76E
[SwitchA-pkey-key-code]EBC1D128D97F0678D7722B5341C8506F358214B16A2FAC4B3
68950387811C7DA33021500C773218C
[SwitchA-pkey-key-code]737EC8EE993B4F2DED30F48EDACE915F0281810082269009E
14EC474BAF2932E69D3B1F18517AD95
[SwitchA-pkey-key-code]94184CCDFCEAE96EC4D5EF93133E84B47093C52B20CD35D02
492B3959EC6499625BC4FA5082E22C5
[SwitchA-pkey-key-code]B374E16DD00132CE71B020217091AC717B612391C76C1FB2E
88317C1BD8171D41ECB83E210C03CC9
[SwitchA-pkey-key-code]B32E810561C21621C73D6DAAC028F4B1585DA7F42519718CC
9B09EEF0381840002818000AF995917
[SwitchA-pkey-key-code]E1E570A3F6B1C2411948B3B4FFA256699B3BF871221CC9C5D
F257523777D033BEE77FC378145F2AD
[SwitchA-pkey-key-code]D716D7DB9FCABB4ADBF6FB4FDB0CA25C761B308EF53009F71
01F7C62621216D5A572C379A32AC290
[SwitchA-pkey-key-code]E55B394A217DA38B65B77F0185C8DB8095522D1EF044B465E
8716261214A5A3B493E866991113B2D
[SwitchA-pkey-key-code]485348
[SwitchA-pkey-key-code] public-key-code end
[SwitchA-pkey-public-key] peer-public-key end
# Specify the host public key for the SSH server (10.165.87.136) as key1.
[SwitchA] ssh client authentication server 10.165.87.136 assign publickey key1
[SwitchA] quit
# Establish an SSH connection to server 10.165.87.136.
<SwitchA> ssh2 10.165.87.136
Username: client001
Trying 10.165.87.136
Press CTRL+K to abort
Connected to 10.165.87.136...
Enter password:
After you enter the correct password, you can log in to Switch B successfully.
When switch acts as client for publickey authentication
Network requirements
As shown in Figure 11, Switch A (the SSH client) must pass publickey authentication to log in to Switch B (the SSH server) through the SSH protocol. Use the DSA public key algorithm.
Figure 11 Switch acts as client for publickey authentication
Configuration procedure
|
|
NOTE: During SSH server configuration, the client public key is required. Use the client software to generate a DSA key pair on the client before configuring the SSH server. |
1. Configure the SSH client
# Create VLAN-interface 1 and assign an IP address to it.
<SwitchA> system-view
[SwitchA] interface vlan-interface 1
[SwitchA-Vlan-interface1] ip address 10.165.87.137 255.255.255.0
[SwitchA-Vlan-interface1] quit
# Generate a DSA key pair.
[SwitchA] public-key local create dsa
The range of public key size is (512 ~ 2048).
NOTES: If the key modulus is greater than 512,
It will take a few minutes.
Press CTRL+C to abort.
Input the bits of the modulus[default = 1024]:
Generating Keys...
++++++++++++++++++++++++++++++++++++++++++++++++++++++++++++++++++++++++++++++++
+++++++++++++++++++++++++++++++++++
# Export the DSA public key to file key.pub.
[SwitchA] public-key local export dsa ssh2 key.pub
[SwitchA] quit
Then, you need to transmit the public key file to the server through FTP or TFTP.
2. Configure the SSH server
# Generate the RSA key pairs.
<SwitchB> system-view
[SwitchB] public-key local create rsa
The range of public key size is (512 ~ 2048).
NOTES: If the key modulus is greater than 512,
It will take a few minutes.
Press CTRL+C to abort.
Input the bits of the modulus[default = 1024]:
Generating Keys...
++++++++
++++++++++++++
+++++
++++++++
# Generate a DSA key pair.
[SwitchB] public-key local create dsa
The range of public key size is (512 ~ 2048).
NOTES: If the key modulus is greater than 512,
It will take a few minutes.
Press CTRL+C to abort.
Input the bits of the modulus[default = 1024]:
Generating Keys...
++++++++++++++++++++++++++++++++++++++++++++++++++++++++++++++++++++++++++++++++
+++++++++++++++++++++++++++++++++++
# Enable the SSH server.
[SwitchB] ssh server enable
# Configure an IP address for VLAN-interface 1, which the SSH client will use as the destination for SSH connection.
[SwitchB] interface vlan-interface 1
[SwitchB-Vlan-interface1] ip address 10.165.87.136 255.255.255.0
[SwitchB-Vlan-interface1] quit
# Set the authentication mode for the user interfaces to AAA.
[SwitchB] user-interface vty 0 4
[SwitchB-ui-vty0-4] authentication-mode scheme
# Enable the user interfaces to support SSH.
[SwitchB-ui-vty0-4] protocol inbound ssh
# Set the user command privilege level to 3.
[SwitchB-ui-vty0-4] user privilege level 3
[SwitchB-ui-vty0-4] quit
# Import the peer public key from the file key.pub.
[SwitchB] public-key peer Switch001 import sshkey key.pub
# Specify the authentication method for user client002 as publickey, and assign the public key Switch001 to the user.
[SwitchB] ssh user client002 service-type stelnet authentication-type publickey assign publickey Switch001
3. Establish a connection between the SSH client and the SSH server
# Establish an SSH connection to the server (10.165.87.136).
<SwitchA> ssh2 10.165.87.136
Username: client002
Trying 10.165.87.136 ...
Press CTRL+K to abort
Connected to 10.165.87.136 ...
The Server is not authenticated. Continue? [Y/N]:y
Do you want to save the server public key? [Y/N]:n
Later, you will find that you have logged in to Switch B successfully.
This chapter includes these sections:
· Configuring the device as an SFTP server
· Configuring the device an SFTP client
· SFTP client configuration example
· SFTP server configuration example
|
|
NOTE: · The term "switch" or "device" in this chapter refers to the switching engine on a WX3000E wireless switch. · The WX3000E series comprises WX3024E and WX3010E wireless switches. · The port numbers in this chapter are for illustration only. |
SFTP overview
The Secure File Transfer Protocol (SFTP) is a new feature in SSH2.0.
SFTP uses the SSH connection to provide secure data transfer. The device can serve as the SFTP server, allowing a remote user to log in to the SFTP server for secure file management and transfer. The device can also serve as an SFTP client, enabling a user to log in from the device to a remote device for secure file transfer.
Configuring the device as an SFTP server
Configuration prerequisites
Before you configure this task, complete the following tasks:
· Configure the SSH server.
· Use the ssh user service-type command to set the service type of SSH users to sftp or all.
For more information about the configuration procedures, see the chapter “SSH configuration.”
Enabling the SFTP server
This configuration task will enable the SFTP service so that a client can log in to the SFTP server through SFTP.
Follow these steps to enable the SFTP server:
|
To do… |
Use the command… |
Remarks |
|
Enter system view |
system-view |
— |
|
Enable the SFTP server |
sftp server enable |
Required Disabled by default |
|
|
NOTE: When the device functions as the SFTP server, only one client can access the SFTP server at a time. If the SFTP client uses WinSCP, a file on the server cannot be modified directly; it can only be downloaded to a local place, modified, and then uploaded to the server. |
Configuring the SFTP connection idle timeout period
Once the idle period of an SFTP connection exceeds the specified threshold, the system automatically tears the connection down.
Follow these steps to configure the SFTP connection idle timeout period:
|
To do… |
Use the command… |
Remarks |
|
Enter system view |
system-view |
— |
|
Configure the SFTP connection idle timeout period |
sftp server idle-timeout time-out-value |
Optional 10 minutes by default |
Configuring the device an SFTP client
Specifying a source ip address or interface for the SFTP client
You can configure a client to use only a specified source IP address or interface to access the SFTP server, enhancing the service manageability.
Follow these steps to specify a source IP address or interface for the SFTP client:
|
To do… |
Use the command… |
Remarks |
|
|
Enter system view |
system-view |
— |
|
|
Specify a source IP address or interface for the SFTP client |
Specify a source IPv4 address or interface for the SFTP client |
sftp client source { ip ip-address | interface interface-type interface-number } |
Required Use either command. By default, an SFTP client uses the IP address of the interface specified by the route of the device to access the SFTP server. |
|
Specify a source IPv6 address or interface for the SFTP client |
sftp client ipv6 source { ipv6 ipv6-address | interface interface-type interface-number } |
||
Establishing a connection to the SFTP server
This configuration task will enable the SFTP client to establish a connection to the remote SFTP server and enter SFTP client view.
Follow these steps to enable the SFTP client:
|
To do… |
Use the command… |
Remarks |
|
|
Establish a connection to the remote SFTP server and enter SFTP client view |
Establish a connection to the remote IPv4 SFTP server and enter SFTP client view |
sftp server [ port-number ] [ identity-key { dsa | rsa } | prefer-ctos-cipher { 3des | aes128 | des } | prefer-ctos-hmac { md5 | md5-96 | sha1 | sha1-96 } | prefer-kex { dh-group-exchange | dh-group1 | dh-group14 } | prefer-stoc-cipher { 3des | aes128 | des } | prefer-stoc-hmac { md5 | md5-96 | sha1 | sha1-96 } ] * |
Required Use either command in user view. |
|
Establish a connection to the remote IPv6 SFTP server and enter SFTP client view |
sftp ipv6 server [ port-number ] [ identity-key { dsa | rsa } | prefer-ctos-cipher { 3des | aes128 | des } | prefer-ctos-hmac { md5 | md5-96 | sha1 | sha1-96 } | prefer-kex { dh-group-exchange | dh-group1 | dh-group14 } | prefer-stoc-cipher { 3des | aes128 | des } | prefer-stoc-hmac { md5 | md5-96 | sha1 | sha1-96 } ] * |
||
Working with SFTP directories
SFTP directory operations include:
· Changing or displaying the current working directory
· Displaying files under a specified directory or the directory information
· Changing the name of a specified directory on the server
· Creating or deleting a directory
Follow these steps to work with the SFTP directories:
|
To do… |
Use the command… |
Remarks |
|
Enter SFTP client view |
For more information, see “Establishing a connection to the SFTP server.“ |
Required Execute the command in user view. |
|
Change the working directory of the remote SFTP server |
cd [ remote-path ] |
Optional |
|
Return to the upper-level directory |
cdup |
Optional |
|
Display the current working directory of the remote SFTP server |
pwd |
Optional |
|
Display files under a specified directory |
dir [ -a | -l ] [ remote-path ] |
Optional The dir command functions as the ls command. |
|
ls [ -a | -l ] [ remote-path ] |
||
|
Change the name of a specified directory on the SFTP server |
rename oldname newname |
Optional |
|
Create a new directory on the remote SFTP server |
mkdir remote-path |
Optional |
|
Delete one or more directories from the SFTP server |
rmdir remote-path&<1-10> |
Optional |
Working with SFTP files
· Changing the name of a file
· Downloading a file
· Uploading a file
· Displaying a list of the files
· Deleting a file
Follow these steps to work with SFTP files:
|
To do… |
Use the command… |
Remarks |
|
Enter SFTP client view |
For more information, see “Establishing a connection to the SFTP server.“ |
Required Execute the command in user view. |
|
Change the name of a specified file on the SFTP server |
rename old-name new-name |
Optional |
|
Download a file from the remote server and save it locally |
get remote-file [ local-file ] |
Optional |
|
Upload a local file to the remote SFTP server |
put local-file [ remote-file ] |
Optional |
|
Display the files under a specified directory |
dir [ -a | -l ] [ remote-path ] |
Optional The dir command functions as the ls command. |
|
ls [ -a | -l ] [ remote-path ] |
||
|
Delete one or more directories from the SFTP server |
delete remote-file&<1-10> |
Optional The delete command functions as the remove command. |
|
remove remote-file&<1-10> |
Displaying help information
This configuration task will display a list of all commands or the help information of an SFTP client command, such as the command format and parameters.
Follow these steps to display a list of all commands or the help information of an SFTP client command:
|
To do… |
Use the command… |
Remarks |
|
Enter SFTP client view |
For more information, see “Establishing a connection to the SFTP server.“ |
Required Execute the command in user view. |
|
Display a list of all commands or the help information of an SFTP client command |
help [ all | command-name ] |
Required |
Terminating the connection to the remote SFTP server
Follow these steps to terminate the connection to the remote SFTP server:
|
To do… |
Use the command… |
Remarks |
|
Enter SFTP client view |
For more information, see “Establishing a connection to the SFTP server.“ |
Required Execute the command in user view. |
|
Terminate the connection to the remote SFTP server and return to user view |
bye |
Required. Use any of the commands. These three commands function in the same way. |
|
exit |
||
|
quit |
SFTP client configuration example
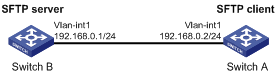
Network requirements
As shown in Figure 12, an SSH connection is required between Switch A and Switch B. Switch A, an SFTP client, needs to log in to Switch B for file management and file transfer. Use publickey authentication and the RSA public key algorithm.
Figure 12 Network diagram for SFTP client configuration
Configuration procedure
|
|
NOTE: During SFTP server configuration, the client public key is required. Use the client software to generate RSA key pairs on the client before configuring the SFTP server. |
1. Configure the SFTP client
# Create VLAN-interface 1 and assign an IP address to it.
<SwitchA> system-view
[SwitchA] interface vlan-interface 1
[SwitchA-Vlan-interface1] ip address 192.168.0.2 255.255.255.0
[SwitchA-Vlan-interface1] quit
# Generate the RSA key pairs.
[SwitchA] public-key local create rsa
The range of public key size is (512 ~ 2048).
NOTES: If the key modulus is greater than 512,
It will take a few minutes.
Press CTRL+C to abort.
Input the bits of the modulus[default = 1024]:
Generating Keys...
++++++++
++++++++++++++
+++++
++++++++
# Export the host public key to file pubkey.
[SwitchA] public-key local export rsa ssh2 pubkey
[SwitchA] quit
Then, you need to transmit the public key file to the server through FTP or TFTP.
2. Configure the SFTP server
# Generate the RSA key pairs.
<SwitchB> system-view
[SwitchB] public-key local create rsa
The range of public key size is (512 ~ 2048).
NOTES: If the key modulus is greater than 512,
It will take a few minutes.
Press CTRL+C to abort.
Input the bits of the modulus[default = 1024]:
Generating Keys...
++++++++
++++++++++++++
+++++
++++++++
# Generate a DSA key pair.
[SwitchB] public-key local create dsa
The range of public key size is (512 ~ 2048).
NOTES: If the key modulus is greater than 512,
It will take a few minutes.
Press CTRL+C to abort.
Input the bits of the modulus[default = 1024]:
Generating Keys...
++++++++++++++++++++++++++++++++++++++++++++++++++++++++++++++++++++++++++++++++
+++++++++++++++++++++++++++++++++++
# Enable the SSH server.
[SwitchB] ssh server enable
# Enable the SFTP server.
[SwitchB] sftp server enable
# Configure an IP address for VLAN-interface 1, which the SSH client uses as the destination for SSH connection.
[SwitchB] interface vlan-interface 1
[SwitchB-Vlan-interface1] ip address 192.168.0.1 255.255.255.0
[SwitchB-Vlan-interface1] quit
# Set the authentication mode on the user interfaces to AAA.
[SwitchB] user-interface vty 0 4
[SwitchB-ui-vty0-4] authentication-mode scheme
# Set the protocol that a remote user uses to log in as SSH.
[SwitchB-ui-vty0-4] protocol inbound ssh
[SwitchB-ui-vty0-4] quit
# Import the peer public key from the file pubkey.
[SwitchB] public-key peer Switch001 import sshkey pubkey
# For user client001, set the service type as SFTP, authentication method as publickey, public key as Switch001, and working folder as flash:/
[SwitchB] ssh user client001 service-type sftp authentication-type publickey assign publickey Switch001 work-directory flash:/
3. Establish a connection between the SFTP client and the SFTP server
# Establish a connection to the remote SFTP server and enter SFTP client view.
<SwitchA> sftp 192.168.0.1 identity-key rsa
Input Username: client001
Trying 192.168.0.1 ...
Press CTRL+K to abort
Connected to 192.168.0.1 ...
The Server is not authenticated. Continue? [Y/N]:y
Do you want to save the server public key? [Y/N]:n
sftp-client>
# Display files under the current directory of the server, delete the file named z, and check if the file has been deleted successfully.
sftp-client> dir
-rwxrwxrwx 1 noone nogroup 1759 Aug 23 06:52 config.cfg
-rwxrwxrwx 1 noone nogroup 225 Aug 24 08:01 pubkey2
-rwxrwxrwx 1 noone nogroup 283 Aug 24 07:39 pubkey
drwxrwxrwx 1 noone nogroup 0 Sep 01 06:22 new
-rwxrwxrwx 1 noone nogroup 225 Sep 01 06:55 pub
-rwxrwxrwx 1 noone nogroup 0 Sep 01 08:00 z
sftp-client> delete z
The following File will be deleted:
/z
Are you sure to delete it? [Y/N]:y
This operation might take a long time.Please wait...
File successfully Removed
sftp-client> dir
-rwxrwxrwx 1 noone nogroup 1759 Aug 23 06:52 config.cfg
-rwxrwxrwx 1 noone nogroup 225 Aug 24 08:01 pubkey2
-rwxrwxrwx 1 noone nogroup 283 Aug 24 07:39 pubkey
drwxrwxrwx 1 noone nogroup 0 Sep 01 06:22 new
-rwxrwxrwx 1 noone nogroup 225 Sep 01 06:55 pub
# Add a directory named new1 and check if it has been created successfully.
sftp-client> mkdir new1
New directory created
sftp-client> dir
-rwxrwxrwx 1 noone nogroup 1759 Aug 23 06:52 config.cfg
-rwxrwxrwx 1 noone nogroup 225 Aug 24 08:01 pubkey2
-rwxrwxrwx 1 noone nogroup 283 Aug 24 07:39 pubkey
drwxrwxrwx 1 noone nogroup 0 Sep 01 06:22 new
-rwxrwxrwx 1 noone nogroup 225 Sep 01 06:55 pub
drwxrwxrwx 1 noone nogroup 0 Sep 02 06:30 new1
# Rename directory new1 to new2 and check if the directory has been renamed successfully.
sftp-client> rename new1 new2
File successfully renamed
sftp-client> dir
-rwxrwxrwx 1 noone nogroup 1759 Aug 23 06:52 config.cfg
-rwxrwxrwx 1 noone nogroup 225 Aug 24 08:01 pubkey2
-rwxrwxrwx 1 noone nogroup 283 Aug 24 07:39 pubkey
drwxrwxrwx 1 noone nogroup 0 Sep 01 06:22 new
-rwxrwxrwx 1 noone nogroup 225 Sep 01 06:55 pub
drwxrwxrwx 1 noone nogroup 0 Sep 02 06:33 new2
# Download the pubkey2 file from the server and save it as local file public.
sftp-client> get pubkey2 public
Remote file:/pubkey2 ---> Local file: public
Downloading file successfully ended
# Upload the local file pu to the server, save it as puk, and check if the file has been uploaded successfully.
sftp-client> put pu puk
Local file:pu ---> Remote file: /puk
Uploading file successfully ended
sftp-client> dir
-rwxrwxrwx 1 noone nogroup 1759 Aug 23 06:52 config.cfg
-rwxrwxrwx 1 noone nogroup 225 Aug 24 08:01 pubkey2
-rwxrwxrwx 1 noone nogroup 283 Aug 24 07:39 pubkey
drwxrwxrwx 1 noone nogroup 0 Sep 01 06:22 new
drwxrwxrwx 1 noone nogroup 0 Sep 02 06:33 new2
-rwxrwxrwx 1 noone nogroup 283 Sep 02 06:35 pub
-rwxrwxrwx 1 noone nogroup 283 Sep 02 06:36 puk
sftp-client>
# Terminate the connection to the remote SFTP server.
sftp-client> quit
Bye
Connection closed.
<SwitchA>
SFTP server configuration example
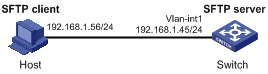
Network requirements
As shown in Figure 13, an SSH connection is required between the host and the switch. The host, an SFTP client, needs to log in to the switch for file management and file transfer. Use password authentication and configure the username client002 and the password aabbcc for the client on the switch.
Figure 13 Network diagram for SFTP server configuration
Configuration procedure
1. Configure the SFTP server
# Generate the RSA key pairs.
<Switch> system-view
[Switch] public-key local create rsa
The range of public key size is (512 ~ 2048).
NOTES: If the key modulus is greater than 512,
It will take a few minutes.
Press CTRL+C to abort.
Input the bits of the modulus[default = 1024]:
Generating Keys...
++++++++
++++++++++++++
+++++
++++++++
# Generate a DSA key pair.
[Switch] public-key local create dsa
The range of public key size is (512 ~ 2048).
NOTES: If the key modulus is greater than 512,
It will take a few minutes.
Press CTRL+C to abort.
Input the bits of the modulus[default = 1024]:
Generating Keys...
++++++++++++++++++++++++++++++++++++++++++++++++++++++++++++++++++++++++++++++++
+++++++++++++++++++++++++++++++++++
# Enable the SSH server.
[Switch] ssh server enable
# Enable the SFTP server.
[Switch] sftp server enable
# Configure an IP address for VLAN-interface 1, which the client will use as the destination for SSH connection.
[Switch] interface vlan-interface 1
[Switch-Vlan-interface1] ip address 192.168.1.45 255.255.255.0
[Switch-Vlan-interface1] quit
# Set the authentication mode of the user interfaces to AAA.
[Switch] user-interface vty 0 4
[Switch-ui-vty0-4] authentication-mode scheme
# Enable the user interfaces to support SSH.
[Switch-ui-vty0-4] protocol inbound ssh
[Switch-ui-vty0-4] quit
# Configure a local user named client002 with the password being aabbcc and the service type being SSH.
[Switch] local-user client002
[Switch-luser-client002] password simple aabbcc
[Switch-luser-client002] service-type ssh
[Switch-luser-client002] quit
# Configure the user authentication method as password and service type as SFTP.
[Switch] ssh user client002 service-type sftp authentication-type password
2. Establish a connection between the SFTP client and the SFTP server
|
|
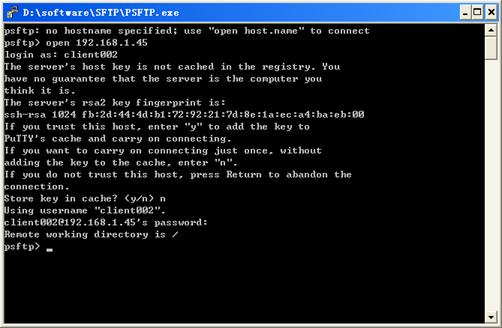
NOTE: · The device supports a variety of SFTP client software. The following takes the PSFTP of PuTTy Version 0.58 as an example. · The PSFTP supports only password authentication. |
# Establish a connection to the remote SFTP server.
Run the psftp.exe to launch the client interface as shown in Figure 14, and enter the following command:
open 192.168.1.45
Enter username client002 and password aabbcc as prompted to log in to the SFTP server.
Figure 14 SFTP client interface