- Table of Contents
-
- 04-Layer 3 Configuration Guide
- 00-Preface
- 01-ARP Configuration
- 02-IP Addressing Configuration
- 03-DHCP Configuration
- 04-DHCPv6 Configuration
- 05-DNS Configuration
- 06-IPv6 DNS Configuration
- 07-NAT Configuration
- 08-Adjacency Table Configuration
- 09-Flow Classification Configuration
- 10-IPv6 Basics Configuration
- 11-IP Performance Optimization Configuration
- 12-IP Routing Basics
- 13-Static Routing Configuration
- 14-IPv6 Static Routing Configuration
- 15-GRE Configuration
- 16-RIP Configuration
- 17-RIPng Configuration
- 18-Policy-Based Routing Configuration
- Related Documents
-
| Title | Size | Download |
|---|---|---|
| 13-Static Routing Configuration | 59.49 KB |
Configuring static routing
Static routes are manually configured. If a network's topology is simple, you only need to configure static routes for the network to work correctly.
Static routes cannot adapt to network topology changes. If a fault or a topological change occurs in the network, the network administrator must modify the static routes manually.
Configuring a static route
Before you configure a static route, complete the following tasks:
· Configure physical parameters for related interfaces.
· Configure link-layer attributes for related interfaces.
· Configure IP addresses for related interfaces.
Follow these guidelines when you configure a static route:
· The next hop address of a static route cannot be the IP address of a local interface. Otherwise, the static route does not take effect.
· You can associate a track entry with a static route to monitor the reachability of the next hops. For more information about track, see High Availability Configuration Guide.
To configure a static route:
|
Step |
Command |
Remarks |
|
1. Enter system view. |
system-view |
N/A |
|
2. Configure a static route. |
ip route-static dest-address { mask | mask-length } { next-hop-address [ track track-entry-number ] | interface-type interface-number [ next-hop-address ] [ preference preference-value ] [ permanent ] [ description description-text ] |
By default, no static route is configured. |
|
3. Configure the default preference for static routes. |
ip route-static default-preference default-preference-value |
Optional. 60 by default. |
|
4. Delete all static routes, including the default route. |
delete static-routes all |
Optional. To delete one static route, use the undo ip route-static command. |
Displaying and maintaining static routes
|
Task |
Command |
Remarks |
|
Display static route information. |
display ip routing-table protocol static [ inactive | verbose ] [ | { begin | exclude | include } regular-expression ] |
Available in any view. |
Static route configuration example
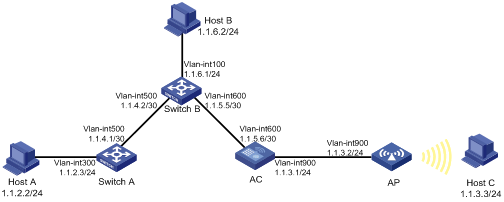
Network requirements
The IP addresses and masks of the AC, AP, switches and hosts are shown in Figure 1. Configure static routes on the routers so that the hosts, switches, and AC can communicate with each other.
Configuration procedure
1. Configure IP addresses for interfaces. (Details not shown.)
2. Configure AC basic functions. (For more information, see WLAN Configuration Guide.)
3. Configure static routes:
# Configure a default route on Switch A.
<SwitchA> system-view
[SwitchA] ip route-static 0.0.0.0 0.0.0.0 1.1.4.2
# Configure two static routes on Switch B.
<SwitchB> system-view
[SwitchB] ip route-static 1.1.2.0 255.255.255.0 1.1.4.1
[SwitchB] ip route-static 1.1.3.0 255.255.255.0 1.1.5.6
# Configure a default route on AC.
<AC> system-view
[AC] ip route-static 0.0.0.0 0.0.0.0 1.1.5.5
4. Configure the default gateways of Host A, Host B, and Host C as 1.1.2.3, 1.1.6.1, and 1.1.3.1. (Details not shown.)
5. Verify the configuration:
# Display the IP routing table on Switch A.
[SwitchA] display ip routing-table
Routing Tables: Public
Destinations : 7 Routes : 7
Destination/Mask Proto Pre Cost NextHop Interface
0.0.0.0/0 Static 60 0 1.1.4.2 Vlan500
1.1.2.0/24 Direct 0 0 1.1.2.3 Vlan300
1.1.2.3/32 Direct 0 0 127.0.0.1 InLoop0
1.1.4.0/30 Direct 0 0 1.1.4.1 Vlan500
1.1.4.1/32 Direct 0 0 127.0.0.1 InLoop0
127.0.0.0/8 Direct 0 0 127.0.0.1 InLoop0
127.0.0.1/32 Direct 0 0 127.0.0.1 InLoop0
# Display the IP routing table on Switch B.
[SwitchB] display ip routing-table
Routing Tables: Public
Destinations : 10 Routes : 10
Destination/Mask Proto Pre Cost NextHop Interface
1.1.2.0/24 Static 60 0 1.1.4.1 Vlan500
1.1.3.0/24 Static 60 0 1.1.5.6 Vlan600
1.1.4.0/30 Direct 0 0 1.1.4.2 Vlan500
1.1.4.2/32 Direct 0 0 127.0.0.1 InLoop0
1.1.5.4/30 Direct 0 0 1.1.5.5 Vlan600
1.1.5.5/32 Direct 0 0 127.0.0.1 InLoop0
127.0.0.0/8 Direct 0 0 127.0.0.1 InLoop0
127.0.0.1/32 Direct 0 0 127.0.0.1 InLoop0
1.1.6.0/24 Direct 0 0 192.168.1.47 Vlan100
1.1.6.1/32 Direct 0 0 127.0.0.1 InLoop0
# Use the ping command on Host B to test reachability of Host A (assuming Windows XP runs on the two hosts).
C:\Documents and Settings\Administrator>ping 1.1.2.2
Pinging 1.1.2.2 with 32 bytes of data:
Reply from 1.1.2.2: bytes=32 time=1ms TTL=255
Reply from 1.1.2.2: bytes=32 time=1ms TTL=255
Reply from 1.1.2.2: bytes=32 time=1ms TTL=255
Reply from 1.1.2.2: bytes=32 time=1ms TTL=255
Ping statistics for 1.1.2.2:
Packets: Sent = 4, Received = 4, Lost = 0 (0% loss),
Approximate round trip times in milli-seconds:
Minimum = 1ms, Maximum = 1ms, Average = 1ms
# Use the tracert command on Host B to test reachability of Host A.
[HostB] tracert 1.1.2.2
Tracing route to 1.1.2.2 over a maximum of 30 hops
1 <1 ms <1 ms <1 ms 1.1.6.1
2 <1 ms <1 ms <1 ms 1.1.4.1
3 1 ms <1 ms <1 ms 1.1.2.2
Trace complete.
