- Table of Contents
-
- H3C S9500 Operation Manual-Release1648[v1.24]-07 Security Volume
- 00-1Cover
- 01-Protocol Port Security Configuration
- 02-802.1x Configuration
- 03-AAA RADIUS HWTACACS Configuration
- 04-Password Control Configuration
- 05-SSH Configuration
- 06-IDS Linkage Configuration
- 07-Portal Configuration
- 08-VBAS Configuration
- 09-Traffic Accounting Configuration
- Related Documents
-
| Title | Size | Download |
|---|---|---|
| 02-802.1x Configuration | 127.52 KB |
Table of Contents
Chapter 1 802.1x Configuration
1.1.1 802.1x Standard Overview
1.1.2 802.1x System Architecture
1.1.3 802.1x Authentication Process
1.1.4 Implementing 802.1x on Ethernet Switches
1.2.1 Enabling/Disabling 802.1x
1.2.2 Setting the Port Authorization Mode
1.2.3 Setting Port Access Control Method
1.2.4 Checking the Users that Log on the Switch Through Proxy
1.2.5 Setting Supplicant Number on a Port
1.2.6 Setting the Authentication in DHCP Environment
1.2.7 Configuring Authentication Method for 802.1x User
1.2.9 Setting the Maximum Retransmission Times of Authentication Request Messages
1.2.10 Configuring 802.1x Timers
1.2.11 Enabling/Disabling Quiet-Period Timer
1.2.12 Enabling/Disabling Handshake-Period Timer
1.3 Displaying and Maintaining 802.1x
1.4 802.1x Configuration Example
Chapter 1 802.1x Configuration
When configuring 802.1x, go to these sections for information you are interested in:
l Displaying and Maintaining 802.1x
l 802.1x Configuration Example
1.1 802.1x Overview
This section covers these topics:
l 802.1x Authentication Process
l Implementing 802.1x on Ethernet Switches
1.1.1 802.1x Standard Overview
IEEE 802.1x (hereinafter simplified as 802.1x) is a port-based network access control protocol that is used as the standard for LAN user access authentication.
In the LANs complying with the IEEE 802 standards, the user can access the devices and share the resources in the LAN through connecting the LAN access control device like the LAN Switch. However, in telecom access, commercial LAN (a typical example is the LAN in the office building) and mobile office, the LAN providers generally hope to control the user’s access. In these cases, the requirement on the above-mentioned “Port Based Network Access Control” originates.
As the name implies, “Port Based Network Access Control” means to authenticate and control all the accessed devices on the port of LAN access control device. If the user’s device connected to the port can pass the authentication, the user can access the resources in the LAN. Otherwise, the user cannot access the resources in the LAN. It equals that the user is physically disconnected.
802.1x defines port based network access control protocol and only defines the point-to-point connection between the access device and the access port. The port can be either physical or logical. The typical application environment is as follows: Each physical port of the LAN Switch only connects to one user workstation (based on the physical port) and the wireless LAN access environment defined by the IEEE 802.11 standard (based on the logical port), etc.
1.1.2 802.1x System Architecture
The system using the 802.1x is the typical C/S (Client/Server) system architecture. It contains three entities, supplicant system, authenticator system and authentication sever system, as illustrated in Figure 1-1.
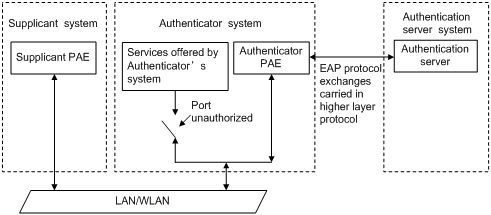
Figure 1-1 802.1x system architecture
The LAN access control device needs to provide the Authenticator System of 802.1x. The devices at the user side such as the computers need to be installed with the 802.1x client software, for example, the iNode client provided by H3C, or in Microsoft Windows XP. The 802.1x Authentication Sever system normally stays in the carrier’s AAA center.
Authenticator and Authentication Sever exchange information through extensible authentication protocol (EAP) frames. The Supplicant and the Authenticator exchange information through the extensible authentication protocol over LANs (EAPOL) frame defined by IEEE 802.1x. Authentication data are encapsulated in the EAP frame, which is to be encapsulated in the packets of other AAA upper layer protocols (e.g. RADIUS) so as to go through the complicated network to reach the Authentication Server. Such procedure is called EAP Relay.
There are two types of ports for the Authenticator. One is the Uncontrolled Port, and the other is the Controlled Port. The Uncontrolled Port is always in bi-directional connection state. The user can access and share the network resources any time through the ports. The Controlled Port will be in connecting state only after the user passes the authentication. Then the user is allowed to access the network resources.
1.1.3 802.1x Authentication Process
802.1x configures EAP frame to carry the authentication information. The Standard defines the following types of EAP frames:
l EAP-Packet: Authentication information frame, used to carry the authentication information.
l EAPOL-Start: Authentication originating frame, actively originated by the Supplicant.
l EAPOL-Logoff: Logoff request frame, actively terminating the authenticated state.
l EAPOL-Key: Key information frame, supporting to encrypt the EAP packets.
l EAPOL-Encapsulated-ASF-Alert: Supports the Alerting message of Alert Standard Forum (ASF).
The EAPOL-Start, EAPOL-Logoff and EAPOL-Key only exist between the Supplicant and the Authenticator. The EAP-Packet information is re-encapsulated by the Authenticator System and then transmitted to the Authentication Server System. The EAPOL-Encapsulated-ASF-Alert is related to the network management information and terminated by the Authenticator.
802.1x provides an implementation solution of user ID authentication. However, 802.1x itself is not enough to implement the scheme. The administrator of the access device should configure the AAA scheme by selecting RADIUS or local authentication so as to assist 802.1x to implement the user ID authentication. For detailed description of AAA, refer to AAA RADIUS HWTACACS Configuration part of this manual.
1.1.4 Implementing 802.1x on Ethernet Switches
H3C Series Ethernet Switches not only support the port access authentication method regulated by 802.1x, but also extend and optimize it in the following way:
l Support to connect several End Stations in the downstream via a physical port.
l The access control method (that is, the way in which 802.1x authenticates users on a port) can be port-based or MAC-based.
In this way, the system becomes much securer and easier to manage.
1.2 802.1x Configuration
The configuration tasks of 802.1x itself can be fulfilled in system view of the Ethernet switch. After the global 802.1x is enabled, the user can configure the 802.1x state of the port. The configured items will take effect after the global 802.1x is enabled.
& Note:
When 802.1x is enabled on a port, the max number of MAC address learning which is configured by the command mac-address max-mac-count cannot be configured on the port, and vice versa.
The following sections describe 802.1x configuration tasks.
l Setting the Port Authorization Mode
l Setting Port Access Control Method
l Checking the Users that Log on the Switch Through Proxy
l Setting Supplicant Number on a Port
l Setting the Authentication in DHCP Environment
l Configuring Authentication Method for 802.1x User
l Setting the Maximum Retransmission Times of Authentication Request Messages
l Enabling/Disabling Quiet-Period Timer
l Enabling/Disabling Handshake-Period Timer
1.2.1 Enabling/Disabling 802.1x
The following command can be used to enable/disable the 802.1x on the specified port or globally. When it is used in system view, if the parameter interface-list is not specified, 802.1x will be globally enabled. If the parameter interface-list is specified, 802.1x will be enabled on the specified port. When this command is used in Ethernet port view, other ports cannot be specified and 802.1x can only be enabled on the current port.
Perform the following operations in system view or Ethernet port view to enable/disable 802.1x:
|
To do... |
Use the command... |
|
Enable the 802.1x |
dot1x [ interface interface-list ] |
|
Disable the 802.1x |
undo dot1x [ interface interface-list ] |
By default, 802.1x authentication has not been enabled globally and on any port.
You cannot enable 802.1x on a port before you enable it globally. And you must disable 802.1x on each port before you disable 802,1x globally.
1.2.2 Setting the Port Authorization Mode
The following commands can be used for setting 802.1x port authorization mode on the specified ports. When no port is specified, the authorization mode of all ports is configured.
Perform the following operations in system view or Ethernet port view to set/restore the port authorization mode:
|
To do... |
Use the command... |
|
Set the port authorization mode |
dot1x port-control { authorized-force | unauthorized-force | auto } [ interface interface-list ] |
|
Restore the default authorization mode of the port |
undo dot1x port-control [ interface interface-list ] |
auto (automatic identification mode, which is also called protocol control mode). That is, the initial state of the port is unauthorized. It only permits EAPOL packets receiving/transmitting and does not permit the user to access the network resources. If the authentication flow is passed, the port will be switched to the authorized state and permit the user to access the network resources.
The authorized-force keyword specifies the port to operate in authorized-force mode. Ports in this mode are always authorized. Users can access a network through this kind of port without being authorized.
The unauthorized-force keyword specifies the port to operate in unauthorized-force mode. Ports in this mode are always unauthorized. They do not respond to authorization requests. Users cannot access a network through this kind of port.
By default, the authorization mode of 802.1x performing access control on the port is auto (automatic identification mode).
1.2.3 Setting Port Access Control Method
The following commands are used for setting 802.1x access control method on the specified ports. When no port is specified in system view, the access control method of all ports is configured.
Perform the following operations in system view or Ethernet port view to set/restore port access control method:
|
To do... |
Use the command... |
|
Set port access control method |
dot1x port-method { macbased | portbased } [ interface interface-list ] |
|
Restore the default port access control method |
undo dot1x port-method [ interface interface-list ] |
The macbased keyword specifies the port-based control method. If a port works in this method, each user connected to the port has to be authenticated in order to access the network. And disconnection of a user does not affect other users. The portbased keyword specifies the MAC-based control method. If a port works in this method, after a user passes the authentication on the port, all subsequent users on the port can access the network without being authenticated. However, these users will be denied access if the user who passes the authentication goes offline.
& Note:
l When using the 802.1x dynamic ACL advertisement function, you need to ensure that the dynamically advertised ACLs match the traffic templates (including the default and self-defined traffic template) validated on the port.
l If the 802.1x-enabled port is MAC authentication based and uses the dynamic ACLs, you must also ensure that the traffic template validated on the port contains the source MAC (SMAC). Otherwise, the authentication fails.
By default, 802.1x access control method on a port is macbased. That is, authentication is performed per MAC address.
& Note:
Without NAM boards, the system cannot perform traffic statistics for macbased users. Because the system performs traffic statistics only for ports instead of multiple users connecting with the same port, the system can perform traffic statistics only for portbased users.
1.2.4 Checking the Users that Log on the Switch Through Proxy
The following commands are used for checking the users that log on the switch via proxy.
Perform the following operations in system view or Ethernet port view to enable/disable the check for the users who log on the switch through proxy
|
To do... |
Use the command... |
|
Enable the check for access users through proxy |
dot1x supp-proxy-check { logoff | trap } [ interface interface-list ] |
|
Cancel the check for access users through proxy |
undo dot1x supp-proxy-check { logoff | trap } [ interface interface-list ] |
These commands take effect on the ports specified by the interface-list parameter when executed in system view. The parameter interface-list cannot be input when the command is executed in Ethernet Port view and it has effect only on the current interface. After globally enabling proxy user detection and control in system view, only if you enable this feature on a specific port can this configuration take effects on the port.
1.2.5 Setting Supplicant Number on a Port
The following commands are used for setting number of users allowed by 802.1x on specified port. When no port is specified, all the ports accept the same number of supplicants.
Perform the following operations in system view or Ethernet port view to configure the maximum number of users allowed on specified port:
|
To do... |
Use the command... |
|
Set the maximum number of users allowed on specified port |
dot1x max-user user-number [ interface interface-list ] |
|
Restore the maximum number of users on the port to the default value |
undo dot1x max-user [ interface interface-list ] |
By default, 802.1x allows up to 1024 supplicants on each port for H3C S9500 Series Routing Switches (hereinafter referred to as S9500 series), and an S9500 series routing switch can accommodate total of 2048 supplicants.
1.2.6 Setting the Authentication in DHCP Environment
If in DHCP environment the users configure static IP addresses, you can set 802.1x to disable the switch to trigger the user ID authentication over them with the following command.
Perform the following operations in system view to configure the authentication in DHCP environment:
|
To do... |
Use the command... |
|
Disable the switch to trigger the user ID authentication over the users who configure static IP addresses in DHCP environment |
dot1x dhcp-launch |
|
Enable the switch to trigger the authentication over them |
undo dot1x dhcp-launch |
By default, the switch can trigger the user ID authentication over the users who configure static IP addresses in DHCP environment.
1.2.7 Configuring Authentication Method for 802.1x User
The following commands can be used to configure the authentication method for 802.1x user. Three kinds of methods are available: PAP authentication (RADIUS server must support PAP authentication), CHAP authentication (RADIUS server must support CHAP authentication), EAP relay authentication (switch send authentication information to RADIUS server in the form of EAP packets directly and RADIUS server must support EAP authentication).
Perform the following operations in system view to configure authentication method for 802.1x user:
|
To do... |
Use the command... |
|
Configure authentication method for 802.1x user |
dot1x authentication-method { chap | pap | eap { md5-challenge | peap | tls } } |
|
Restore the default authentication method for 802.1x user |
undo dot1x authentication-method |
By default, CHAP authentication is used for 802.1x user authentication.
& Note:
l When you are configuring authentication methods for 802.1x users, the authentication method on the switch must be consistent with that on the authentication server.
l Currently, the S9500 series switches do not support 802.1X re-authentication. That is, the device does not deal with online user’s authentication requests.
1.2.8 Configuring Guest VLAN
If Guest VLAN is enabled, a switch broadcasts active authentication packets to all 802.1x-enabled ports. The ports not sending response packets are added to Guest VLAN when the maximum number of re-authentications is reached. Users in a Guest VLAN can utilize resources in the Guest VLAN without undergoing the 802.1x authentication, but they can utilize the resources outside the Guest VLAN only when they have passed the 802.1x authentication. In this way, unauthenticated users can still perform operations such as accessing some resources with the 802.1x client not installed, and upgrading 802.1x client.
Perform the following operations in system view or Ethernet interface view to configure guest VLAN:
|
To do... |
Use the command... |
|
Enable Guest VLAN |
dot1x guest-vlan vlan-id [ interface interface-list ] |
|
Disable Guest VLAN |
undo dot1x guest-vlan vlan-id [ interface interface-list ] |
Note that:
l Guest VLAN is supported only when the switch performs port-based authentication.
l A switch can have only one Guest VLAN.
l Users who are not authenticated, fail to be authenticated, or are offline are all members of the Guest VLAN.
l Guest VLANs can only be configured on Access ports.
l You must use an existing VLAN ID, and the corresponding VLAN cannot be a Super VLAN isolate-user-vlan.
l You must perform corresponding configuration manually to isolate the Guest VLAN from other VLAN interfaces.
1.2.9 Setting the Maximum Retransmission Times of Authentication Request Messages
The following commands are used for setting the maximum retransmission times of the authentication request message that the switch sends to the supplicant.
Perform the following operations in system view to configure the maximum times of the authentication request message retransmission:
|
To do... |
Use the command... |
|
Set the maximum times of the authentication request message retransmission |
dot1x retry max-retry-value |
|
Restore the default maximum retransmission times |
undo dot1x retry |
By default, the max-retry-value is 2. That is, the switch can retransmit the authentication request message to a supplicant for 2 times at most.
1.2.10 Configuring 802.1x Timers
The following commands are used for configuring the 802.1x timers.
Perform the following operations in system view to configure 802.1x timers:
|
To do... |
Use the command... |
|
Configure timers |
dot1x timer { handshake-period handshake-period-value | quiet-period quiet-period-value | tx-period tx-period-value | supp-timeout supp-timeout-value | server-timeout server-timeout-value } |
|
Restore default settings of the timers |
undo dot1x timer { handshake-period | quiet-period | tx-period | supp-timeout | server-timeout } |
handshake-period: This timer begins after the user has passed the authentication. After setting handshake-period, system will send the handshake packet by the period. Suppose the dot1x retry time is configured as N, the system will consider the user having logged off and set the user as logoff state if system doesn’t receive the response from user for consecutive N times.
handshake-period-value: Handshake period. The value ranges from 1 to 1024 in units of second and defaults to 30.
quiet-period: Specifies the quiet timer. If an 802.1x user has not passed the authentication, the Authenticator will keep quiet for a while (which is specified by quiet-period timer) before launching the authentication again. During the quiet period, the Authenticator does not do anything related to 802.1x authentication.
quiet-period-value: Specifies how long the quiet period is. The value ranges from 10 to 120 in units of second and defaults to 60.
server-timeout: Specifies the timeout timer of an Authentication Server. If an Authentication Server has not responded before the specified period expires, the Authenticator will resend the authentication request.
server-timeout-value: Specifies how long the duration of a timeout timer of an Authentication Server is. The value ranges from 100 to 300 in units of second and defaults to 100 seconds.
supp-timeout: Specifies the authentication timeout timer of a Supplicant. After the Authenticator sends Request/Challenge request packet which requests the MD5 encrypted text, the supp-timeout timer of the Authenticator begins to run. If the Supplicant does not respond back successfully within the time range set by this timer, the Authenticator will resend the above packet.
supp-timeout-value: Specifies how long the duration of an authentication timeout timer of a Supplicant is. The value ranges from 10 to 120 in units of second and defaults to 30.
tx-period: Has two major effects, which are described in detail in the following section.
l Specifies the transmission timeout timer. After the Authenticator sends the Request/Identity request packet which requests the user name or user name and password together, the tx-period timer of the Authenticator begins to run. If the Supplicant does not respond back with authentication reply packet successfully, then the Authenticator will resend the authentication request packet.
l Specifies the interval of multicasting 802.1x request packets periodically. In order to be compatible with clients who do not send EAPOL-Start frames actively, S9500 switches will multicast 802.1x request packets periodically. The clients will respond after receiving these packets. tx-period specifies the period of multicasting 802.1x request packets.
tx-period-value: Specifies how long the duration of the transmission timeout timer is. The value ranges from 10 to 120 in units of second and defaults to 30.
& Note:
It is recommended to configure different handshake period value and handshake timeout times according to the number of users:
l When the number of users is 2048, the handshake period value should be no smaller than 2 minutes, and the handshake timeout times should be no less than 3 times;
l When the number of users is 1024, the handshake period value should be no smaller than 1 minutes, and the handshake timeout times should be no less than 3 times
l When the number of users is 512, the handshake period value should be no smaller than 30 seconds, and the handshake timeout times should be no less than 2 times.
1.2.11 Enabling/Disabling Quiet-Period Timer
You can use the following commands to enable/disable a Quiet-Period timer of an Authenticator (such as a H3C Series Switch). If an 802.1x user has not passed the authentication, the Authenticator will keep quiet for a while (which is specified by dot1x timer quiet-period command) before launching the authentication again. During the Quiet Period, the Authenticator does not do anything related to 802.1x authentication.
Perform the following operations in system view to enable/disable a quiet-period timer:
|
To do... |
Use the command... |
|
Enable a quiet-period timer |
dot1x quiet-period |
|
Disable a quiet-period timer |
undo dot1x quiet-period |
By default, Quiet-Period timer is disabled.
1.2.12 Enabling/Disabling Handshake-Period Timer
You can use the following commands to enable/disable a handshake-period timer of an Authenticator (such as a H3C series switch). With the handshake-period timer enabled, after an 802.1x user passes the authentication, the Authenticator will send to the user handshake requests at the interval specified by the timer to check whether the user is online. If the Authenticator receives no response after sending the allowed maximum number of handshake requests, it considers that the user is offline.
Perform the following operations in system view to enable/disable the handshake-period timer:
|
To do... |
Use the command... |
|
Enable the handshake-period timer |
dot1x handshake enable |
|
Disable the handshake-period timer |
undo dot1x handshake enable |
By default, the handshake-period timer is enabled.
& Note:
The undo dot1x handshake enable command takes effect immediately for all users, while the dot1x handshake enable command takes effect only for users who pass authentication after you configure the command. You are recommended to configure the commands before user authentication.
1.3 Displaying and Maintaining 802.1x
|
To do... |
Use the command... |
Remarks |
|
Display the configuration, running and statistics information of 802.1x |
display dot1x [ sessions | statistics | enabled-interface | guest vlan ] [ interface interface-list | sessions | statistics] |
Available in any view |
|
Reset the 802.1x statistics information |
reset dot1x statistics [ interface interface-list ] |
Available in user view |
|
Enable the error/event/packet/all debugging of 802.1x |
debugging dot1x { error | event | packet | all } |
Available in user view |
|
Disable the error/event/packet/all debugging of 802.1x. |
undo debugging dot1x { error | event | packet | all } |
Available in user view |
1.4 802.1x Configuration Example
I. Network requirements
As shown in Figure 1-2, the workstation of a user is connected to the port Ethernet 2/1/1 of the Switch.
The switch administrator will enable 802.1x on all the ports to authenticate the supplicants so as to control their access to the Internet. The access control method on ports is MAC address based access control.
All the supplicants belong to the default domain H3C163.net, which can contain up to 30 users. RADIUS authentication is performed first. If there is no response from the RADIUS server, local authentication will be performed. For accounting, if the RADIUS server fails to account, the user will be disconnected. In addition, when the user is accessed, the domain name does not follow the user name. Normally, if the user’s traffic is less than 2000 Byte/s consistently over 20 minutes, he will be disconnected.
A server group, consisting of two RADIUS servers at 10.11.1.1 and 10.11.1.2 respectively, is connected to the switch. The former one acts as the primary-authentication/secondary-accounting server. The latter one acts as the secondary-authentication/primary-accounting server. Set the encryption key as name when the system exchanges packets with the authentication RADIUS server and money when the system exchanges packets with the accounting RADIUS server. Configure the system to retransmit packets to the RADIUS server if no response received in 5 seconds. Retransmit the packet no more than 5 times in all. Configure the system to transmit a real-time accounting packet to the RADIUS server every 15 minutes. The system is instructed to transmit the user name to the RADIUS server after removing the user domain name from the user name.
The user name of the local 802.1x access user is localuser and the password is localpass (input in plain text). The idle cut function is enabled.
II. Network diagram
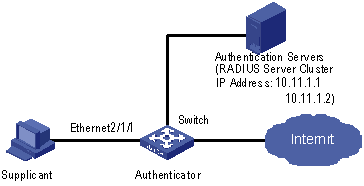
Figure 1-2 Enable 802.1x and RADIUS to perform AAA on the supplicant
III. Configuration procedure
& Note:
The following examples concern most of the AAA/RADIUS configuration commands. For details, refer to the AAA RADIUS HWTACACS Configuration part of this manual.
The configurations of access user workstation are omitted.
RADIUS server configuration is carried out in terms of RADIUS schemes. A RADIUS scheme actually can either be a stand-alone RADIUS server or two mutually backed up RADIUS servers with the same configuration and different IP addresses. So, for each RADIUS scheme, you need to configure the IP addresses for the primary and secondary RADIUS servers, and the shared key.
# Enable 802.1x globally.
[H3C] dot1x
# Enable the 802.1x performance on the specified port Ethernet 2/1/1.
[H3C] dot1x interface Ethernet 2/1/1
# Set the access control method to MAC-based. (Optional. MAC-based access control is the default setting.)
[H3C] dot1x port-method macbased interface Ethernet 2/1/1
# Create the RADIUS scheme radius1 and enters its configuration mode.
[H3C] radius scheme radius1
# Set IP address of the primary authentication/accounting RADIUS servers.
[H3C-radius-radius1] primary authentication 10.11.1.1
[H3C-radius-radius1] primary accounting 10.11.1.2
# Set the IP address of the secondary authentication/accounting RADIUS servers.
[H3C-radius-radius1] secondary authentication 10.11.1.2
[H3C-radius-radius1] secondary accounting 10.11.1.1
# Set the encryption key when the system exchanges packets with the authentication RADIUS server.
[H3C-radius-radius1] key authentication name
# Set the encryption key when the system exchanges packets with the accounting RADIUS server.
[H3C-radius-radius1] key accounting money
# Set the interval and times for the system to retransmit packets to the RADIUS server.
[H3C-radius-radius1] timer 5
[H3C-radius-radius1] retry 5
# Set the interval for the system to transmit real-time accounting packets to the RADIUS server.
[H3C-radius-radius1] timer realtime-accounting 15
# Configure the system to transmit the user name to the RADIUS server after removing the domain name.
[H3C-radius-radius1] user-name-format without-domain
[H3C-radius-radius1] quit
# Create the user domain H3C163.net and enters its configuration mode.
[H3C] domain H3C163.net
# Specify radius1 as the RADIUS scheme for the users in the domain H3C163.net.
[H3C-isp-H3C163.net] radius-scheme radius1
# Set a limit of 30 users to the domain H3C163.net.
[H3C-isp-H3C163.net] access-limit enable 30
# Enable idle cut function for the user and set the idle cut parameter in the domain H3C163.net.
[H3C-isp-H3C163.net] idle-cut enable 20 2000
# Add a local supplicant and sets its parameter.
[H3C] local-user localuser
[H3C-luser-localuser] service-type lan-access
[H3C-luser-localuser] password simple localpass
