- Table of Contents
-
- 16-Security Configuration Guide
- 00-Preface
- 01-ACL configuration
- 02-Packet filter configuration
- 03-Time range configuration
- 04-User profile configuration
- 05-Password control configuration
- 06-Keychain configuration
- 07-Public key management
- 08-PKI configuration
- 09-IPsec configuration
- 10-IKE configuration
- 11-IKEv2 configuration
- 12-SSH configuration
- 13-SSL configuration
- 14-SSL VPN configuration
- 15-Session management
- 16-Connection limit configuration
- 17-Attack detection and prevention configuration
- 18-IP-based attack prevention configuration
- 19-IP source guard configuration
- 20-ARP attack protection configuration
- 21-ND attack defense configuration
- 22-Protocol packet rate limit configuration
- 23-Security policy configuration
- 24-Object group configuration
- 25-ASPF configuration
- Related Documents
-
| Title | Size | Download |
|---|---|---|
| 14-SSL VPN configuration | 379.58 KB |
Contents
Configuring an SSL VPN gateway
Configuring SSL VPN user authentication
About SSL VPN user authentication
Configuring verification code authentication
Configuring the IP access service
Restrictions and guidelines for IP access service configuration
IP access service tasks at a glance
Configuring an SSL VPN AC interface for IP access
Configuring IP access parameters for an SSL VPN gateway
Configuring outbound dynamic NAT for SSL VPN IP access
Configuring SSL VPN access for mobile clients
SSL VPN access for mobile clients tasks at a glance
Specifying an EMO server for mobile clients
Specifying a message server for mobile clients
Configuring online SSL VPN user control
Verifying and maintaining SSL VPN
Displaying SSL VPN information
SSL VPN configuration examples
Example: Configuring IP access
Configuring SSL VPN
About SSL VPN
SSL VPN operating mechanism
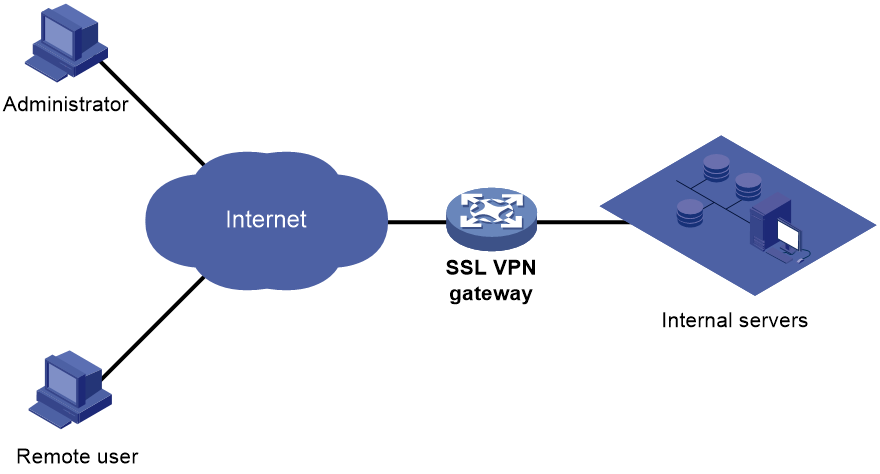
To allow remote user access to protected resources behind an SSL VPN gateway, you must configure these resources on the gateway. Remote users can access only the resources authorized to them after they establish an SSL-encrypted connection to the gateway and pass the identity authentication.
As shown in Figure 1, SSL VPN operates as follows:
1. The remote user establishes an HTTPS connection to the SSL VPN gateway.
In this process, the remote user and the SSL VPN gateway perform SSL certificate authentication.
2. The remote user enters the username and password.
3. The SSL VPN gateway authenticates the credentials that the user entered, and authorizes the user to access a range of resources.
4. The user selects a resource to access.
An access request for that resource is sent to the SSL VPN gateway through the SSL connection.
5. The SSL VPN gateway resolves the request and forwards the request to the corresponding internal server.
6. The SSL VPN gateway forwards the server's reply to the user through the SSL connection.
Figure 1 SSL VPN network diagram
SSL VPN networking modes
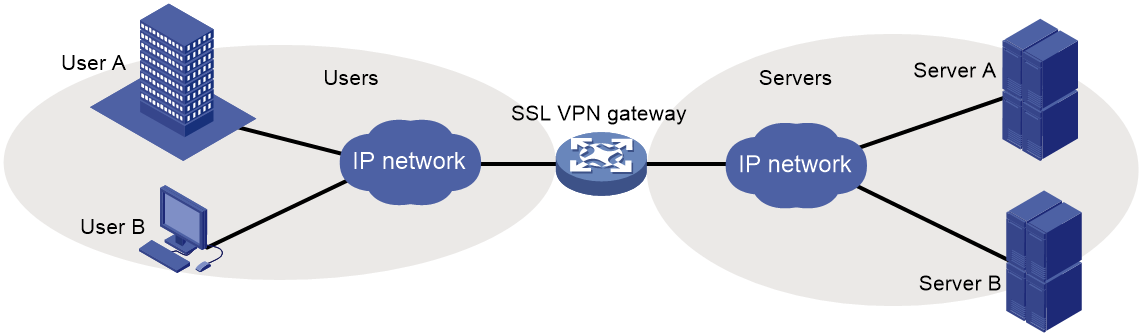
Gateway mode
In gateway mode, the SSL VPN gateway acts as a gateway that connects remote users and the internal servers network, as shown in Figure 2. Because the SSL VPN gateway is deployed in line, it can provide full protection to the internal network but it affects data transmission performance.
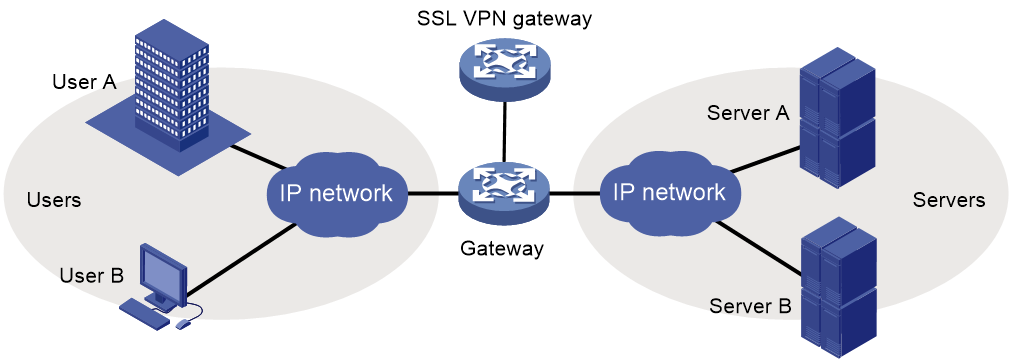
Single-arm mode
In single-arm mode, the SSL VPN gateway is attached to the network gateway, as shown in Figure 3.
The gateway forwards user-to-server traffic to the SSL VPN gateway. The SSL VPN gateway processes the traffic and sends the processed traffic back to the gateway. The gateway forwards the traffic to the internal servers. The SSL VPN gateway is not a performance bottleneck in the network because it is not deployed on the key path. However, the SSL VPN gateway cannot provide full protection to the internal network.
SSL VPN access modes
IP access implements secured IP communication between remote users and internal servers.
To access an internal server in IP access mode, a user must install dedicated IP access client software. The client software will install a virtual network interface card (VNIC) on the SSL VPN client.
To implement IP access, you must configure the following on the SSL VPN gateway:
· An SSL VPN AC interface.
· Routes to accessible IP resources. The routes will be issued to SSL VPN clients to instruct packet forwarding.
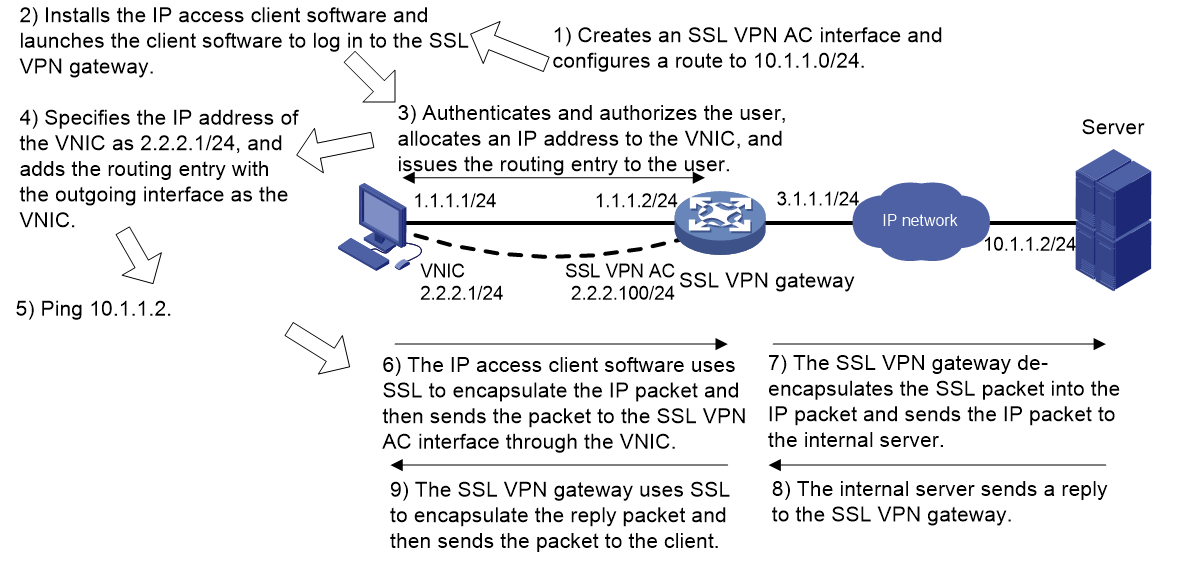
Figure 4 uses a ping operation to illustrate the IP access process. The administrator must first configure a route to the ping destination (server 10.1.1.2/24) on the SSL VPN gateway.
The access process is as follows:
1. The user installs the IP access client software and launches the client software to log in to the SSL VPN gateway.
2. The SSL VPN gateway performs the following operations:
a. Authenticates and authorizes the user.
b. Allocates an IP address to the VNIC of the user.
c. Issues the authorized IP access resources to the client.
In this example, a route to server 10.1.1.2/24 is issued.
3. The client specifies the allocated IP address as the VNIC's address and adds the route to the local routing table, using the VNIC as output interface.
4. The user pings the server address.
The ping request matches the route. Matching packets will be encapsulated by SSL.
5. The client uses SSL to encapsulate the ping request packet, and then sends the packet to the SSL VPN AC interface through the VNIC.
6. The SSL VPN gateway de-encapsulates the SSL packet into the IP packet and forwards the IP packet to the corresponding internal server.
7. The internal server sends a reply to the SSL VPN gateway.
8. The SSL VPN gateway uses SSL to encapsulate the reply packet and then sends the packet to the client through the SSL VPN AC interface.
Figure 4 Network diagram for IP access
SSL VPN user authentication
To access resources through an SSL VPN gateway, a user must first pass identity authentication to log in to the SSL VPN gateway. User authentication methods include only username/password authentication and verification code authentication. If two authentication methods are enabled, a user must pass these two authentication methods before access to internal resources. For more information about users, see AAA configuration in User Access and Authentication Configuration Guide.
The username/password authentication process is as follows:
1. The SSL VPN user enters the login username and password on the SSL VPN login page. The username and password are sent to the SSL VPN gateway.
2. The SSL VPN gateway sends the received username and password to AAA for authentication, authorization, and accounting, or to a custom authentication server for authentication and authorization.
SSL VPN tasks at a glance
To configure SSL VPN, perform the following tasks on the SSL VPN gateway:
1. Configuring an SSL VPN gateway
2. Configuring SSL VPN user authentication, authorization, and accounting
Configuring SSL VPN user authentication
3. Configuring SSL VPN resource access control as needed
¡ Configuring the IP access service
¡ Configuring SSL VPN access for mobile clients
4. (Optional.) Configuring SSL VPN user control
Configuring online SSL VPN user control
5. (Optional.) Enabling SSL VPN logging
Prerequisites for SSL VPN
Before you configure the SSL VPN gateway, configure an SSL server policy to be used by the SSL VPN gateway. For more information, see SSL configuration in Security Configuration Guide.
Configuring an SSL VPN gateway
Restrictions and guidelines
The IP address and port number of the interface for an SSL VPN gateway cannot both be the same as those of the HTTPS server on the device. Otherwise, you can access only the SSL VPN Web interface but cannot access the device management Web interface by using those IP address and port number.
If the settings of the SSL server policy applied to an SSL VPN gateway are changed, you must disable and then enable the SSL VPN gateway to use the modified policy.
Procedure
1. Enter system view.
system-view
2. Create an SSL VPN gateway and enter its view.
sslvpn gateway gateway-name
3. Specify an interface for the SSL VPN gateway.
interface interface-type interface-number
By default, no interface is specified for the SSL VPN gateway.
4. Configure an HTTPS port number for the SSL VPN gateway.
https-port port-number
By default, HTTPS port number 443 is configured for the SSL VPN gateway.
5. Specify an ISP domain for AAA of SSL VPN users.
aaa domain domain-name
By default, the default ISP domain is used for AAA of SSL VPN users.
An SSL VPN username cannot carry ISP domain information. After this command is executed, the SSL VPN gateway uses the specified domain for AAA of SSL VPN users.
6. Apply an SSL server policy to the SSL VPN gateway.
ssl server-policy policy-name
By default, an SSL VPN gateway uses the SSL server policy of its self-signed certificate.
7. (Optional.) Set the idle timeout timer for online SSL VPN users.
timeout idle minutes
By default, the idle timeout timer for online SSL VPN users is 30 minutes.
8. Enable the IPv4 service for the SSL VPN gateway.
service ipv4 enable
By default, the IPv4 service is disabled for the SSL VPN gateway.
Configuring SSL VPN user authentication
About SSL VPN user authentication
The SSL VPN gateway supports only username/password authentication and verification code authentication. If verification code authentication is enabled, users must pass both username/password authentication and verification code authentication. If verification code authentication is disabled, users must pass only username/password authentication.
Configuring verification code authentication
1. Enter system view.
system-view
2. Enter SSL VPN gateway view.
sslvpn gateway gateway-name
3. Enable verification code authentication.
verify-code enable
By default, verification code authentication is disabled.
Configuring the IP access service
To allow remote users to access internal resources in IP access mode, you must configure IP access resources and associate the resources with an SSL VPN policy group.
Restrictions and guidelines for IP access service configuration
To ensure correct forwarding of reply packets to an SSL VPN client, configure static routes from the internal servers to the network segment where the client's VNIC resides.
If the device installs with multiple security modules, the IP access mode need to cooperate with NAT to ensure that the forward and return packets of a data flow are forwarded to the same security module.
IP access service tasks at a glance
To configure the IP access service, perform the following tasks:
1. Configuring an SSL VPN AC interface for IP access
2. Configuring IP access parameters for an SSL VPN
3. (Optional.) Configuring outbound dynamic NAT for SSL VPN IP access
Configuring an SSL VPN AC interface for IP access
Configuring an SSL VPN AC interface
1. Enter system view.
system-view
2. Create an SSL VPN AC interface and enter its view.
interface sslvpn-ac interface-number
3. Configure an IPv4 address for the interface.
ip address ip-address { mask | mask-length }
By default, no IPv4 address is configured for an AC interface.
4. (Optional.) Set the expected bandwidth for the interface.
bandwidth bandwidth-value
The expected bandwidth is 64 kbps by default.
The expected bandwidth is an informational parameter used only by higher-layer protocols for calculation. You cannot adjust the actual bandwidth of an interface by using this command.
5. (Optional.) Configure the description of the interface.
description text
The default interface description is interface name Interface. For example, SSLVPN-AC1000 Interface.
6. (Optional.) Set the MTU of the interface.
mtu size
By default, the MTU of the interface is 150 bytes.
7. Bring up the interface.
undo shutdown
By default, an SSL VPN AC interface is up.
Restoring the default settings for the SSL VPN AC interface
|
|
IMPORTANT: Restoring the default interface settings might interrupt ongoing network services. Make sure you are fully aware of the impact of this operation when you perform it on a live network. |
To restore the default settings for the SSL VPN AC interface:
1. Enter system view.
system-view
2. Enter SSL VPN AC interface view.
interface sslvpn-ac interface-number
3. Restore the default settings for the SSL VPN AC interface.
default
This command might fail to restore the default settings for some commands for reasons such as command dependencies and system restrictions. You can use the display this command in interface view to check for these commands, and use their undo forms or follow the command reference to restore their respective default settings. If your restoration attempt still fails, follow the error message instructions to resolve the problem.
Configuring IP access parameters for an SSL VPN gateway
About this task
You can create an IP address pool for an SSL VPN gateway to assign IP addresses to the VNICs used by IP access users.
After you configure IPv4 routes to be issued to IP access clients for an SSL VPN gateway, these clients can access the servers on specific network segments through the configured IPv4 routes.
Restrictions and guidelines
To prevent IP address conflicts, make sure the IP addresses in the address pool meet the following requirements:
· Not in the same network segment as the physical NICs on the clients.
· Exclude IP addresses of the interfaces on the device that acts the SSL VPN gateway.
· Not in the same network segment as the internal addresses to be accessed.
Procedure
1. Enter system view.
system-view
2. Enter SSL VPN gateway view.
sslvpn gateway gateway-name
3. Specify an SSL VPN AC interface for IP access.
ip-tunnel interface sslvpn-ac interface-number
By default, no SSL VPN AC interface is specified for IP access.
4. Create an IPv4 address pool for IP access.
ip-tunnel address-pool start-ipv4-address end-ipv4-address mask { mask | mask-length }
5. Configure IPv4 routes to be issued to clients.
ip-tunnel access-route { ip-address { mask-length | mask } | force-all | ip-route-list list-name }
By default, no IPv4 routes are configured.
6. (Optional.) Set the keepalive interval.
ip-tunnel keepalive seconds
By default, the keepalive interval is 30 seconds.
7. (Optional.) Specify an IPv4 DNS server for IP access.
ip-tunnel dns-server { primary | secondary } ip-address
By default, no IPv4 DNS servers are specified for IP access.
8. (Optional.) Specify a WINS server for IP access.
ip-tunnel wins-server { primary | secondary } ip-address
By default, no WINS servers are specified for IP access.
Configuring outbound dynamic NAT for SSL VPN IP access
About this task
When the device installs with multiple security modules, you must configure outbound dynamic NAT on the interface connected to the internal server to translate source IP addresses to ensure that the forward and return packets of a data flow are forwarded to the same security module.
If no source address translation is performed, the forward and return packets of a data flow might be redirected to different security modules because of the following:
· When the SSL VPN gateway receives a user packet that accesses the internal server, it uses the source IP address of the packet (the IP address of the physical NIC of the user host) to select a security module through hash computation.
· When the SSL VPN gateway receives the return packet, it uses the destination IP address of the return packet (the IP address of the virtual NIC of the user host) to select a security module through hash computation.
· The security modules selected by the two hash computations might be different.
In this case, configure NAT to translate the source IP address of the packets between the SSL VPN gateway and the internal server and generate OpenFlow entries to ensure the forward and return packets of a data flow are redirected to the same security module.
For more information about NAT, see Network Connectivity Configuration Guide.
Restrictions and guidelines
Configure outbound dynamic NAT on the interface connected to the internal server to translate source IP addresses.
Make sure the IP addresses in the NAT address group are in the same subnet as the interface where NAT is configured.
Make sure you configure NAT source address translation for the IP address of the IP client (virtual NIC).
Procedure
1. Enter system view.
system-view
2. Create a NAT address group and enter NAT address group view.
nat address-group group-id
3. Add an address range to the address group.
address start-address end-address
You can repeat this command to add multiple address ranges to an address group.
Make sure the address ranges in the same address group or different address groups do not overlap.
4. Return to system view.
quit
5. Enter interface view.
interface interface-type interface-number
6. Configure outbound dynamic NAT.
nat outbound [ ipv4-acl-number | name ipv4-acl-name ] address-group { group-id no-pat [ reversible ] [ rule rule-name ] [ priority priority ]
By default, no outbound dynamic NAT rules exist.
Configuring SSL VPN access for mobile clients
SSL VPN access for mobile clients tasks at a glance
To configure SSL VPN access for mobile clients, perform the following tasks:
1. Specifying an EMO server for mobile clients
2. (Optional.) Specifying a message server for mobile clients
Specifying an EMO server for mobile clients
About this task
An EMO server provides services for mobile clients. After you specify an EMO server for mobile clients, the SSL VPN gateway issues the EMO server information to the clients. The clients can access available service resources through the EMO server.
Procedure
1. Enter system view.
system-view
2. Enter SSL VPN gateway view.
sslvpn gateway gateway-name
3. Specify an EMO server for mobile clients.
ip-tunnel emo-server address { host-name | ipv4-address } port port-number
By default, no EMO server is specified for mobile clients.
Specifying a message server for mobile clients
About this task
A message server provides services for mobile clients. After you specify a message server for mobile clients, the SSL VPN gateway issues the message server information to the clients. The clients can access the message server.
Procedure
1. Enter system view.
system-view
2. Enter SSL VPN gateway view.
sslvpn gateway gateway-name
3. Specify a message server for mobile clients.
ip-tunnel message-server address { host-name | ipv4-address } port port-number
By default, no message server is specified for mobile clients.
Configuring online SSL VPN user control
About this task
Perform this task to configure the SSL VPN user login control features, including the force logout feature and specifying the maximum number of concurrent online users.
Procedure
1. Enter system view.
system-view
2. Enter SSL VPN gateway view.
sslvpn gateway gateway-name
3. Force online users to log out.
force-logout { all | user-id user-id | username user-name }
4. Set the maximum number of concurrent online users allowed for the SSL VPN gateway.
max-online-users per-gateway max-number
By default, the maximum number of concurrent online users is 1048575.
Enabling SSL VPN logging
About this task
Logs generated by SSL VPN logging are sent to the information center of the device. For the logs to be output correctly, you must also configure the information center on the device. For more information about the information center, see Device Management Configuration Guide.
Procedure
1. Enter system view.
system-view
2. Enter SSL VPN gateway view.
sslvpn gateway gateway-name
3. Enable logging for user login and logoff events.
log user-login enable
By default, logging for user login and logoff events is disabled.
4. Enable logging for resource accesses of users.
log resource-access enable [ brief | filtering ] *
By default, resource access logging is disabled.
5. Enable logging for IP address allocations and releases, IP access connection close events, or IP access packet drop events.
log ip-tunnel { address-alloc-release | connection-close | packet-drop }
By default, logging for IP address allocations and releases, IP access connection close events, or IP access packet drop events is disabled.
Verifying and maintaining SSL VPN
Displaying SSL VPN information
Perform display tasks in any view.
· Display SSL VPN AC interface information.
display interface sslvpn-ac [ interface-number ] [ brief [ description | down ] ]
· Display SSL VPN gateway information.
display sslvpn gateway [ brief | name gateway-name ]
· Display information about online SSL VPN users.
display sslvpn online-users [ gateway gateway-name ] [ user user-name | verbose ]
Clearing SSL VPN statistics
To clear SSL VPN AC interface statistics, execute the following command in user view:
reset counters interface [ sslvpn-ac [ interface-number ] ]
SSL VPN configuration examples
Example: Configuring IP access
Network configuration
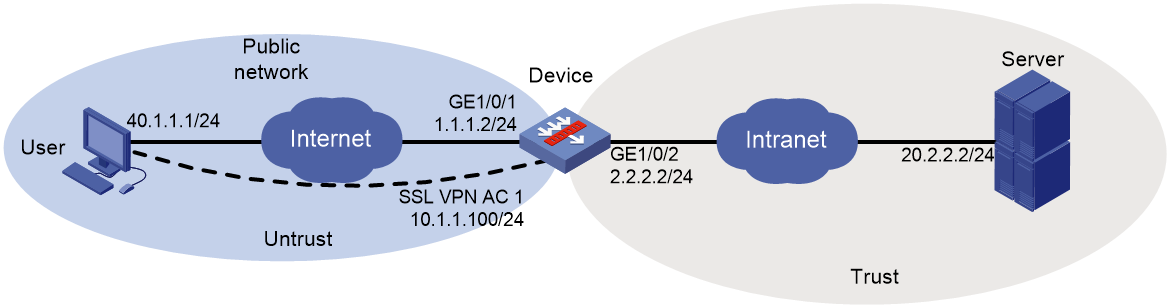
As shown in Figure 5, the device acts as an SSL VPN gateway that connects the public network and the private network.
The device uses a CA-signed SSL server certificate. If no SSL server policy is applied to the device, the device uses a self-signed SSL server certificate.
Configure SSL VPN IP access on the device to allow the user to access the internal server in the private network.
Configure the device to perform local authentication and authorization for the user.
Prerequisites
Before configuring IP access, make sure the server has a route to 10.1.1.0/24.
Procedure
1. Obtain CA certificate file ca.cer and local certificate file server.pfx for the device. (Details not shown.)
2. Assign IP addresses to interfaces:
# Assign an IP address to interface GigabitEthernet 1/0/1.
<Device> system-view
[Device] interface gigabitethernet 1/0/1
[Device-GigabitEthernet1/0/1] ip address 1.1.1.2 255.255.255.0
[Device-GigabitEthernet1/0/1] quit
# Assign IP addresses to other interfaces in the same way. (Details not shown.)
3. Create SSL VPN AC interface AC 1 and configure the IP address as 10.1.1.100/24 for the interface.
[Device] interface sslvpn-ac 1
[Device-SSLVPN-AC1] ip address 10.1.1.100 24
[Device-SSLVPN-AC1] quit
4. Configure settings for routing.
This example configures static routes, and the next hop in the routes is 2.2.2.3 to the server, and 1.1.1.3 to the user.
[Device] ip route-static 20.2.2.2 24 2.2.2.3
[Device] ip route-static 40.1.1.1 24 1.1.1.3
5. Add interfaces to security zones.
[Device] security-zone name untrust
[Device-security-zone-Untrust] import interface gigabitethernet 1/0/1
[Device-security-zone-Untrust] import interface sslvpn-ac 1
[Device-security-zone-Untrust] quit
[Device] security-zone name trust
[Device-security-zone-Trust] import interface gigabitethernet 1/0/2
[Device-security-zone-Trust] quit
6. Configure rules in a security policy to permit the traffic between security zones for the user to access the SSL VPN gateway and the server:
# Configure a rule named sslvpnlocalout1 to permit the packets from the device to the user.
[Device] security-policy ip
[Device-security-policy-ip] rule name sslvpnlocalout1
[Device-security-policy-ip-1-sslvpnlocalout1] source-zone local
[Device-security-policy-ip-1-sslvpnlocalout1] destination-zone untrust
[Device-security-policy-ip-1-sslvpnlocalout1] action pass
[Device-security-policy-ip-1-sslvpnlocalout1] quit
# Configure a rule named sslvpnlocalin1 to permit the packets from the user to the device.
[Device-security-policy-ip] rule name sslvpnlocalin1
[Device-security-policy-ip-2-sslvpnlocalin1] source-zone untrust
[Device-security-policy-ip-2-sslvpnlocalin1] destination-zone local
[Device-security-policy-ip-2-sslvpnlocalin1] action pass
[Device-security-policy-ip-2-sslvpnlocalin1] quit
# Configure a rule named sslvpnlocalout2 to permit the packets from the device to the server.
[Device-security-policy-ip] rule name sslvpnlocalout2
[Device-security-policy-ip-3-sslvpnlocalout2] source-zone local
[Device-security-policy-ip-3-sslvpnlocalout2] destination-zone trust
[Device-security-policy-ip-3-sslvpnlocalout2] action pass
[Device-security-policy-ip-3-sslvpnlocalout2] quit
# Configure a rule named sslvpnlocalin2 to permit the packets from the server to the device.
[Device-security-policy-ip] rule name sslvpnlocalin2
[Device-security-policy-ip-4-sslvpnlocalin2] source-zone trust
[Device-security-policy-ip-4-sslvpnlocalin2] destination-zone local
[Device-security-policy-ip-4-sslvpnlocalin2] action pass
[Device-security-policy-ip-4-sslvpnlocalin2] quit
# Configure a rule named untrust-trust to allow the user to access the server through the SSL VPN AC interface.
[Device-security-policy-ip] rule name untrust-trust
[Device-security-policy-ip-5-untrust-trust] source-zone untrust
[Device-security-policy-ip-5-untrust-trust] destination-zone trust
[Device-security-policy-ip-5-untrust-trust] action pass
[Device-security-policy-ip-5-untrust-trust] quit
# Configure a rule named trust-untrust to permit the packets from the server to the user through the SSL VPN AC interface.
[Device-security-policy-ip] rule name trust-untrust
[Device-security-policy-ip-6-trust-untrust] source-zone trust
[Device-security-policy-ip-6-trust-untrust] destination-zone untrust
[Device-security-policy-ip-6-trust-untrust] action pass
[Device-security-policy-ip-6-trust-untrust] quit
[Device-security-policy-ip] quit
7. Configure a PKI domain named sslvpn and certificate-related parameters.
<Device> system-view
[Device] pki domain sslvpn
[Device-pki-domain-sslvpn] public-key rsa general name sslvpn
[Device-pki-domain-sslvpn] undo crl check enable
[Device-pki-domain-sslvpn] quit
[Device] pki import domain sslvpn der ca filename ca.cer
[Device] pki import domain sslvpn p12 local filename server.pfx
8. Create an SSL server policy named ssl and specify PKI domain sslvpn for the policy.
[Device] ssl server-policy ssl
[Device-ssl-server-policy-ssl] pki-domain sslvpn
[Device-ssl-server-policy-ssl] quit
9. Configure the SSL VPN gateway for user access. Specify interface GigabitEthernet 1/0/1 for SSL VPN gateway gw as 1.1.1.2, configure HTTPS port number as 4430, and then apply SSL server policy ssl to the gateway.
[Device] sslvpn gateway gw
[Device-sslvpn-gateway-gw] interface gigabitEthernet 1/0/1
[Device-sslvpn-gateway-gw] https-port 4430
[Device-sslvpn-gateway-gw] ssl server-policy ssl
[Device-sslvpn-gateway-gw] service ipv4 enable
10. Configure IP access parameters for SSL VPN gateway gw, including an address pool for IP access and IPv4 routes to be issues to clients.
[Device-sslvpn-gateway-gw] ip-tunnel interface sslvpn-ac 1
[Device-sslvpn-gateway-gw] ip-tunnel address-pool 10.1.1.1 10.1.1.10 mask 24
[Device-sslvpn-gateway-gw] ip-tunnel access-route 20.2.2.0 24
[Device-sslvpn-gateway-gw] quit
11. Create a local user named sslvpnuser, set the password to 123456, service type to sslvpn, and user role to network-operator.
[Device] local-user sslvpnuser class network
[Device-luser-network-sslvpnuser] password simple 123456
[Device-luser-network-sslvpnuser] service-type sslvpn
[Device-luser-network-sslvpnuser] authorization-attribute user-role network-operator
[Device-luser-network-sslvpnuser] quit
Verifying the configuration
# Verify that SSL VPN gateway gw is up on the device.
[Device] display sslvpn gateway
Gateway name: gw
Operation state: Up
Down reason: Administratively down
AAA domain: Not specified
Code verification: Disabled
Associated SSL VPN Interface: GigabitEthernet1/0/1
SSL server policy configured: a
HTTPS port: 4430
Maximum users allowed: 1048575
Idle timeout: 30 min
# Download the IP client application and install the application. After the IP client application is installed, start the iNode client, as shown in Figure 6.
Figure 6 Starting the iNode client
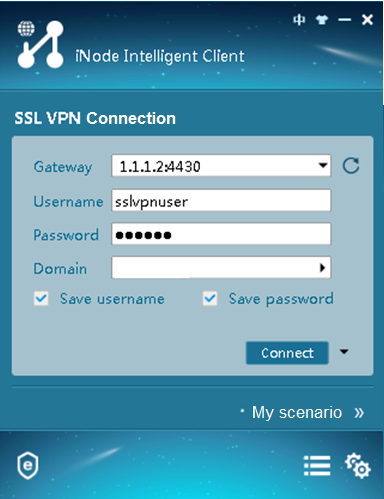
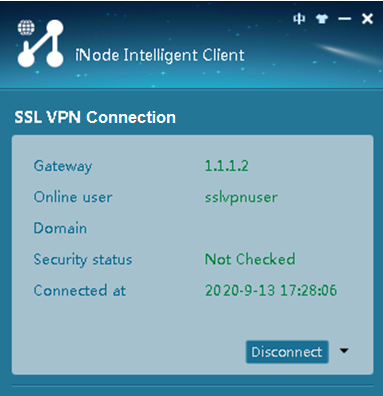
# Click Connect to log in to the SSL VPN client, as shown in Figure 6.
Figure 7 Logging in to the SSL VPN client
# Verify that the user can ping the server.
C:\>ping 20.2.2.2
Pinging 20.2.2.2 with 32 bytes of data:
Reply from 20.2.2.2: bytes=32 time=31ms TTL=254
Reply from 20.2.2.2: bytes=32 time=18ms TTL=254
Reply from 20.2.2.2: bytes=32 time=15ms TTL=254
Reply from 20.2.2.2: bytes=32 time=16ms TTL=254
Ping statistics for 20.2.2.2:
Packets: Sent = 4, Received = 4, Lost = 0 (0% loss),
Approximate round trip times in milli-seconds:
Minimum = 15ms, Maximum = 31ms, Average = 20ms
# Display online user information for SSL VPN user sslvpnuser.
[Device] display sslvpn online-users user sslvpnuser
User : sslvpnuser
Authentication method : Username/password authentication
Gateway : gw
Idle timeout : 30 min
Created at : 13:49:27 UTC Wed 05/14/2021
Lastest : 17:50:58 UTC Wed 05/14/2021
Allocated client IPv4 : 10.1.1.1
User IPv4 address : 172.16.1.16
User ID : 14
Endpoint information : Windows
