- Table of Contents
-
- 13-Network Management and Monitoring Configuration Guide
- 00-Preface
- 01-System maintenance and debugging configuration
- 02-NQA configuration
- 03-iNQA configuration
- 04-NTP configuration
- 05-PTP configuration
- 06-SNMP configuration
- 07-RMON configuration
- 08-NETCONF configuration
- 09-EAA configuration
- 10-Process monitoring and maintenance configuration
- 11-Sampler configuration
- 12-Mirroring configuration
- 13-sFlow configuration
- 14-Information center configuration
- 15-GOLD configuration
- 16-Packet capture configuration
- 17-VCF fabric configuration
- 18-CWMP configuration
- 19-SmartMC configuration
- 20-Event MIB configuration
- 21-SQA configuration
- 22-eMDI configuration
- 23-Performance management configuration
- 24-Ansible configuration
- 25-EPS agent configuration
- 26-Cloud connection configuration
- 27-EPA configuration
- 28-Packet trace configuration
- 29-IPv6 NetStream configuration
- 30-NetStream configuration
- Related Documents
-
| Title | Size | Download |
|---|---|---|
| 25-EPS agent configuration | 164.76 KB |
Contents
Display and maintenance commands for EPS agent
EPS agent configuration examples
Example: Configuring EPS agent (in standalone mode)
Configuring EPS agent
About EPS and EPS agent
H3C iMC Endpoints Profiling System (EPS) detects, identifies, and monitors network-wide endpoints, including cameras, PCs, servers, switches, routers, firewalls, APs, printers, and ATMs. New endpoints and abnormal endpoints can be timely discovered and identified.
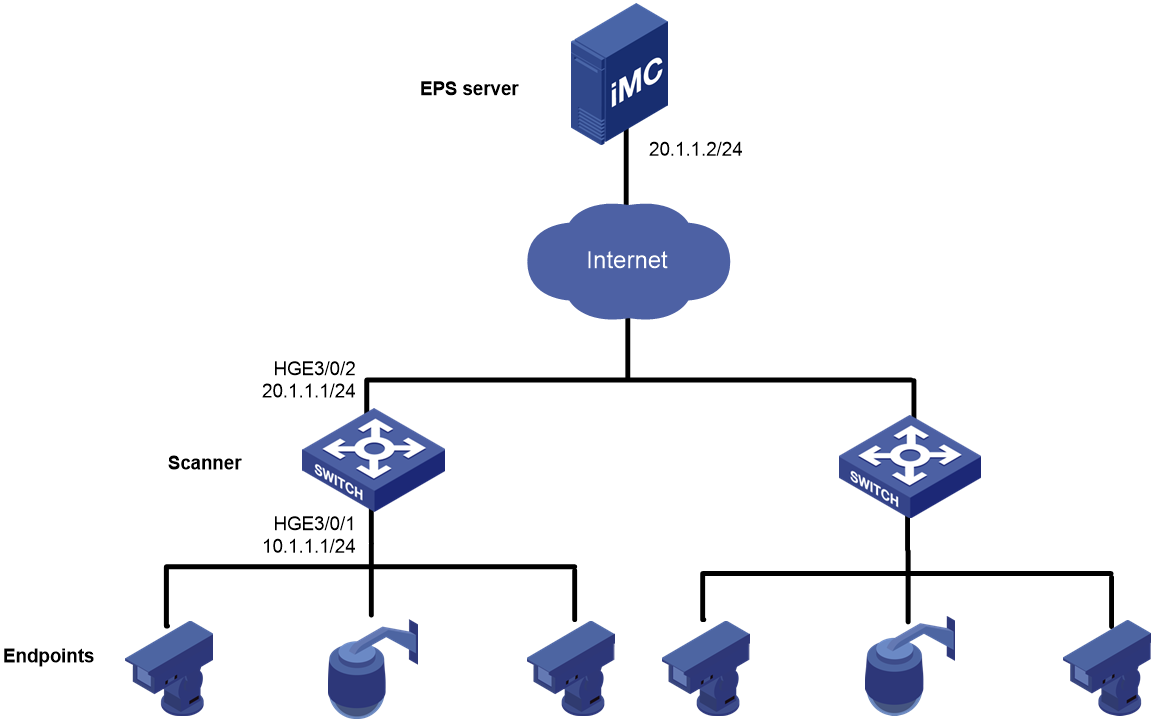
As shown in Figure 1, an EPS system contains the EPS server, scanners, and endpoints.
Figure 1 EPS network architecture

EPS server
The EPS server is a server installed with the iMC EPS component. It acts as the console to assign instructions to scanners, receive scan results, compare scan results with baselines, and support change auditing.
Scanner
A scanner is a device installed with iMC EScan and enabled with EPS agent. The scanner scans and manages endpoints by following the instruction of the EPS server and reports scan results to the EPS server.
EPS agent is based on the Comware platform and integrates the EPS scanner function. This chapter describes how to configure EPS agent.
Endpoint
An endpoint refers to a device scanned by a scanner. EPS supports user-defined endpoint types and the following system-defined endpoint types: camera, PC, server, switch, router, firewall, AP, printer, ATM, unknown, and other.
Prerequisites
Before you configure EPS agent, execute the display boot-loader command to determine whether the scanner feature image EScan is displayed in the Current software images field. If EScan is not installed, install it by using the boot-loader, install, or issu command, and then relog in to the device.
For more information about the display boot-loader and boot-loader commands, see software upgrade commands in Fundamentals Command Reference. For more information about the install and issu commands, see ISSU commands in Fundamentals Command Reference.
Configuring EPS agent
About this task
After you enable EPS agent for the scanner on a slot, the scanner scans and manages connected, reachable endpoints in its ARP table by following the instructions of the EPS server.
Procedure
1. Enter system view.
system-view
2. Configure EPS server parameters
eps server ip-address port port-number [ key { cipher | simple } key-value ] [ log-level level-value ] [ use-server-setting ]
By default, EPS server parameters are not configured.
3. Enable EPS agent.
In standalone mode:
eps agent enable [ slot slot-number ]
In IRF mode:
eps agent enable [ chassis chassis-number slot slot-number ]
By default, EPS agent is disabled.
Display and maintenance commands for EPS agent
Execute display commands in any view.
|
Task |
Command |
|
Display scanned endpoint information. |
In standalone mode: display eps agent discovery [ slot slot-number ] In IRF mode: display eps agent discovery [ chassis chassis-number slot slot-number ] |
EPS agent configuration examples
Example: Configuring EPS agent (in standalone mode)
Network configuration
As shown in Figure 2, configure the scanner to enable it to scan endpoints based on the instruction of the EPS server.
Procedure
# Display system version information, and prepare the EScan feature image file compatible with the current boot image file and system image file.
<Device> display version
H3C Comware Software, Version 7.1.070, Demo 01
Copyright (c) 2004-2019 New H3C Technologies Co., Ltd. All rights reserved.
H3C S12508G-AF uptime is 0 weeks, 0 days, 5 hours, 33 minutes
Last reboot reason : Cold reboot
Boot image: flash:/boot-01.bin
Boot image version: 7.1.070, Demo 01
Compiled Oct 20 2019 16:00:00
System image: flash:/system-01.bin
System image version: 7.1.070, Demo 01
Compiled Oct 20 2019 16:00:00
...
# Download the EScan feature image file EScan.bin from TFTP server 192.168.1.1.
<Device> tftp 192.168.1.1 get escan.bin
Press CTRL+C to abort.
% Total % Received % Xferd Average Speed Time Time Time Current
Dload Upload Total Spent Left Speed
100 11.3M 0 11.3M 0 0 155k 0 --:--:-- 0:01:14 --:--:-- 194k
Writing file...Done.
# Install EScan.bin on all IRF member devices and commit software changes. In this example, EScan.bin is installed on slot 1.
<Device> install activate feature flash:/escan.bin slot 1
Verifying the file flash:/escan.bin on slot 1....Done.
Identifying the upgrade methods....Done.
Upgrade summary according to following table:
flash:/escan.bin
Running Version New Version
None Demo 01
Slot Upgrade Way
1 Service Upgrade
Upgrading software images to compatible versions. Continue? [Y/N]:y
This operation might take several minutes, please wait....................Done.
<Device> install commit
This operation will take several minutes, please wait.......................Done.
# Relog in to the device.
# Specify 20.1.1.2 and 4500 as the IP address and port number of the EPS server, respectively.
<Sysname> system-view
[Sysname] eps server 20.1.1.2 port 4500
# Enable EPS agent on slot 1.
[Sysname] eps agent enable slot 1
Verifying the configuration
# Display EPS scanner information.
[Sysname] display eps agent
EPS agent information:
Slot Port number
1 12000
EPS server information:
IP address : 20.1.1.2
Port number : 4500
Cipher key : $c$3$rGn++lJ/vHnkk1oQDAKX9NLIz+4vXONZXCRTpQ==
Log level : 5
Use server setting: Yes
# Verify that the scanned information is displayed on slot 1 after the EPS server issues a scan instruction.
[Sysname] display eps agent discovery slot 1
IP-Address MAC-Address OS-Type OS-ver Vendor Product
100.100.100.100 cc:ef:48:9b:5f:c1 IOS 12.X Cisco C3560E
