- Table of Contents
-
- 11-Security Configuration Guide
- 00-Preface
- 01-AAA Configuration
- 02-802.1X_Configuration
- 03-MAC Authentication Configuration
- 04-Portal Configuration
- 05-Password Control Configuration
- 06-Public Key Configuration
- 07-IPsec Configuration
- 08-SSH Configuration
- 09-Blacklist Configuration
- 10-TCP and ICMP Attack Protection Configuration
- 11-IP Source Guard Configuration
- 12-ARP Attack Protection Configuration
- 13-ND Attack Defense Configuration
- 14-URPF Configuration
- 15-PKI Configuration
- 16-SSL Configuration
- Related Documents
-
| Title | Size | Download |
|---|---|---|
| 09-Blacklist Configuration | 104.24 KB |
Contents
Configuring the blacklist function
Displaying and maintaining the blacklist
Blacklist configuration example
|
|
NOTE: This function is available only on the network management port of the device. |
Blacklist function overview
The blacklist function is an attack protection measure that filters packets by source IP address. Compared with Access Control List (ACL) packet filtering, blacklist filtering is simpler in matching packets and therefore can filter packets at a high speed. Blacklist filtering is very effective in filtering packets from certain IP addresses.
Working in conjunction with the user login authentication function, the switch can add blacklist entries automatically and can age such blacklist entries. More specifically, when the switch detects that an FTP, Telnet, SSH, or web user has failed to provide the correct username, password, or verification code (for a web login user) after the maximum number of attempts, it considers the user an attacker, adds the IP address of the user to the blacklist, and filters subsequent login requests from the user. This mechanism can effectively prevent attackers from cracking login passwords through repeated login attempts. The maximum number of login failures is six, the blacklist entry aging time is 10 minutes, and they are not configurable.
The switch also allows you to add and delete blacklist entries manually. Blacklist entries added manually can be permanent blacklist entries or non-permanent blacklist entries. A permanent entry will always exist in the blacklist unless you delete it manually. You can configure the aging time of a non-permanent entry. After the timer expires, the switch automatically deletes the blacklist entry, allowing packets from the corresponding IP address to pass.
|
|
NOTE: · The blacklist function for excessive login failures takes effect only for users who try to log in to the switch from the interfaces on the MPU. |
Configuring the blacklist function
The blacklist configuration includes enabling the blacklist function and adding blacklist entries. When adding a blacklist entry, you can also configure the entry aging time. If you do not configure the aging time, the entry will never age out and thus always exist until you delete it manually.
To configure the blacklist function:
|
Step |
Command |
Remarks |
|
1. Enter system view. |
system-view |
N/A |
|
2. Enable the blacklist function. |
blacklist enable |
Disabled by default. |
|
3. Add a blacklist entry. |
blacklist ip source-ip-address [ timeout minutes ] |
Optional. The scanning attack protection function can add blacklist entries automatically. |
Displaying and maintaining the blacklist
|
Task |
Command |
Remarks |
|
Display information about one or all blacklist entries on a switch working in standalone mode. |
display blacklist { all | ip source-ip-address [ slot slot-number ] | slot slot-number } [ | { begin | exclude | include } regular-expression ] |
Available in any view |
|
Display information about one or all blacklist entries on a switch working in IRF mode. |
display blacklist { all | chassis chassis-number slot slot-number | ip source-ip-address [ chassis chassis-number slot slot-number ] } [ | { begin | exclude | include } |
Available in any view |
Blacklist configuration example
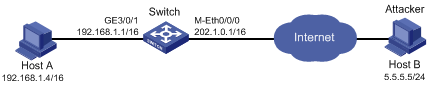
Network requirements
As shown in Figure 1, assume that you find an attacker (Host B) in the outside network by analyzing the traffic statistics. Configure the switch to filer packets from Host B permanently.
Configuration procedure
1. Configure the switch:
# Configure IP addresses for interfaces. (Details not shown)
# Enable the blacklist function.
<Switch> system-view
[Switch] blacklist enable
# Add Host B’s IP address 5.5.5.5 to the blacklist without configuring an aging time for it.
[Switch] blacklist ip 5.5.5.5
2. Verify the configuration:
After the above configuration, you can view the added blacklist entries through the display blacklist all command.
[Switch] display blacklist all
Blacklist information
-------------------------------------------------------------------------
Blacklist : enabled
Blacklist items : 2
------------------------------------------------------------------------------
IP Type Aging started Aging finished Dropped packets
YYYY/MM/DD hh:mm:ss YYYY/MM/DD hh:mm:ss
5.5.5.5 manual 2008/04/09 16:02:20 Never 0
After the configuration takes effect, the switch should always drop packets from Host B unless you delete Host B’s IP address from the blacklist by using the undo blacklist ip 5.5.5.5 command.
