- Table of Contents
-
- 11-Security Configuration Guide
- 00-Preface
- 01-AAA Configuration
- 02-802.1X_Configuration
- 03-MAC Authentication Configuration
- 04-Portal Configuration
- 05-Password Control Configuration
- 06-Public Key Configuration
- 07-IPsec Configuration
- 08-SSH Configuration
- 09-Blacklist Configuration
- 10-TCP and ICMP Attack Protection Configuration
- 11-IP Source Guard Configuration
- 12-ARP Attack Protection Configuration
- 13-ND Attack Defense Configuration
- 14-URPF Configuration
- 15-PKI Configuration
- 16-SSL Configuration
- Related Documents
-
| Title | Size | Download |
|---|---|---|
| 06-Public Key Configuration | 152.3 KB |
Public key configuration task list
Configuring a local asymmetric key pair on the local device
Creating a local asymmetric key pair
Displaying or exporting the local host public key
Destroying a local asymmetric key pair
Specifying the peer public key on the local device
Displaying and maintaining public keys
Public key configuration examples
Manually specifying the peer public key on the local device
Importing a public key from a public key file
Overview
To protect data confidentiality during transmission, the data sender uses an algorithm and a key to encrypt the plain text data before sending the data out, and the receiver uses the same algorithm with the help of a key to decrypt the data, as shown in Figure 1.
Figure 1 Encryption and decryption

The keys that participate in the conversion between the plain text and the cipher text can be the same or different, dividing the encryption and decryption algorithms into the following types:
· Symmetric key algorithm—The keys for encryption and decryption are the same.
· Asymmetric key algorithm—The keys for encryption and decryption are different, one is the public key, and the other is the private key. The information encrypted with the public key can only be decrypted with the corresponding private key, and vice versa. The private key is kept secret, and the public key may be distributed widely. The private key cannot be practically derived from the public key. Asymmetric key algorithms include the Revest-Shamir-Adleman Algorithm (RSA), the Digital Signature Algorithm (DSA), and the Elliptic Curve Digital Signature Algorithm (ECDSA).
Asymmetric key algorithms can be used in two scenarios for two purposes:
· To encrypt and decrypt data—The sender uses the public key of the intended receiver to encrypt the information to be sent. Only the intended receiver, the holder of the paired private key, can decrypt the information. This mechanism ensures confidentiality. Only RSA can be used for data encryption and decryption.
· To authenticate a sender—Also called digital signature. The sender "signs" the information to be sent by encrypting the information with its own private key. A receiver decrypts the information with the sender's public key and, based on whether the information can be decrypted, determines the authenticity of the information. RSA, DSA, and ECDSA can be used for digital signature.
Asymmetric key algorithms are widely used in various applications. For example, Secure Shell (SSH), Secure Sockets Layer (SSL), and Public Key Infrastructure (PKI) use the algorithms for digital signature. For information about SSH, SSL, and PKI, see the chapters “Configuring SSH,” ”Configuring SSL,” and ”Configuring PKI.”
|
|
NOTE: The switch does not support ECDSA. |
Public key configuration task list
The configuration tasks enable you to manage the local asymmetric key pairs, and configure the peer host public keys on the local device. By completing these tasks, your host is ready to work with applications such as SSH and SSL to implement data encryption/decryption, or digital signature.
Complete these tasks to configure public keys:
|
Task |
Remarks |
|
|
Choose one or more tasks. |
||
Configuring a local asymmetric key pair on the local device
Creating a local asymmetric key pair
Configuration guidelines
When you create an asymmetric key pair on the local device, follow these guidelines:
· Create an asymmetric key pair of the proper type to work with a target application.
· After you enter the command, specify a proper modulus length for the key pair. The following table compares these types of key pairs.
Table 1 A comparison between different types of asymmetric key pairs
|
Type |
Number of key pairs |
Modulus length |
Remarks |
|
RSA |
Two key pairs, one server key pair and one host key par. Each key pair comprises a public key and a private key |
512 to 2048 bits 1024 by default |
To achieve high security, specify at least 768 bits. |
|
DSA |
One key pair, the host key pair |
512 to 2048 bits 1024 by default |
|
|
NOTE: Only SSH1.5 uses the RSA server key pair. |
Configuration procedure
To create a local asymmetric key pair:
|
Step |
Command |
Remarks |
|
1. Enter system view. |
system-view |
N/A |
|
2. Create a local asymmetric key pair. |
public-key local create { dsa | rsa } |
By default, no asymmetric key pair is created. |
|
|
NOTE: Key pairs created with the public-key local create command are saved automatically and can survive system reboots. |
Displaying or exporting the local host public key
In some applications, such as SSH, to allow your local device to be authenticated by a peer device through digital signature, you must display or export the local host public key, which will then be specified on the peer device.
To display or export the local host public key, choose one of the following methods:
· Displaying and recording the host public key information
· Displaying the host public key in a specific format and saving it to a file
· Exporting the host public key in a specific format to a file
If your local device functions to authenticate the peer device, you must specify the peer public key on the local device. For more information, see "Specifying the peer public key on the local device."
Displaying and recording the host public key information
After you display the host public key, record the key information for manually configuration of the key on the peer device.
To display the local public key:
|
Task |
Command |
Remarks |
|
Display the local RSA public keys. |
display public-key local rsa public [ | { begin | exclude | include } regular-expression ] |
Available in any view. |
|
Display the local DSA host public key. |
display public-key local dsa public [ | { begin | exclude | include } regular-expression ] |
Available in any view. |
|
|
NOTE: The display public-key local rsa public command displays both the RSA server and host public keys. Recording the RSA host public key is enough. |
Displaying the host public key in a specific format and saving it to a file
After you display the host public key in a specify format, save the key to a file, and transfer this file to the peer device.
To display the local host public key in a specific format:
|
Step |
Command |
Remarks |
|
1. Enter system view. |
system-view |
N/A |
|
2. Display the local RSA or DSA host public key in a specific format. |
· To
display the local RSA host public key in a specific format: · To display
the local DSA host public key in a specific format: |
Use at least one command. |
Exporting the host public key in a specific format to a file
After you export and save the host public key in a specify format to a file, transfer the file to the peer device.
To export and save the local host public key to a file:
|
Step |
Command |
Remarks |
|
1. Enter system view. |
system-view |
N/A |
|
2. Export and save the local RSA/DSA host public key in a specific format to a file. |
· To
export and save the local RSA host public key to a file: · To
export and save the local DSA host public key to a file: |
Use at least one command. |
Destroying a local asymmetric key pair
You may need to destroy a local asymmetric key pair and generate a new pair when an intrusion event has occurred, the storage media of the device is replaced, the asymmetric key has been used for a long time, or the local certificate expires. For more information about the local certificate, see the chapter “Configuring PKI.”
To destroy a local asymmetric key pair:
|
Step |
Command |
|
1. Enter system view. |
system-view |
|
2. Destroy a local asymmetric key pair. |
public-key local destroy { dsa | rsa } |
Specifying the peer public key on the local device
In some applications, such as SSH, to enable the local device to authenticate a peer device, specify the peer public key on the local device. Take one of the following methods:
|
Method |
Prerequisites |
Remarks |
|
Import the public key from a public key file (recommended) |
1. Save the host public key of the intended asymmetric key pair in a file. 2. Transfer a copy of the file through FTP or TFTP in binary mode to the local device. |
During the import process, the system automatically converts the public key to a string in Public Key Cryptography Standards (PKCS) format. |
|
Manually configure the public key—input or copy the key data |
· Display and record the public key of the intended asymmetric key pair. · If the peer device is an H3C device, use the display public-key local public command to view and record its public key. A public key displayed by other methods for the H3C device may not be in a correct format. |
· The recorded public key must be in the correct format, or the manual configuration of a format-incompliant public key will fail. · Always use the first method if you are not sure about the format of the recorded public key. |
|
|
NOTE: · The device supports up to 20 peer public keys. · For information about displaying or exporting the host public key, see "Displaying or exporting the local host public key." |
To import the host public key from a public key file to the local device:
|
Step |
Command |
|
1. Enter system view. |
system-view |
|
2. Import the host public key from the public key file. |
public-key peer keyname import sshkey filename |
To manually configure the peer public key on the local device:
|
Step |
Command |
Remarks |
|
1. Enter system view. |
system-view |
N/A |
|
2. Specify a name for the public key and enter public key view. |
public-key peer keyname |
N/A |
|
3. Enter public key code view. |
public-key-code begin |
N/A |
|
4. Configure the peer public key. |
Type or copy the key |
Spaces and carriage returns are allowed between characters, but are not saved. |
|
5. Return to public key view. |
public-key-code end |
When you exit public key code view, the system automatically saves the public key. |
|
6. Return to system view. |
peer-public-key end |
N/A |
Displaying and maintaining public keys
|
Task |
Command |
Remarks |
|
Display the local public keys. |
display public-key local { dsa | rsa } public [ | { begin | exclude | include } regular-expression ] |
Available in any view |
|
Display the specified or all peer public keys on the local device. |
display public-key peer [ brief | name publickey-name ] [ | { begin | exclude | include } regular-expression ] |
Available in any view |
Public key configuration examples
|
|
NOTE: By default, Ethernet interfaces, VLAN interfaces, and aggregation ports are down. To configure these interfaces, use the undo shutdown command to bring them up first. |
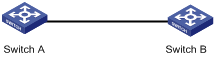
Manually specifying the peer public key on the local device
Network requirements
As shown in Figure 2, to prevent illegal access, Switch B (the local device) authenticates Switch A (the peer device) through a digital signature. Before configuring authentication parameters on Switch B, configure the public key of Switch A on Switch B.
· Configure Switch B to use the asymmetric key algorithm of RSA.
· Manually specify the host public key of Switch A's public key pair on Switch B.
Configuration procedure
1. Configure Switch A.
# Create local RSA key pairs on Switch A, setting the modulus length to the default, 1024 bits.
<SwitchA> system-view
[SwitchA] public-key local create rsa
The range of public key size is (512 ~ 2048).
NOTES: If the key modulus is greater than 512,
It will take a few minutes.
Press CTRL+C to abort.
Input the bits of the modulus[default = 1024]:
Generating Keys...
++++++
++++++
++++++++
++++++++
# Display the public keys of the local RSA key pairs.
[SwitchA] display public-key local rsa public
=====================================================
Time of Key pair created: 09:50:06 2007/08/07
Key name: HOST_KEY
Key type: RSA Encryption Key
=====================================================
Key code:
30819F300D06092A864886F70D010101050003818D0030818902818100D90003FA95F5A44A2A2CD3F814F
9854C4421B57CAC64CFFE4782A87B0360B600497D87162D1F398E6E5E51E5E353B3A9AB16C9E766BD995C
669A784AD597D0FB3AA9F7202C507072B19C3C50A0D7AD3994E14ABC62DB125035EA326470034DC078B2B
AA3BC3BCA80AAB5EE01986BD1EF64B42F17CCAE4A77F1EF999B2BF9C4A10203010001
=====================================================
Time of Key pair created: 09:50:07 2007/08/07
Key name: SERVER_KEY
Key type: RSA Encryption Key
=====================================================
Key code:
307C300D06092A864886F70D0101010500036B003068026100999089E7AEE9802002D9EB2D0433B87BB61
58E35000AFB3FF310E42F109829D65BF70F7712507BE1A3E0BC5C2C03FAAF00DFDDC63D004B4490DACBA3
CFA9E84B9151BDC7EECE1C8770D961557D192DE2B36CAF9974B7B293363BB372771C2C1F0203010001
2. Configure Switch B.
# Configure the host public key of Switch A's RSA key pairs on Switch B. In public key code view, input the host public key of Switch A. The host public key is the content of HOST_KEY displayed on Switch A by using the display public-key local dsa public command.
<SwitchB> system-view
[SwitchB] public-key peer switcha
Public key view: return to System View with "peer-public-key end".
[SwitchB-pkey-public-key] public-key-code begin
Public key code view: return to last view with "public-key-code end".
[SwitchB-pkey-key-code]30819F300D06092A864886F70D010101050003818D0030818902818100D900
03FA95F5A44A2A2CD3F814F9854C4421B57CAC64CFFE4782A87B0360B600497D87162D1F398E6E5E51E5E
353B3A9AB16C9E766BD995C669A784AD597D0FB3AA9F7202C507072B19C3C50A0D7AD3994E14ABC62DB12
5035EA326470034DC078B2BAA3BC3BCA80AAB5EE01986BD1EF64B42F17CCAE4A77F1EF999B2BF9C4A1020
3010001
[SwitchB-pkey-key-code] public-key-code end
[SwitchB-pkey-public-key] peer-public-key end
# Display the host public key of Switch A saved on Switch B.
[SwitchB] display public-key peer name switcha
=====================================
Key Name : switcha
Key Type : RSA
Key Module: 1024
=====================================
Key Code:
30819F300D06092A864886F70D010101050003818D0030818902818100D90003FA95F5A44A2A2CD3F814F
9854C4421B57CAC64CFFE4782A87B0360B600497D87162D1F398E6E5E51E5E353B3A9AB16C9E766BD995C
669A784AD597D0FB3AA9F7202C507072B19C3C50A0D7AD3994E14ABC62DB125035EA326470034DC078B2B
AA3BC3BCA80AAB5EE01986BD1EF64B42F17CCAE4A77F1EF999B2BF9C4A10203010001
The output shows that the host public key of Switch A saved on Switch B is consistent with the one created on Switch A.
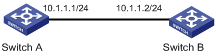
Importing a public key from a public key file
Network requirements
As shown in Figure 3, to prevent illegal access, Switch B (the local device) authenticates Switch A (the peer device) through a digital signature. Before configuring authentication parameters on Switch B, configure the public key of Switch A on Switch B.
· Configure Switch B to use the asymmetric key algorithm of RSA.
· Import the host public key of Switch A from the public key file to Switch B.
Configuration procedure
1. Create key pairs on Switch A and export the host public key.
# Create local RSA key pairs on Switch A, setting the modulus length to the default, 1024 bits.
<SwitchA> system-view
[SwitchA] public-key local create rsa
The range of public key size is (512 ~ 2048).
NOTES: If the key modulus is greater than 512,
It will take a few minutes.
Press CTRL+C to abort.
Input the bits of the modulus[default = 1024]:
Generating Keys...
++++++
++++++
++++++++
++++++++
# Display the public keys of the local RSA key pairs.
[SwitchA] display public-key local rsa public
=====================================================
Time of Key pair created: 09:50:06 2007/08/07
Key name: HOST_KEY
Key type: RSA Encryption Key
=====================================================
Key code:
30819F300D06092A864886F70D010101050003818D0030818902818100D90003FA95F5A44A2A2CD3F814F
9854C4421B57CAC64CFFE4782A87B0360B600497D87162D1F398E6E5E51E5E353B3A9AB16C9E766BD995C
669A784AD597D0FB3AA9F7202C507072B19C3C50A0D7AD3994E14ABC62DB125035EA326470034DC078B2B
AA3BC3BCA80AAB5EE01986BD1EF64B42F17CCAE4A77F1EF999B2BF9C4A10203010001
=====================================================
Time of Key pair created: 09:50:07 2007/08/07
Key name: SERVER_KEY
Key type: RSA Encryption Key
=====================================================
Key code:
307C300D06092A864886F70D0101010500036B003068026100999089E7AEE9802002D9EB2D0433B87BB61
58E35000AFB3FF310E42F109829D65BF70F7712507BE1A3E0BC5C2C03FAAF00DFDDC63D004B4490DACBA3
CFA9E84B9151BDC7EECE1C8770D961557D192DE2B36CAF9974B7B293363BB372771C2C1F0203010001
# Export the RSA host public key HOST_KEY to a file named switcha.pub.
[SwitchA] public-key local export rsa ssh2 switcha.pub
2. Enable the FTP server function on Switch A.
# Enable the FTP server function, create an FTP user with the username ftp, password 123, and user level 3. This user level ensures that the user has the permission to perform FTP operations.
[SwitchA] ftp server enable
[SwitchA] local-user ftp
[SwitchA-luser-ftp] password simple 123
[SwitchA-luser-ftp] service-type ftp
[SwitchA-luser-ftp] authorization-attribute level 3
[SwitchA-luser-ftp] quit
3. On Switch B, get the public key file of Switch A.
# From Switch B, use FTP to log in to Switch A, and get the public key file switcha.pub with the file transfer mode of binary.
<SwitchB> ftp 10.1.1.1
Trying 10.1.1.1 ...
Press CTRL+K to abort
Connected to 10.1.1.1.
220 FTP service ready.
User(10.1.1.1:(none)):ftp
331 Password required for ftp.
Password:
230 User logged in.
[ftp] binary
200 Type set to I.
[ftp] get switcha.pub
227 Entering Passive Mode (10,1,1,1,5,148).
125 BINARY mode data connection already open, transfer starting for /switcha.pub.
226 Transfer complete.
FTP: 299 byte(s) received in 0.189 second(s), 1.00Kbyte(s)/sec.
[ftp] quit
221 Server closing.
4. Import the host public key of Switch A to Switch B.
# Import the host public key of Switch A from the key file switcha.pub to Switch B.
<SwitchB> system-view
[SwitchB] public-key peer switcha import sshkey switcha.pub
# Display the host public key of Switch A on Switch B.
[SwitchB] display public-key peer name switcha
=====================================
Key Name : switcha
Key Type : RSA
Key Module: 1024
=====================================
Key Code:
30819F300D06092A864886F70D010101050003818D0030818902818100D90003FA95F5A44A2A2CD3F814F
9854C4421B57CAC64CFFE4782A87B0360B600497D87162D1F398E6E5E51E5E353B3A9AB16C9E766BD995C
669A784AD597D0FB3AA9F7202C507072B19C3C50A0D7AD3994E14ABC62DB125035EA326470034DC078B2B
AA3BC3BCA80AAB5EE01986BD1EF64B42F17CCAE4A77F1EF999B2BF9C4A10203010001
The output shows that the host public key of Switch A saved on Switch B is consistent with the one created on Switch A.
