- Table of Contents
-
- H3C S9500 Operation Manual-Release1648[v1.24]-01 Access Volume
- 00-1Cover
- 01-Ethernet Port Configuration
- 02-POS Port Configuration
- 03-Link Aggregation Configuration
- 04-Port Isolation Configuration
- 05-VLAN Configuration
- 06-MAC Address Table Management Configuration
- 07-GVRP Configuration
- 08-QinQ Configuration
- 09-Ethernet Port Loopback Detection Configuration
- 10-DLDP Configuration
- 11-Ethernet OAM Configuration
- 12-Smart Link and Monitor Link Configuration
- 13-MSTP Configuration
- 14-BPDU Tunnel Configuration
- 15-HVRP Configuration
- 16-RRPP Configuration
- 17-RPR Configuration
- Related Documents
-
| Title | Size | Download |
|---|---|---|
| 07-GVRP Configuration | 66.2 KB |
Table of Contents
1.2.1 Enabling/Disabling Global GVRP
1.2.2 Enabling/Disabling Port GVRP
1.2.3 Setting the GVRP Registration Type
1.3 Displaying and Maintaining GVRP
1.4 GVRP Configuration Example
Chapter 1 GVRP Configuration
When configuring GVRP, go to these sections for information you are interested in:
l Overview
l Displaying and Maintaining GVRP
1.1 Overview
1.1.1 Introduction to GARP
The Generic Attribute Registration Protocol (GARP) provides a mechanism that allows participants in a GARP application to distribute, propagate, and register with other participants in a LAN the attributes specific to the GARP application, such as the VLAN or multicast address attribute.
GARP itself does not exist on a device as an entity. GARP-compliant participants are known as GARP applications. Two common examples are GVRP and GMRP. When a GARP participant is present on a port on your device, the port is regarded as a GARP participant.
The GARP mechanism allows the configuration information on one GARP member to be propagated rapidly across the switching network. A GARP member can be a terminal workstation or a bridge. The GARP member can notify other members to register or remove its attribute information by sending declarations or withdrawing declarations. It can also register or remove the attribute information of other GARP members according to the received declarations/withdrawals.
GARP participants exchange information by sending three types of messages: Join, Leave, and LeaveAll. When a GARP participant wants to register its attribute information with other switches, it sends a Join message outward. When it wants to remove some attribute information from other switches, it sends a Leave message. The LeaveAll timer starts when each GARP participant is enabled and the LeaveAll message is sent upon expiration. The Join and Leave messages cooperate to ensure the logout and the re-registration of a message. The message exchange enables all the to-be-registered attribute information to be propagated to all the switches across the same switching network.
The destination MAC addresses of the packets of the GARP participants are specific multicast MAC addresses. A GARP supporting switch classifies the packets received from the GARP participants and processes them with corresponding GARP applications (GVRP or GMRP).
GARP and GMRP are described in details in the IEEE 802.1P standard (which has been merged to the IEEE802.1D standard). H3C series switches fully support the GARP compliant with the IEEE standards.
The following section describes the GARP configuration task:
& Note:
l The configuration of the GARP timers will be used for all the GARP applications, including GVRP and GMRP, running in one switched network.
l In one switched network, the GARP timers on all the switching devices should be set to the same value. Otherwise, GARP applications cannot work normally.
1.1.2 Introduction to GVRP
The GARP VLAN Registration Protocol (GVRP) is a GARP application. Based on the GARP operating mechanism, GVRP provides maintenance of the dynamic VLAN registration information in the switch and propagates the information to other switches. All the GVRP-enabled switches can receive VLAN registration information from other switches and dynamically update the local VLAN registration information including the active members and through which port those members can be reached. All the GVRP-enabled switches can propagate their local VLAN registration information to other switches so that the VLAN information is consistent on all GVRP-enabled devices in one switching network. The VLAN registration information propagated by GVRP includes both the local static registration information configured manually and the dynamic registration information from other switches.
GVRP is described in details in the IEEE 802.1Q standard. H3C series switches fully support the GARP compliant with the IEEE standards.
Configuring GVRP primarily involves the following tasks:
l Enabling/Disabling Global GVRP
l Enabling/Disabling Port GVRP
l Setting the GVRP Registration Type
In the above-mentioned configuration tasks, GVRP should be enabled globally before it is enabled on a port. Configuration of GVRP registration type can only take effect after port GVRP is enabled. Besides, GVRP should be configured on trunk ports.
& Note:
l After an aggregation group is created, although the GVRP-related configuration of the port operating as the master port remains unchanged and is synchronized to the slave ports, GVRP is not enabled on the slave ports.
l Although ports added to an existing aggregation group adopt the GVRP configuration of the aggregation group, GVRP are not enabled on them.
l When the master port leaves an aggregation group, the GVRP-related configurations on both the aggregation group and the port remain unchanged. However, when a slave port leaves an aggregation group, the GVRP-related configuration on the port is removed.
l The GVRP-related configuration of a port in an aggregation group is mapped to all the other members in the aggregation group.
l When you query the GVRP feature configured on any port in an aggregation group, the returned result is about the master port of the group.
1.2 Configuring GVRP
Complete the following tasks to configure GVRP:
l Enabling/Disabling Global GVRP
l Enabling/Disabling Port GVRP
l Setting the GVRP Registration Type
1.2.1 Enabling/Disabling Global GVRP
You can use the following commands to enable or disable global GVRP.
Perform the following configuration in system view.
|
To do… |
Use the command… |
|
Enable global GVRP |
gvrp |
|
Disable global GVRP |
undo gvrp |
By default, global GVRP is disabled.
1.2.2 Enabling/Disabling Port GVRP
You can use the following commands to enable or disable GVRP on a port.
Perform the following configurations in Ethernet port view.
|
To do … |
Use the command … |
|
Enable port GVRP |
gvrp |
|
Disable port GVRP |
undo gvrp |
Before enabling port GVRP, you must enable global GVRP. Note that GVRP can only be enabled on trunk ports.
By default, port GVRP is disabled.
1.2.3 Setting the GVRP Registration Type
GVRP provides the following three registration types on a port (refer to IEEE 802.1Q):
l Normal — Enables the port to dynamically register and deregister VLANs, and to propagate both dynamic and static VLAN information.
l Forbidden — Disables the port to dynamically register and deregister VLANs, and to propagate VLAN information except information about VLAN 1. A trunk port with forbidden registration type thus allows only VLAN 1 to pass through even though it is configured to carry all VLANs.
Perform the following configuration in Ethernet port view.
|
To do … |
Use the command … |
|
Configure the GVRP registration mode on the port |
gvrp registration { normal | fixed | forbidden } |
|
Restore the default GVRP registration mode |
undo gvrp registration |
The default GVRP registration mode is normal.
1.2.4 Setting GARP Timers
GARP uses the following four timers to set the intervals for sending GARP messages:
l Hold timer — When a GARP application entity receives the first registration request, it starts a hold timer and collects succeeding requests. When the timer expires, the entity sends all these requests in one Join message. This helps you save bandwidth.
l Join timer –– A GARP participant sends each Join message at most twice for reliability sake and uses a join timer to set the sending interval. If the first Join message has not been acknowledged before the Join timer expires, the GARP participant sends the second Join message.
l Leave timer –– Starts upon receipt of a Leave message sent for deregistering some attribute information. If no Join message has been received before this timer expires, the GARP participant removes the attribute information as requested.
l LeaveAll timer — Starts when a GARP participant starts. When this timer expires, the entity sends a LeaveAll message so that other participants can re-register its attribute information. Then, a LeaveAll timer starts again.
Set the Hold timer, Join timer and Leave timer in Ethernet port view; set the LeaveAll timer in system view.
|
To do … |
Use the command … |
|
Set the GARP Hold timer, Join timer, and Leave timer |
garp timer { hold | join | leave } timer_value |
|
Set the GARP LeaveAll timer |
garp timer leaveall timer_value |
|
Restore the default settings of the GARP Hold timer, Join timer, and Leave timer |
undo garp timer { hold | join | leave } |
|
Restore the default setting of the GARP LeaveAll timer |
undo garp timer leaveall |
The default settings of GARP timers are as follows (in centiseconds).
l Hold timer:10
l Join timer: 20
l Leave timer: 60
l LeaveAll timer: 1000
Note that, the setting of the Join timer must be no less than twice that of the Hold timer; the setting of the Leave timer must be greater than twice that of the Join timer and smaller than that of the LeaveAll timer. Besides, when counted in centiseconds, the setting of the Join timer must be a multiple of 5. Otherwise, the system will report errors.
The settings of the timers are correlated. If you fail to set a timer to a certain value, you can try to adjust the settings of the rest timers.
l The lower threshold of the Hold timer is 10 centiseconds. You can change its upper threshold by adjusting the setting of the Join timer.
l You can change the lower threshold and upper threshold of the Join timer by adjusting the setting of the Hold timer and the Leave timer respectively.
l You can change the lower threshold and upper threshold of the Leave timer by adjusting the setting of the Join timer and the LeaveAll timer respectively.
l The upper threshold of the LeaveAll timer is 32765 centiseconds. You can change its lower threshold by adjusting the value of the Leave timer.
1.3 Displaying and Maintaining GVRP
|
To do … |
Use the command … |
Remarks |
|
Display GARP statistics information |
display garp statistics [ interface interface-list ] |
Available in any view |
|
Display GARP timer settings |
display garp timer [ interface interface-list ] |
Available in any view |
|
Clear GARP statistics information |
reset garp statistics [ interface interface-list ] |
Available in user view |
|
Enable GARP event debugging |
debugging garp event |
Available in user view |
|
Disable GARP event debugging |
undo debugging garp event |
Available in user view |
|
Display GVRP statistics information |
display gvrp statistics [ interface interface-list ] |
Available in any view |
|
Display GVRP global status information |
display gvrp status |
Available in any view |
|
Enable GVRP packet or event debugging |
debugging gvrp { packet | event } |
Available in user view |
|
Disable GVRP packet or event debugging |
undo debugging gvrp { packet | event } |
Available in user view |
1.4 GVRP Configuration Example
I. Configuration task
Configure GVRP to allow Switch A and Switch B to dynamically register and update VLAN information with each other.
II. Configuration prerequisites
l Enable global GVRP before enabling port GVRP.
l The GVRP registration type takes effect on a port only after GVRP is enabled on it.
l The port where you want to enable GVRP must be a trunk.
III. Network diagram
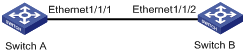
Figure 1-1 Network diagram for GVRP configuration
IV. Configuration procedure
1) Configure Switch A
# Enable GVRP globally.
<H3C> system-view
System View: return to User View with Ctrl+Z.
[H3C] gvrp
# Configure Ethernet 1/1/1 as a trunk port and allow the packets of all the VLANs to pass through.
[H3C] interface ethernet1/1/1
[H3C-Ethernet1/1/1] port link-type trunk
[H3C-Ethernet1/1/1] port trunk permit vlan all
# Enable GVRP on the trunk port.
[H3C-Ethernet1/1/1] gvrp
2) Configure Switch B
# Enable GVRP globally.
[H3C] gvrp
# Configure Ethernet 1/1/2 as a trunk port and allow the packets of all the VLANs to pass through.
[H3C] interface ethernet1/1/2
[H3C-Ethernet1/1/2] port link-type trunk
[H3C-Ethernet1/1/2] port trunk permit vlan all
# Enable GVRP on the trunk port.
[H3C-Ethernet1/1/2] gvrp
