- Table of Contents
-
- H3C S9500 Series Routing Switches Command Manual-(V1.01)
- 00-1Cover
- 01-Getting Started Command
- 02-Port Command
- 03-VLAN-QinQ Command
- 04-Network Protocol Command
- 05-Routing Protocol Command
- 06-Multicast Protocol Command
- 07-QACL Command
- 08-MPLS Command
- 09-STP Command
- 10-Security Command
- 11-Reliability Command
- 12-System Management Command
- 13-PoE Command
- 14-NAT-URPF-VPLS Command
- 15-Integrated Management Command
- 16-Appendix
- Related Documents
-
| Title | Size | Download |
|---|---|---|
| 01-Getting Started Command | 168 KB |
Table of Contents
Chapter 1 Commands Used to Log in to Switch
1.1 Logging in to Switch Commands
1.1.11 history-command max-size
1.1.25 set authentication password
Chapter 2 Password Control Configuration Commands
2.1 Password Control Configuration Commands
2.1.1 display password-control
2.1.2 display password-control blacklist
2.1.3 display password-control super
2.1.8 reset password-control history-record
2.1.9 reset password-control history-record super
2.1.10 reset password-control blacklist
Chapter 1 Commands Used to Log in to Switch
1.1 Logging in to Switch Commands
1.1.1 authentication-mode
Syntax
authentication-mode { password | scheme | none }
View
User interface view
Parameter
password: Performs local password authentication.
scheme: Performs local or remote authentication of username and password.
none: Log in without authentication.
Description
Use the authentication-mode command to configure the authentication method for login user.
Use the authentication-mode none command to configure no authentication.
This command with the password parameter indicates to perform local password authentication, that is, you need to configure a login password using the set authentication password { cipher | simple } password command.
This command with the scheme parameter indicates to perform authentication of local or remote username and password. The type of the authentication depends on your configuration. For detailed information, see “Security” section.
By default, terminal authentication is not required for local users log in via the Console port. However, password authentication is required for local users and remote Modem users to log in via the AUX port, and for Telnet users and VTY users to log in through Ethernet port.
Note: If the Console port is configured for local password authentication, the user can directly log in to the system even without a password configured; if other user interfaces, such as the AUX port and VTY interface, are configured for local password authentication, users cannot log in to the system without a password.
Example
# Configure local password authentication.
<H3C>system-view
System View: return to User View with Ctrl+Z.
[H3C] user-interface aux 0
[H3C-ui-aux0] authentication-mode password
1.1.2 auto-execute command
Syntax
auto-execute command text
undo auto-execute command
View
User interface view
Parameter
text: Specifies the command to be run automatically.
Description
Use the auto-execute command command to configure to automatically run a specified command. When a user logs in, the command configured will be executed automatically. The user will be disconnected after that.
Use the undo auto-execute command command to configure not to run the command automatically.
This command is usually used to configure the telnet command on the terminal, which will connect the user to a designated device automatically.
By default, auto run is disabled.
![]() Caution:
Caution:
l If you execute this command, the user-interface can no longer be used to perform routine configurations on the local system. Therefore use caution when using this command.
Example
# Configure to automatically execute telnet 10.110.100.1 after the user logs in via VTY 0.
<H3C>system-view
System View: return to User View with Ctrl+Z.
[H3C] user-interface vty 0
[H3C-ui-vty0] auto-execute command telnet 10.110.100.1
1.1.3 command-privilege level
Syntax
command-privilege level level view view command
undo command-privilege view view command
View
System view
Parameter
level: Specifies the command level, ranging from 0 to 3.
view: Specifies the command view, which can be any of the views supported by the switch.
command: Specifies the command to be configured.
Description
Use the command-privilege level command to configure the priority of the specifically command of the specifically view.
Use the undo command-privilege view command to restore the default command priority.
The command levels include visit, monitoring, configuration, and management, which are identified as 0 through 3 respectively. An administrator assigns authorities as per user requirements and allows them to operate in corresponding views. When a user logs in to the switch, the command level that it can access depends on two points. One is the command level that the user itself can access, the other is the set command level of this user interface. If the two levels are different, the former will be taken. For example, the command level of VTY 0 user interface is 1, however, user Tom has the right to access commands of level 3; if Tom logs in from VTY 0 user interface, he can access commands of level 3 and lower.
By default, ping, tracert, and telnet are at visit level (0); display and debugging are at monitoring level (1); all the configuration commands are at configuration level (2); and FTP, TFTP and commands for file system operations are at management level (3).
Example
# Configure the precedence of the command "interface" as 0.
<H3C>system-view
System View: return to User View with Ctrl+Z.
[H3C] command-privilege level 0 view system interface
1.1.4 databits
Syntax
databits { 7 | 8 }
undo databits
View
User interface view
Parameter
7: Sets 7 data bits.
8: Sets 8 data bits.
Description
Use the databits command to configure the data bits for the user interface.
Use the undo databits command to restore the default bits of the user interface.
This command can only be performed in Console and AUX user interface view.
By default, the value is 8.
Example
# Configure the data bits of AUX port to 7 bits.
<H3C>system-view
System View: return to User View with Ctrl+Z.
[H3C] user-interface aux 0
[H3C-ui-aux0] databits 7
1.1.5 display history-command
Syntax
display history-command { Command-Number } { | { begin | include | exclude } Match-string }
View
Any view
Parameter
Command-Number: The number of history commands the user wants to query. The value range is 1 to 256.
|: Operator, indicating that a regular expression follows.
begin: Displays all commands starting from the one that matches the match string.
include: Displays only the command that matches the string.
exclude: Displays only the commands that do not match the match string.
Match-string: The regular expression to match.
Description
The display history-command command is used to query selectively the history commands. All the history commands are stored in the history command buffer. When the history command buffer is full, the oldest information in the buffer will be replaced by new information.
The number of history commands obtained through the display history-command command, Command-Number, depends on the size of the history command buffer set through the history-command max-size command, and Command-Number should not be bigger than the size of the history command buffer Max-size. If the specified Command-Number is bigger than the Max-size, all the commands in the history command buffer will be queried.
Refer to Figure 1-1.
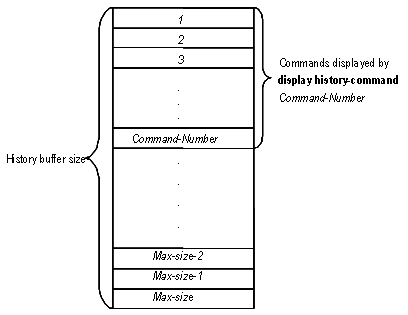
Figure 1-1 Relation between history buffer size and Command-Number
You can either specify the number of commands to be queried (Command-Number) or input a string to query commands that match the string. You can the two methods separately or in combination.
l If you only specify Command-Number, the first Command-Number pieces of commands will be displayed.
l If you specify a regular expression “| { begin | include | exclude } Match-string”, all the commands that have been successfully executed by the user and that match the regular expression.
l If you specify both the number of commands Command-Number and a regular expression “| { begin | include | exclude } Match-string”, the system will display the commands that match the regular expression among the first Command-Number pieces of commands.
Related command: history-command max-size.
Example
# Display all history commands in the buffer.
<H3C>display history-command
system-view
user-interface vty 0
user-interface vty 0 4
history-command max-size 100
quit
display vlan
display vlan all
acl name lc
interface Vlan-interface 1
ip address 10.11.113.14 24
quit
quit
# Display the first 5 commands in the history command buffer.
<H3C>display history-command 5
system-view
user-interface vty 0
user-interface vty 0 4
history-command max-size 100
quit
# Display all the buffered history commands that match the specified regular expression.
<H3C>display history-command | begin ip
ip address 10.11.113.14 24
quit
quit
display history-command
# Display all the buffered history commands that do not match the specified regular expression.
<H3C>display history-command | exclude ip
system-view
user-interface vty 0
user-interface vty 0 4
history-command max-size 100
quit
display vlan
display vlan all
acl name lc
interface Vlan-interface 1
quit
quit
display history-command
display history-command 5
display history-command | include 10\.11\.113\.14
display history-command 5
1.1.6 display user-interface
Syntax
display user-interface [ type number | number ] [ summary ]
View
Any view
Parameter
type: Specifies the type of a user interface.
number: Specifies the number of a user interface.
Summary: Displays the summary of a user interface.
Description
Use the display user-interface command to view the relational information of the user interface. This command without the summary parameter displays user interface type, absolute/relative index, transmission speed, priority, authentication methods, and physical location. This command with the summary parameter displays one user interface in use totally and user interface name etc.
Example
# Display the relational information of user interface 0.
<H3C> display user-interface 0
Idx Type Tx/Rx Modem Privi Auth Int
+ 0 CON 0 9600 - 3 N -
+ : Current user-interface is active.
F : Current user-interface is active and work in async mode.
Idx : Absolute index of user-interface.
Type : Type and relative index of user-interface.
Privi: The privilege of user-interface.
Auth : The authentication mode of user-interface.
Int : The physical location of UIs.
A: Authenticate use AAA.
N: Current UI need not authentication.
P: Authenticate use current UI's password.
Table 1-1 Description on the fields of the display user-interface command
|
Field |
Description |
|
+ |
Current user interface is in use |
|
F |
Current user interface is in use and work in asynchronous mode |
|
Idx |
Absolute index of user interface |
|
Type |
Type and relative index of user interface |
|
Tx/Rx |
User interface speed |
|
Modem |
Modem operation mode |
|
Privi |
Which levels of commands can be used after logging in from the user interface |
|
Auth |
User interface authentication method |
|
Int |
The physical location of user interfaces |
# Display the summary information of user interface 0.
<H3C> display user-interface 0 summary
0: U
1 character mode users. (U)
1 total UIs in use.
UI's name: con0
Table 1-2 Description on the fields of the display the user-interface summary command
|
Field |
Description |
|
0: U |
User interface type |
|
1 character mode users. |
One type user interface |
|
1 total UIs in use. |
One user interface in use totally |
|
UI's name |
User interface name |
1.1.7 display users
Syntax
display users [ all ]
View
Any view
Parameter
all: Displays the information of all user interfaces.
Description
Use the display users command to view the information of the user interface.
Example
# Display the information of the current user interface.
UI Delay Type Ipaddress Username
+ 0 CON 0 00:00:00
Table 1-3 Description on the fields of the display users command
|
Field |
Description |
|
+ |
Current user interface is in use and work in asynchronous mode. |
|
UI |
Number of the first list is the absolute number of user interface. Number of the second list is the relative number of user interface. |
|
Delay |
Indicates the interval from the latest input till now in seconds. |
|
Type |
User type |
|
IPaddress |
Displays initial connection location, namely the host IP address of the incoming connection. |
|
Username |
Display the name of the user using this user interface, namely the login username of the user. |
1.1.8 flow-control
Syntax
flow-control { hardware | none | software }
undo flow-control
View
User interface view
Parameter
hardware: Configures to perform hardware flow control.
none: Configures no flow control.
software: Configures to perform software flow control.
Description
Use the flow-control command to configure the flow control mode on the user interface.
Use the undo flow-control command to restore the default flow control mode.
By default, the value is none. That is, no flow control will be performed.
This command can only be performed in Console and AUX user interface view.
Example
# Configure software flow control on AUX port.
<H3C>system-view
System View: return to User View with Ctrl+Z.
[H3C] user-interface aux 0
[H3C-ui-aux0] flow-control software
1.1.9 free user-interface
Syntax
free user-interface [ type ] number
View
User view
Parameter
type: Specifies the user interface type.
number: Specifies the absolute/relative number of the user interface. Configured together with the type, it will specify the user interface number of the corresponding type. If the type is not specified, number will specify an absolute user interface number.
Description
Use the free user-interface command to release a specified user interface. The user interface will be disconnected after the command is executed.
Note that the current user interface cannot be release.
Example
# Release user interface 1 after logged in to the switch via user interface 0.
<H3C> free user-interface 1
After the command is executed, user interface 1 will be disconnected. It will not be connected to the switch until you log in via the user interface 1 for the next time.
1.1.10 header
Syntax
header [ shell | incoming | login ] text
undo header [ shell | incoming | login ]
View
System view
Parameter
login: Login information in case of authentication. It is displayed before the user is prompted to enter user name and password.
shell: User conversation established header, the information output after user conversation has been established. If authentication is required, it is prompted after the user passes authentication.
incoming: Login header, the information output after a Modem user logs in. If authentication is required, it is prompted after the user passes authentication. In this case, no shell information is output.
text: Specifies the title text. If you do not choose any keyword in the command, the system displays the login information by default. The system supports two types of input modes: one is to input all the text in one line, and altogether 256 characters, including command key word, can be input; the other is to input all the text in several lines using the <Enter> key, and altogether 1024 characters, excluding command key word, can be input. The text starts and ends with the first character. After inputting the end character, press the <Enter> key to exit the interact process.
Description
Use the header command to configure to display header when user login.
Use the undo header command to configure not to display the header.
When the user logs in to the switch, if a connection is activated, the login header will be displayed. After the user successfully logs in to the switch, the shell header will be displayed.
Note that if you press <Enter> after typing any of the three keywords shell, login and incoming in the command, then what you type after the word header is the contents of the login information, instead of identifying header type.
You can judge whether the initial character can be used as the header contents this way:
1) If there is only one character in the first line and it is used as the identifier, this initial character pairs with the ending character and is not header content.
2) If there are many characters in the first line but the initial and ending characters are different, this initial character pairs with the ending character and is header content.
3) Texts are input in multiple lines, there are many characters in the first line and the initial character is identical with the ending character, this initial character is not header content).
Example
# Configure the header of setting up a session.
Mode 1: Input in one line
<H3C>system-view
System View: return to User View with Ctrl+Z.
[H3C] header shell %SHELL: Hello! Welcome% (The starting and ending characters must be the same, and press the <Enter> key to finish a line)
When you log in to the switch again, the terminal displays the configured session establishment title.
[H3C] quit
<H3C> quit
Please press ENTER
SHELL: Hello! Welcome (The initial character “%” is not the header contents)
<H3C>
Mode 2: Input in several lines
[H3C] header shell % SHELL: (After you pressing the <Enter> key, the system prompts the following message:)
Input banner text, and quit with the character '%'.
Go on inputting the rest text and end your input with the first letter:
Hello! Welcome % (Press the <Enter> key)
[H3C]
When you log in to the switch again, the terminal displays the configured session establishment title.
[H3C] quit
<H3C> quit
Please press ENTER
%SHELL: (The initial character “%” is the header contents)
Hello! Welcome
<H3C>
1.1.11 history-command max-size
Syntax
history-command max-size value
undo history-command max-size
View
User interface view
Parameter
value: Defines the size of the history buffer, ranging from 0 to 256. By default, the size is 10, that is, 10 history commands can be saved.
Description
Use the history-command max-size command to configure the size of the history command buffer.
Use the undo history-command max-size command to restore default size of the history command buffer.
Example
# Set the history buffer to 20, namely saving 20 history commands.
<H3C>system-view
System View: return to User View with Ctrl+Z.
[H3C] user-interface aux 0
[H3C-ui-aux0] history-command max-size 20
1.1.12 idle-timeout
Syntax
idle-timeout minutes [ seconds ]
undo idle-timeout
View
User interface view
Parameter
minutes: Specifies the minute, ranging from 0 to 35791.
seconds: Specifies the second, ranging from 0 to 59.
Description
Use the idle-timeout command to configure the timeout function. If there is no user operation performed before idle-timeout expires, the user interface will be disconnected.
Use the undo idle-timeout command to restore the default idle-timeout.
idle-timeout 0 means disabling idle-timeout.
By default, idle-timeout is set to 10 minutes.
Example
# Configure the timeout value to 1 minute on the AUX user interface.
<H3C>system-view
System View: return to User View with Ctrl+Z.
[H3C] user-interface aux 0
[H3C-ui-aux0] idle-timeout 1 0
1.1.13 language-mode
Syntax
language-mode { chinese | english }
View
User view
Parameter
chinese: Configures the language environment of command line interface as Chinese.
english: Configures the language environment of command line interface as English.
Description
Use the language-mode command to switch between different language environments of command line interface for convenience of different users.
By default, the value is English.
Example
# Switch from English mode to Chinese mode.
<H3C> language-mode chinese
1.1.14 lock
Syntax
lock
View
User view
Parameter
None
Description
Use the lock command to lock the user interface to prevent unauthorized user from operating it.
Example
# Lock the current user interface.
<H3C> lock
Password: xxxx
Again: xxxx
1.1.15 modem
Syntax
modem [ call-in | both ]
undo modem [ call-in | both ]
View
User interface view
Parameter
call-in: Configures to allow call-in.
both: Configures to allow call-in and call-out.
Description
Use the modem command to configure the call-in and call-out attributes of the Modem. Use the undo modem command to cancel the configuration of Modem call-in and call-out attributes.
The modem command without parameters is used to allow call-in and call-out.
The undo modem command without parameters is used to ban call-in and call-out.
This command can only be performed in AUX user interface view.
Example
# Configure to allow call-in and call-out of Modem on the AUX port.
<H3C>system-view
System View: return to User View with Ctrl+Z.
[H3C] user-interface aux 0
[H3C-ui-aux0] modem both
1.1.16 modem auto-answer
Syntax
modem auto-answer
undo modem auto-answer
View
User interface view
Parameter
None
Description
Use the modem auto-answer command to configure the answer mode as auto-answer.
Use the undo modem auto-answer command to configure the answer mode as manual answer.
By default, the mode is set to manual answer.
This command can only be performed in AUX user interface view.
Example
# Configure the answer mode of the Modem on the AUX port as auto-answer.
<H3C>system-view
System View: return to User View with Ctrl+Z.
[H3C] user-interface aux 0
[H3C-ui-aux0] modem auto-answer
1.1.17 modem timer answer
Syntax
modem timer answer seconds
undo modem timer answer
View
User interface view
Parameter
seconds: Specifies the timer answer in seconds, ranging from 1 to 60.The default value is 30s.
Description
Use the modem timer answer command to configure the timer answer from off-hook to carrier detected when establishing the call in connection.
Use the undo modem timer answer command to restore the default timeout value.
This command can only be performed in AUX user interface view.
Example
# Set the timer answer of AUX 0 to 45s.
<H3C>system-view
System View: return to User View with Ctrl+Z.
[H3C] user-interface aux 0
[H3C-ui-aux0] modem timer answer 45
1.1.18 parity
Syntax
parity { even | mark | none | odd | space }
undo parity
View
User interface view
Parameter
even: Configures to perform even parity.
mark: Configures to perform mark parity.
none: Configures not to perform parity.
odd: Configures to perform odd parity.
space: Configures to perform space parity.
Description
Use the parity command to configure the parity mode on the user interface.
Use the undo parity command to restore the default parity mode.
This command can only be performed in Console and AUX user interface view.
By default, the mode is set to none.
Example
# Set mark parity on the AUX port.
<H3C>system-view
System View: return to User View with Ctrl+Z.
[H3C] user-interface aux 0
[H3C-ui-aux0] parity mark
1.1.19 protocol inbound
Syntax
protocol inbound { all | telnet | ssh }
View
User interface view
Parameter
all: Specifies to support all the protocols including Telnet and SSH.
ssh: Specifies to support SSH protocol only.
telnet: Specifies to support Telnet protocol only.
Description
Use the protocol inbound command to set the protocols to be used when logging in.
By default, all the protocols are set to be used for user login
Note that only the VTY type of user interfaces support protocol setting.
Related command: user-interface vty.
Example
# Set the Telnet protocol to be used for user login.
<H3C>system-view
System View: return to User View with Ctrl+Z.
[H3C] user-interface vty 0
[H3C-ui-vty0] protocol inbound telnet
1.1.20 quit
Syntax
quit
View
Any view
Parameter
None
Description
Use the quit command to return to the lower level view from the current view. If the current view is user view, you can quit the system.
There are three levels of views, which are listed from low to high as follows:
l User view
l System view
l VLAN view, Ethernet port view, and so on.
Related command: see return, system-view.
Example
# Return to user view from system view.
[H3C] quit
<H3C>
1.1.21 return
Syntax
return
View
System view or above
Parameter
None
Description
Use the return command to return to user view from a view other than user view.
Combination key <Ctrl+Z> performs the same function with the return command.
Related command: quit.
Example
# Return to user view from system view.
<H3C>system-view
System View: return to User View with Ctrl+Z.
[H3C]vlan 2
[H3C-vlan2] return
<H3C>
1.1.22 screen-length
Syntax
screen-length screen-length
undo screen-length
View
User interface view
Parameter
screen-length: Specifies how many lines can be displayed on a screen, ranging from 0 to 512. The default value is 24.
Description
Use the screen-length command to configure how many lines that can be displayed on a screen of the terminal.
Use the undo screen-length command to restore the default number of terminal information lines displayed on the terminal screen.
By default, 24 lines (including the multi-screen identifier lines) are displayed in one screen when the multi-screen display function is enabled.
The screen-length 0 command is used to disable this function.
Example
# Configure the lines that can be displayed on a screen as 20 lines.
<H3C>system-view
System View: return to User View with Ctrl+Z.
[H3C] user-interface aux 0
[H3C-ui-aux0] screen-length 20
1.1.23 send
Syntax
send { all | number | type number }
View
User view
Parameter
all: Configures to send message to all user interfaces.
type: Specifies the user interface type, which can be console, aux or vty.
number: Specifies the absolute/relative number of the user interface. If it follows type, it is a relative number. For Aux or Console user types, it can be 0 only. For VTY user type, it ranges from 0 to 4. If the type is not specified, it is an absolute number, which ranges from 0 to 6.
Description
Use the send command to send messages between different user interfaces.
Example
# Send message to all the user interfaces.
<H3C> send all
1.1.24 service-type telnet
Syntax
service-type telnet [ level level ]
undo service-type telnet
View
Local-user view
Parameter
level: Specifies which level of command a user can use after login, ranging from 0 to 3 and defaults to level 2.
Description
Use the service-type telnet command to configure which level of command a user can use after login.
Use the undo service-type telnet command to restore the default level of command a user can use after login.
Commands are classified into four levels, namely visit level, monitoring level, configuration level and management level. They are introduced as follows:
l Visit level: Commands of this level involve command of network diagnosis tool (such as ping and tracert), command of switch between different language environments of user interface ( language-mode), and telnet command etc. The operation of saving configuration file is not allowed on this level of commands.
l Monitoring level: Commands of this level, including the display command and the debugging command, are used for system maintenance, service fault diagnosis, etc. The operation of saving the configuration file is not allowed on this level of commands.
l Configuration level: Service configuration commands, including routing command and commands on each network layer, are used to provide direct network service to the user.
l Management level: These are commands that influence the basic operation of the system and system support module, which plays a supporting role on service. Commands of this level involve file system commands, FTP commands, TFTP commands, XModem downloading commands, user management commands, and level setting commands.
Example
# Configure the user zbr to use commands at level 0 after login.
System View: return to User View with Ctrl+Z.
[H3C] local-user zbr
[H3C-luser-zbr] service-type telnet level 0
1.1.25 set authentication password
Syntax
set authentication password { cipher | simple } password
undo set authentication password
View
User interface view
Parameter
cipher: Displays the current password with cipher text.
simple: Displays the current password with plain text.
password: If the authentication is in the simple mode, the password must be in plain text. If the authentication is in the cipher mode, the password can be either in encrypted text or in plain text. The result is determined by the input. A plain text password is a sequential character string of no more than 16 digits, for example, test918. The length of an encrypted password must be 24 digits and in encrypted text, for example, _(TT8F]Y\5SQ=^Q`MAF4<1!!.
Description
Use the set authentication password command to configure the password for local authentication.
Use the undo set authentication password command to cancel local authentication password.
The password in plain text is required when performing authentication, regardless whether the configuration is plain text or encrypted text.
& Note:
By default, password is required to be set for authenticating local users and remote Modem users log in via the AUX port, and Telnet users log in through Ethernet port. If no password has been set, the following prompt will be displayed “Login password has not been set.”
Example
# Configure the local authentication password on VTY 0 to aaa.
<H3C>system-view
System View: return to User View with Ctrl+Z.
[H3C] user-interface vty 0
[H3C-ui-vty0] set authentication password simple aaa
1.1.26 shell
Syntax
shell
undo shell
View
User interface view
Parameter
None
Description
Use the shell command to enable terminal service of a user interface.
Use the undo shell command to disable the terminal service of a user interface.
By default, terminal service is enabled.
When using the undo shell command, note the following points.
l The undo shell command can only be used on the user interfaces other than the Console user interface.
l You cannot use this command on the user interface via which you log in.
l You will be asked to confirm before executing this command on any legal user interface.
Example
# Disable terminal service on the vty user interface 0 to 4 after logging in to the switch via user interface 0.
<H3C>system-view
System View: return to User View with Ctrl+Z.
[H3C] user-interface vty 0 4
[H3C-ui-vty0-4] undo shell
1.1.27 speed
Syntax
speed speed-value
undo speed
View
User interface view
Parameter
speed-value: Specifies the transmission rate on the user interface in bit/s, which can be 300, 600, 1200, 2400, 4800, 9600, 19200, 38400, 57600, or 115200. The default rate is 9600bit/s.
Description
Use the speed command to configure the transmission rate on the user interface.
Use the undo speed command to restore the default rate.
This command can only be performed in Console and AUX user interface view.
Note that AUX user interface does not support the transmission rate: 57600bit/s and 115200bit/s.
Example
# Configure the transmission speed on the AUX port as 9600bit/s.
<H3C>system-view
System View: return to User View with Ctrl+Z.
[H3C] user-interface aux 0
[H3C-ui-aux0] speed 9600
1.1.28 stopbits
Syntax
stopbits { 1 | 1.5 | 2 }
undo stopbits
View
User interface view
Parameter
1: Sets 1 stop bit.
1.5: Sets 1.5 stop bits.
2: Sets 2 stop bits.
Description
Use the stopbits command to configure the stop bits on the user interface.
Use the undo stopbits command to restore the default stop bits.
This command can only be performed in Console and AUX user interface view.
By default, the value is 1.
Note that setting 1.5 stop bits is not available on H3C S9500 Series Routing Switches at present.
Example
# Set stop bits to 2.
<H3C>system-view
System View: return to User View with Ctrl+Z.
[H3C] user-interface aux 0
[H3C-ui-aux0] stopbits 2
1.1.29 super
Syntax
super [ level ]
View
User view
Parameter
level: User level, ranging 0 to 3. The default value is 3.
Description
Use the super command to enable the user to change to user level from the current user level. If the user has set the super password [ level level ] { simple | cipher } password, then user password of the higher level is needed, or the former user level will not change.
Login users are classified into four levels that correspond to the four command levels respectively. After users of different levels log in, they can only use commands at the levels that are equal to or lower than its own level.
Related command: super password, quit.
Example
# change to user level 3 from the current user level.
<H3C> super 3
Password:
1.1.30 super password
Syntax
super password [ level level ] { simple | cipher } password
undo super password [ level level ]
View
System view
Parameter
level: Specifies the entering password of the specified priority, ranging from 1 to 3. The default value is 3, i.e. do not specify user level. It means the password to be set is used for entering level 3.
simple: Displays the current password with plain text.
cipher: Displays the current password with cipher text.
password: If the authentication is in the simple mode, the password must be in plain text. If the authentication is in the cipher mode, the password can either be in encrypted text or in plain text. The result is determined by the input. A plain text password is a sequential character string of no more than 16 digits, for example, test918. The length of an encrypted password must be 24 digits and in encrypted text, for example, _(TT8F]Y\5SQ=^Q`MAF4<1!!.
Description
Use the super password command to configure the password for changing the user from a lower level to a higher level. In order to prevent unauthorized users from illegal intrusion, user ID authentication is performed when users switch from a lower level to a higher level. For the sake of confidentiality, on the screen the user cannot see the password that he entered. Only when correct password is input for three times, can the user switch to the higher level. Otherwise, the original user level will remain unchanged. Use the undo super password command to cancel the current settings.
The password in plain text is required when performing authentication, regardless whether the configuration is plain text or encrypted text.
Example
# Configure the password to zbr for changing the user from the current level to level 3.
<H3C>system-view
System View: return to User View with Ctrl+Z.
[H3C] super password level 3 simple zbr
1.1.31 sysname
Syntax
sysname text
undo sysname
View
System view
Parameter
text: Specifies the hostname with a character string, ranging from 1 to 30 characters. The default name is H3C.
Description
Use the sysname command to configure the hostname of the switch.
Use the undo sysname command to restore the default hostname.
Changing the hostname of the switch will affect the prompt of command line interface. For example, if the hostname of the switch is H3C, the prompt in user view will be <H3C>.
Example
# Configure the hostname of switch to Switch.
<H3C>system-view
System View: return to User View with Ctrl+Z.
[H3C] sysname Switch
[Switch]
1.1.32 system-view
Syntax
system-view
View
User view
Parameter
None
Description
Use the system-view command to enter system view from user view.
Related command: quit, return.
Example
# Enter system view from user view.
<H3C> system-view
System View: return to User View with Ctrl+Z..
[H3C]
1.1.33 telnet
Syntax
telnet [ vpn-instance vpn-instance-name ] { hostname | ip-address } [ service-port ]
View
User view
Parameter
vpn-instance vpn-instance-name: Specifies vpn-instance of MPLS VPN.
hostname: Specifies the host name of the remote system. It is configured using the ip host command.
ip-address: Specifies the IP address of the remote switch.
service-port: Designates the TCP port on the remote switch providing Telnet service, ranging from 0 to 65535.
Description
Use the telnet command to log in to another switch from the current one via telnet for remote management. To terminate the Telnet login, press <Ctrl+K>.
By default, when the service-port is not specified, the default telnet port number is 23.
Related command: display tcp status.
Example
# Log in to switch H3C2 at 129.102.0.1 from the current H3C1 switch.
<H3C1> telnet 129.102.0.1
Trying 129.102.0.1...
Press CTRL+K to abort
Connected to 129.102.0.1...
<H3C2>
1.1.34 user-interface
Syntax
user-interface [ type ] first-number [ last-number ]
View
System view
Parameter
type: Specifies the user interface type, which can be aux, console or vty.
first-number: Specifies the number of the first user interface to be configured. It must be an integer in the range of 0 to 6.
last-number: Specifies the number of the last user interface to be configured. It must be an integer in the range of 1 to 6 and it must be greater than the value of first-number.
Description
Use the user-interface command to enter single user interface view to configure the corresponding user interfaces.
Example
# Enter vty 0 user interface view for configuration.
<H3C>system-view
System View: return to User View with Ctrl+Z.
[H3C] user-interface vty 0
1.1.35 user privilege level
Syntax
user privilege level level
undo user privilege level
View
User interface view
Parameter
level: Specifies which level of command a user can use after login from the specifically user interface, ranging from 0 to 3.
Description
Use the user privilege level command to configure which level of command a user can use after login from the specifically user interface, so that a user can use all the available commands at this level.
Use the undo user privilege level command to restore the default level of command a user can use after login from the specifically user interface.
By default, a user can access the commands at Level 3 after logging in through the Console user interface, and the commands at Level 0 after logging in through the AUX or VTY user interface.
Example
# Configure to use commands level 0 after logging in from VTY 0 user interface.
<H3C>system-view
System View: return to User View with Ctrl+Z.
[H3C] user-interface vty 0
[H3C-ui-vty0] user privilege level 0
# After you telnet from VTY 0 user interface to the switch, you will view the terminal only displays commands at level 0.
<H3C> ?
User view commands:
debugging Enable system debugging functions
language-mode Specify the language environment
ping Ping function
quit Exit from current command view
super Privilege current user a specified priority level
telnet Establish one TELNET connection
tracert Trace route function
undo Cancel current setting
Chapter 2 Password Control Configuration Commands
2.1 Password Control Configuration Commands
2.1.1 display password-control
Syntax
display password-control
View
Any view
Parameter
None
Description
The display password-control command is used to view the password control information for all users, including the enabled/disabled state of password aging, the aging time, the enabled/disabled state of the minimum password length limitation and the configured minimum password length, the enabled/disabled state of history password recording, the alert time before password expiration, the timeout time for password authentication, the maximum number of password input attempts, the maximum number of history password records, the processing mode after failed password input attempts, the time when the password history was last cleared, and so on
Example
# Display the information about the current password control for all users.
<H3C> display password-control
Global password settings for all users:
Password aging: Disabled
Password length: Disabled
Password history: Disabled
Password alert-before-expire : 7 days
Password authentication-timeout : 60 seconds
Password attempt times : 3 times
Password attempt-failed action : Lock for 120 minutes
2.1.2 display password-control blacklist
Syntax
display password-control blacklist [ username username | ipaddress ipaddress ]
View
Any view
Parameter
username:user name added into the blacklist.
ipaddress:user IP address added into the blacklist.
Description
Use the display password-control blacklist command to view the user information added into the backlist based on the user name or IP address after failed attempts of entering passwords.
Example
# Display the information of all users added into the blacklist after failed attempts of entering passwords.
<H3C> display password-control blacklist
USERNAME IP
Jack 10.1.1.2
The number of users in blacklist is :1
2.1.3 display password-control super
Syntax
display password-control super
View
Any view
Parameter
None
Description
Use the display password-control super command to view the password control information for super passwords, including password aging time and the minimum password length.
Example
# Display the super password control information.
<H3C> display password-control super
Super's password settings:
Password Aging : Enabled(10 days)
Password Length: Enabled(10 Characters)
2.1.4 password
Syntax
password
View
Local user view
Parameter
None
Description
Use the password command to configure a system login password. To change a password, just log in to the switch and carry out this command.
For related configuration, refer to password-control.
Example
# Set the system login password to 9876543210.
<H3C>system-view
System View: return to User View with Ctrl+Z.
[H3C]local-user test
[H3C-luser-test]password
Password:**********
confirm:**********
# change the system login password to 0123456789.
[H3C-luser-test]password
Password:**********
Confirm :**********
Updating password-file ,please waiting ...
2.1.5 password-control
Syntax
password-control { aging aging-time | length length | login-attempt login-times [ exceed { lock | unlock | locktime
[ time ] } ]
| history max-record-num | alert-before-expire alert-time | authentication-timeout authentication-timeout }
undo password-control { aging | length | login-attempt | history | alert-before-expire | authentication-timeout | exceed { lock | unlock | locktime } }
View
System view
Parameter
aging-time: Configures the system password aging time. Value range 1 to 365 days, and the default value is 90 days.
Length: Configures the minimum password length. The value range is 4 to 32 characters, and the default value is 10 characters.
login-Times: Configures the maximum number of login attempts for each user. The value range is 2 to 10, and the default value is 3.
max-record-num: Configures the maximum number of history password records for each user. The value range is 2 to 10; default: 4.
alert-time: Configures the alert time before password expiration. The value range is 1 to 30 days, and the default value is 7 days.
authentication-timeout: Configures the timeout time for user authentication; The value range is 30 to 120 seconds, and the default value is 60 seconds.
Exceed: Configures the processing mode after failed login attempts.
Lock: Locks the login user so that the user will not be able to log in to the switch until the administrator removes the user from the blacklist manually.
locktime [ time ]: Specifies the time during which the user is locked. The value range is 3 to 360 seconds, and the default value is 120 seconds. A locked user can log in to the switch again after the configured lock time.
Unlock: The user can still log in after failed login attempts, without being locked.
The default processing mode is the locktime mode after password authentication fails. Namely, the system will lock the user, and allow the user to log in to the switch after the configured period of time.
Description
Use the password-control aging aging-time command to configure the aging time for system login passwords. This command can also be carried out in the local user view.
Use the password-control length length command to configure the minimum length for the system login passwords. This command can also be carried out in the local user view.
Use the password-control login-attempt login-times command to configure the number of password attempts allowed for each user.
Use the password-control history max-record-num command to configure the maximum number of history password records allowed for each user.
Use the password-control alert-before-expire alert-time command to configure the alert time before password expiration.
Use the password-control authentication-timeout authentication-timeout command to configure the timeout time for user password authentication.
Use the password-control login-attempt attempt-time exceed command to configure the processing mode used after password attempt fails.
Example
# Configure the aging time of the system login passwords to 100 days.
<H3C>system-view
System View: return to User View with Ctrl+Z.
[H3C] password-control aging 100
# Configure the minimum length of the system login passwords to 8 characters.
[H3C] password-control length 8
# Configure the number of password attempts allowed for each user to 5.
[H3C] password-control login-attempt 5
# Configure the maximum number of history password records allowed for each user to 10.
[H3C] password-control history 10
# Configure the alert time so that users are alerted 7 days before their passwords expire.
[H3C] password-control alert-before-expire 7
# Configure the timeout time of the user password authentication to 100 seconds.
[H3C] password-control authentication-timeout 100
# Configure the processing mode so that the system locks the user after failed password authentication attempts and allow the user to log in to the switch again 360 minutes later.
[H3C] password-control login-attempt 3 exceed locktime 360
2.1.6 password-control enable
Syntax
password-control { aging | length | history } enable
undo password-control { aging | length | history } enable
View
System view
Parameter
None
Description
Use the password-control enable commands to enable the password control function of the system. The specific usage is as follows:
Use the password-control aging enable command to enable password aging. By default, the password aging time is 90 days.
Use the password-control length enable command to enable the limitation of the minimum password length. By default, the minimum password length is 10 characters.
Use the password-control history enable command to enable history password recording. When a login password expires, the system will require the user to input a new password and will save the old password automatically to a file in the flash memory. By recording the history passwords, the system can prevent the user from using a single password or repeated passwords when modifying a password, thus to enhance the security.
Use the undo password-control { aging | length | history } enable command to disable password control.
By default, all the above-mentioned password control functions are enabled.
Related command: password-control.
Example
# Enable password aging.
[H3C]password-control aging enable
Password aging enabled for all users. Default: 90 days.
# Enable the limitation of the minimum password length.
[H3C]password-control length enable
Password minimum length enabled for all users. Default: 10 characters.
# Disable password aging.
[H3C]undo password-control aging
Password aging disabled for all users.
# Enable history password recording.
[H3C]password-control history enable
Password history enabled for all users.
# Disable history password recording.
[H3C]undo password-control history
Password history disabled for all users.
2.1.7 password-control super
Syntax
password-control super { aging aging-time | length min-length }
undo password-control super { aging | length }
View
System view
Parameter
aging-time: Specifies the aging time for super passwords. The value range is 1 to 365 days and the default value is 90 days.
min-length: Specifies the minimum length for super passwords. It ranges from 4 to 16 characters, and the default value is 10 characters.
Description
Use the password-control super command to configure some password control parameters for super commands, including the password aging time and the minimum password length. Use the undo password-control super command to restore the default settings.
Example
# Set the password aging time for super commands to 10 days.
<H3C> system-view
System View: return to User View with Ctrl+Z.
[H3C] password-control super aging 10
2.1.8 reset password-control history-record
Syntax
reset password-control history-record [ username username ]
View
User view
Parameter
Username: Specifies a user whose history password record will be deleted.
Description
Use the reset password-control history-record command to delete the history password records of all users. Use the reset password-control history-record username username command to delete the history password record of a specified user.
After the history password record of a user is deleted, the configuration of a new password will not be restricted by the previously configured history password records.
Example
# Delete the history password records of all users.
<H3C> reset password-control history-record
Are you sure to delete all the history record?[Y/N]
If you type "Y", the system will delete the history password records of all users and gives the following prompt:
Updating the password file, please wait...
All historical passwords have been cleared.
# Delete the history password records of user named test.
<H3C> reset password-control history-record user-name test
Are you sure to delete all the history record of user test ?[Y/N]
If you type "Y", the system will delete all the history password records of the specified user and gives the following prompt:
Updating the password file, please wait...
All historical passwords of this user have been cleared.
2.1.9 reset password-control history-record super
Syntax
reset password-control history-record super [ level level-value ]
View
User view
Parameter
level-value: Specifies to delete the history records of super passwords of users at a certain level. The value range is 1 to 3.
Description
Use the reset password-control history-record super level level-value command to delete the history records of the super passwords for the users at the specified level.
Use the reset password-control history-record super command to delete the history records of all super passwords.
After the history password record of a user is deleted, the configuration of a new password will not be restricted by the previously configured history password records.
Example
# Delete the history records of super passwords for the users at level 2.
<H3C>reset password-control history-record super level 2
Are you sure to clear the specified-level super password history records?[Y/N]
If you type "Y", the system will delete the history records of super passwords for users at level 2.
2.1.10 reset password-control blacklist
Syntax
reset password-control blacklist [ username username ]
View
User view
Parameter
username username: Specified a user name.
Description
Use the reset password-control blacklist command to remove all the users from the blacklist.
Use the reset password-control blacklist username username command to remove the specified user from the blacklist.
Example
# Check the user information in the blacklist. Suppose the blacklist contains three users: test, tes, and test2.
<H3C> display password-control blacklist
USERNAME IP
test 192.168.30.25
tes 192.168.30.24
test2 192.168.30.23
# Remove user “test” from the blacklist.
<H3C> reset password-control blacklist user-name test
Are you sure to delete the blacklist-users ?[Y/N]y
All the blacklist users have been cleared.
# Check the current user information in the blacklist and verify that user “test” has been removed.
<H3C> display password-control blacklist
USERNAME IP
tes 192.168.30.24
test2 192.168.30.23
