- Table of Contents
-
- 13-Network Management and Monitoring Configuration Guide
- 00-Preface
- 01-System Maintenance and Debugging Configuration
- 02-NQA Configuration
- 03-NTP Configuration
- 04-Clock Monitoring Configuration
- 05-IPC Configuration
- 06-SNMP Configuration
- 07-RMON Configuration
- 08-CWMP Configuration
- 09-Sampler Configuration
- 10-Mirroring Configuration
- 11-Protocol Packet Statistics Configuration
- 12-sFlow Configuration
- 13-Information Center Configuration
- Related Documents
-
| Title | Size | Download |
|---|---|---|
| 13-Information Center Configuration | 211.31 KB |
Configuring the information center
Classification of system information
System information channels and output destinations
Default output rules of system information
Configuring information center
Information center configuration task list
Outputting the system information to the console
Outputting the system information to a monitor terminal
Outputting the system information to a log host
Outputting the system information to the trap buffer
Outputting the system information to the log buffer
Outputting the system information to the SNMP module
Outputting system information to the web interface
Saving the system information to a log file
Configuring synchronous information output
Disabling an interface from generating link up/down logging information
Displaying and maintaining information center
Information center configuration examples
Outputting log information to the console
|
|
NOTE: The switch operates in IRF or standalone (the default) mode. For more information about the IRF mode, see IRF Configuration Guide. |
Overview
Introduction
The information center classifies and manages system information for network administrators and developers to monitor network performance and troubleshoot network problems.
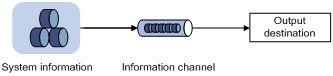
The following describes the working process of information center:
1. Receives system information including log, trap, and debugging information generated by each module.
2. Outputs the information to different information channels according to output rules.
3. Outputs information to different destinations based on the information channel-to-destination associations.
Figure 1 Information center diagram
|
|
NOTE: By default, the information center is enabled. The information center affects system performance to some degree when processing large amounts of information. If the system resources are insufficient, disable the information center to save resources. |
Classification of system information
The system information falls into the following types:
· Log information—Describes user operations and interface statue changes.
· Trap information—Describes switch faults such as authentication and network failures.
· Debugging information—Displays switch running status for operators to perform switch diagnosis and locate network failures.
Source modules refer to protocol modules, board drivers, and configuration modules which generate system information. You can classify, filter, and output system information based on source modules. To view the supported source modules, use the info-center source ? command.
System information levels
The system information is classified into eight severity levels from 0 through 7 in descending order. The switch outputs the system information with a severity level higher than or equal to the specified level. For example, if you configure an output rule with a severity value of 6 (informational), the information with a severity value from 0 to 6 will be output.
Table 1 System information levels
|
Severity |
Severity value |
Description |
Corresponding keyword in commands |
|
Emergency |
0 |
System is unusable, such as the system authorization has expired. |
emergencies |
|
Alert |
1 |
Action must be taken immediately, such as traffic on the interface exceeds the upper limit. |
alerts |
|
Critical |
2 |
Critical conditions, such as the switch temperature exceeds the upper limit, the power module fails, and the fan tray fails. |
critical |
|
Error |
3 |
Error conditions, such as link state changes and a storage card is unplugged. |
errors |
|
Warning |
4 |
Warning conditions, such as logging in to the switch through the web interface and not enough memory. |
warnings |
|
Notice |
5 |
Normal but significant condition, such as logging in to the switch through a terminal and the switch reboots. |
notifications |
|
Informational |
6 |
Informational messages, such as records of input commands and logs of the ping command. |
informational |
|
Debug |
7 |
Debug-level messages |
debugging |
System information channels and output destinations
The system supports ten channels. By default, channels 0 through 6, and channel 9 are configured with channel names and output destinations. You can change their default settings with commands as needed. You can also configure channels 7 and 8 and associate them with output destinations to meet your needs.
Table 2 Default information channels and output destinations
|
Information channel number |
Default channel name |
Default output destination |
System information received by default |
|
0 |
console |
Console |
Log, trap and debugging information |
|
1 |
monitor |
Monitor terminal |
Log, trap and debugging information |
|
2 |
loghost |
Log host |
Log, trap and debugging information |
|
3 |
trapbuffer |
Trap buffer |
Trap information |
|
4 |
logbuffer |
Log buffer |
Log and debugging information. |
|
5 |
snmpagent |
SNMP module |
Trap information |
|
6 |
channel6 |
Web interface |
Log information |
|
7 |
channel7 |
Not specified |
Log, trap, and debugging information |
|
8 |
channel8 |
Not specified |
Log, trap, and debugging information |
|
9 |
channel9 |
Log file |
Log, trap, and debugging information |
|
|
NOTE: · You can use the info-center channel name command to change the name of an information channel. · Each output destination receives information from only one information channel, but each information channel can output information to multiple output destinations. |
Default output rules of system information
The output rules specify the output destination, information type, and severity.
Table 3 Default output rules
|
Output destination |
System information source |
Log |
Trap |
Debug |
|||
|
Enabled/disabled |
Severity |
Enabled/disabled |
Severity |
Enabled/disabled |
Severity |
||
|
Console |
All supported modules |
Enabled |
Informational |
Enabled |
Debug |
Enabled |
Debug |
|
Monitor terminal |
All supported modules |
Enabled |
Informational |
Enabled |
Debug |
Enabled |
Debug |
|
Log host |
All supported modules |
Enabled |
Informational |
Enabled |
Debug |
Disabled |
Debug |
|
Trap buffer |
All supported modules |
Disabled |
Informational |
Enabled |
Informational |
Disabled |
Debug |
|
Log buffer |
All supported modules |
Enabled |
Informational |
Disabled |
Debug |
Disabled |
Debug |
|
SNMP module |
All supported modules |
Disabled |
Debug |
Enabled |
Informational |
Disabled |
Debug |
|
Web interface |
All supported modules |
Enabled |
Debug |
Enabled |
Debug |
Disabled |
Debug |
|
Log file |
All supported modules |
Enabled |
Debug |
Enabled |
Debug |
Disabled |
Debug |
System information format
|
|
NOTE: · The following shows the original format of system information, which may be different from what. you see. The format depends on the log resolution tool you use. · The format of system information displayed on the web interface depends on the web interface. |
Format
The format of system information varies with the output destinations.
Table 4 System information format
|
Output destination |
Format |
Example |
|
Console, monitor terminal, logbuffer, trapbuffer, SNMP module, or log file |
timestamp sysname module/level/digest: content |
%Jun 26 17:08:35:809 2008 Sysname SHELL/4/LOGIN: VTY login from 1.1.1.1. |
|
Log host |
·
H3C format: ·
UNICOM format: |
·
H3C format: ·
UNICOM format: |
Field description
|
Field |
Description |
|
PRI (priority) |
The priority is calculated using the formula: facility*8+severity · facility represents the logging facility name and can be configured with the info-center loghost command. The facility is used to mark different log sources on the log host, and query and filter the logs from log sources. · The severity value ranges from 0 to 7. Table 1 describes the severities in detail. Note that the priority field is available only for information sent to the log host. |
|
timestamp |
Times tamp records the time when the system information was generated. The time stamp of the system information sent to the log host has a precision of seconds, and that to all the other destinations has a precision of milliseconds. The time stamp format of the system information sent to the log host is configured with the info-center timestamp loghost command, and that of the system information sent to the other destinations is configured with the info-center timestamp command. For system information destined to destinations except for the log host: · If the time stamp starts with a percent sign (%), the information is log information · If the time stamp starts with a pound sign (#), the information is trap information · If the time stamp starts with an asterisk (*), the information is debugging information For more information about time stamp format, see Table 5. |
|
Sysname (host name or host IP address) |
· If the system information sent to a log host is in the UNICOM format, and the info-center loghost source command is configured, or the vpn-instance vpn-instance-name option is provided in the info-center loghost command, the sysname field is displayed as the IP address of the switch that generated the system information. · When the system information sent is in the H3C format, the field is displayed as the system name of the switch that generated the system information. You can use the sysname command to modify the local system name. For more information, see Fundamentals Command Reference. |
|
%% (vendor ID) |
This field indicates that the information is generated by an H3C device. It is displayed only when the system information is sent to a log host in the format of H3C. |
|
vv |
This field identifies the version of syslog, and has a value of 10. It is displayed only when the output destination is the log host. |
|
module |
The module field represents the name of the module that generated the system information. You can enter the info-center source ? command in system view to view the module list. |
|
level (severity) |
System information is divided into eight severity levels, from 0 to 7. See Table 1 for more information about these severity levels. You cannot change the system information levels generated by modules. You can use the info-center source command to control the output of system information based on severity levels. |
|
digest |
The digest field contains a string of up to 32 characters. It briefly describes the contents of the system information. For system information destined to the log host: · If the character string ends with (l), the information is log information · If the character string ends with (t), the information is trap information · If the character string ends with (d), the information is debugging information |
|
serial_number |
This field indicates the serial number of the switch that generated the system information. It is displayed only when the system information sent to the log host is in the UNICOM format. |
|
source |
This field indicates the source of the information. It is optional and is displayed only when the system information is sent to a log host in the format of H3C. This field takes one of the following values: · Slot number of a board · IRF member ID · IRF member ID and board slot number · Source IP address of the log sender |
|
content |
This field provides the content of the system information. |
Table 5 Description of the time stamp format
|
Time stamp format |
Description |
Example |
|
boot |
Time since system startup, in the format of xxx.yyy. xxx represents the higher 32 bits, and yyy represents the lower 32 bits. System information sent to all destinations except log host supports this parameter. |
%0.109391473 Sysname FTPD/5/FTPD_LOGIN: User ftp (192.168.1.23) has logged in successfully. 0.109391473 is a time stamp in the boot format. |
|
date |
Current date and time, in the format of mm dd hh:mm:ss:xxx yyy. System information sent to all destinations supports this parameter. |
%May 30 05:36:29:579 2003 Sysname FTPD/5/FTPD_LOGIN: User ftp (192.168.1.23) has logged in successfully. May 30 05:36:29:579 2003 is a time stamp in the date format. |
|
iso |
Time stamp format stipulated in ISO 8601. Only the system information sent to the log host supports this parameter. |
<189>2003-05-30T06:42:44 Sysname %%10FTPD/5/FTPD_LOGIN(l): User ftp (192.168.1.23) has logged in successfully. 2003-05-30T06:42:44 is a time stamp in the iso format. |
|
none |
No time stamp is included. System information sent to all destinations supports this parameter. |
% Sysname FTPD/5/FTPD_LOGIN: User ftp (192.168.1.23) has logged in successfully. No time stamp is included. |
|
no-year-date |
Current date and time without year information, in the format of mm dd hh:mm:ss:xxx. Only the system information sent to the log host supports this parameter. |
<189>May 30 06:44:22 Sysname %%10FTPD/5/FTPD_LOGIN(l): User ftp (192.168.1.23) has logged in successfully. May 30 06:44:22 is a time stamp in the no-year-date format. |
Configuring information center
Information center configuration task list
Complete the following tasks to configure information center:
|
Task |
Remarks |
|
Optional |
|
|
Optional |
|
|
Optional |
|
|
Optional |
|
|
Optional |
|
|
Optional |
|
|
Optional |
|
|
Optional |
|
|
Optional |
|
|
Disabling an interface from generating link up/down logging information |
Optional |
|
|
NOTE: Configurations for the information output destinations function independently. |
Outputting the system information to the console
Outputting the system information to the console
|
Step |
Command |
Remarks |
|
1. Enter system view. |
system-view |
N/A |
|
2. Enable information center. |
info-center enable |
Optional. Enabled by default. |
|
3. Name the channel with a specified channel number. |
info-center channel channel-number name channel-name |
Optional. See Table 2 for the default channel names. |
|
4. Configure the channel through which system information can be output to the console. |
info-center console channel { channel-number | channel-name } |
Optional. By default, system information is output to the console through channel 0 (known as console). |
|
5. Configure the output rules of system information. |
info-center source { module-name | default } channel { channel-number | channel-name } [ debug { level severity | state state } * | log { level severity | state state } * | trap { level severity | state state } * ] * |
Optional. |
|
6. Configure the format of the time stamp. |
info-center timestamp { debugging | log | trap } { boot | date | none } |
Optional. The time stamp format for log, trap and debugging information is date by default. |
Enabling display of the system information on the console
After setting to output system information to the console, you need to enable the associated display function to display the output information on the console.
To enable the display of system information on the console (in user view):
|
Step |
Command |
Remarks |
|
1. Enable the monitoring of system information on the console. |
terminal monitor |
Optional. Enabled on the console by default. |
|
2. Enable the display of system information on the console. |
· Enable the display of debugging information on the console: · Enable the display of log information on the console: · Enable the display of trap information on the console: |
Optional. |
Outputting the system information to a monitor terminal
The system information can be output to a monitor terminal, which is a user terminal that has login connections through the AUX, VTY, or TTY user interface.
Outputting the system information to a monitor terminal
|
Step |
Command |
Remarks |
|
1. Enter system view. |
system-view |
N/A |
|
2. Enable information center. |
info-center enable |
Optional. Enabled by default. |
|
3. Name the channel with a specified channel number. |
info-center channel channel-number name channel-name |
Optional. See Table 2 for the default channel names. |
|
4. Configure the channel through which system information can be output to a monitor terminal. |
info-center monitor channel { channel-number | channel-name } |
Optional. By default, system information is output to the monitor terminal through channel 1 (known as monitor). |
|
5. Configure the output rules of the system information. |
info-center source { module-name | default } channel { channel-number | channel-name } [ debug { level severity | state state } * | log { level severity | state state } * | trap { level severity | state state } * ] * |
Optional. |
|
6. Configure the format of the time stamp. |
info-center timestamp { debugging | log | trap } { boot | date | none } |
Optional. By default, the time stamp format for log, trap and debugging information is date. |
Enabling display of the system information on a monitor terminal
After setting to output system information to a monitor terminal, you need to enable the associated display function in order to display the output information on the monitor terminal.
To enable the display of system information on a monitor terminal (in user view):
|
Step |
Command |
Remarks |
|
1. Enable the monitoring of system information on a monitor terminal. |
terminal monitor |
Disabled on the monitor terminal by default. You need to first execute this command, and then you can enable the display of debugging, log, and trap information on the monitor terminal. |
|
2. Enable the display of system information on a monitor terminal. |
· Enable the display of debugging information on a monitor terminal: · Enable the display of log information on a monitor terminal: · Enable the display of trap information on a monitor terminal: |
Optional. |
|
|
NOTE: For more information about terminal access, see Terminal Access Configuration Guide. |
Outputting the system information to a log host
|
Step |
Command |
Remarks |
|
1. Enter system view. |
system-view |
N/A |
|
2. Enable information center. |
info-center enable |
Optional. Enabled by default. |
|
3. Name the channel with a specified channel number. |
info-center channel channel-number name channel-name |
Optional. See Table 2 for default channel names. |
|
4. Configure the output rules of the system information. |
info-center source { module-name | default } channel { channel-number | channel-name } [ debug { level severity | state state } * | log { level severity | state state } * | trap { level severity | state state } * ] * |
Optional. |
|
5. Specify the source IP address for the log information. |
info-center loghost source interface-type interface-number |
Optional. By default, the source interface is determined by the matched route, and the primary IP address of this interface is the source IP address of the log information. |
|
6. Configure the format of the time stamp for system information output to the log host. |
info-center timestamp loghost { date | iso | no-year-date | none } |
Optional. date by default. |
|
7. Set the format of the system information sent to a log host. |
· Set the format to UNICOM: · Set the format to H3C: |
Optional. Use either approach H3C by default. |
|
8. Specify a log host and configure the related output parameters. |
info-center loghost [ vpn-instance vpn-instance-name ] { host-ipv4-address | ipv6 host-ipv6-address } [ port port-number ] [ channel { channel-number | channel-name } | facility local-number ] * |
By default, the system does not output information to a log host. If you specify to output system information to a log host without providing the channel, the system uses channel 2 (loghost) by default. Support for the ipv6 and vpn-instance keywords depends on the device model. The value of the port-number argument should be the same as the value configured on the log host, otherwise, the log host cannot receive system information. |
Outputting the system information to the trap buffer
|
|
NOTE: The trap buffer receives only the trap information, and discards the other types of information. |
To set to output the system information to the trap buffer:
|
Step |
Command |
Remarks |
|
1. Enter system view. |
system-view |
N/A |
|
2. Enable information center. |
info-center enable |
Optional. Enabled by default. |
|
3. Name the channel with a specified channel number. |
info-center channel channel-number name channel-name |
Optional. See Table 2 for the default channel names. |
|
4. Configure the channel through which system information can be output to the trap buffer and specify the buffer size. |
info-center trapbuffer [ channel { channel-number | channel-name } | size buffersize ] * |
Optional. By default, system information is output to the trap buffer through channel 3 (known as trapbuffer) and the default buffer size is 256. |
|
5. Configure the output rules of the system information. |
info-center source { module-name | default } channel { channel-number | channel-name } [ debug { level severity | state state } * | log { level severity | state state } * | trap { level severity | state state } * ] * |
Optional. |
|
6. Configure the format of the time stamp. |
info-center timestamp { debugging | log | trap } { boot | date | none } |
Optional. The time stamp format for log, trap and debugging information is date by default. |
Outputting the system information to the log buffer
|
|
NOTE: You can configure to output log, trap, and debugging information to the log buffer, but the log buffer receives the log and debugging information only, and discards the trap information. |
|
Step |
Command |
Remarks |
|
1. Enter system view. |
N/A |
|
|
2. Enable information center. |
info-center enable |
Optional. Enabled by default. |
|
3. Name the channel with a specified channel number. |
info-center channel channel-number name channel-name |
Optional. See Table 2 for the default channel names. |
|
4. Configure the channel through which system information can be output to the log buffer and specify the buffer size. |
info-center logbuffer [ channel { channel-number | channel-name } | size buffersize ] * |
Optional. By default, system information is output to the log buffer through channel 4 (known as logbuffer) and the default buffer size is 512. |
|
5. Configure the output rules of the system information. |
info-center source { module-name | default } channel { channel-number | channel-name } [ debug { level severity | state state } * | log { level severity | state state } * | trap { level severity | state state } * ] * |
Optional. |
|
6. Configure the format of the time stamp. |
info-center timestamp { debugging | log | trap } { boot | date | none } |
Optional. The time stamp format for log, trap and debugging information is date by default. |
Outputting the system information to the SNMP module
|
|
NOTE: The SNMP module receives the trap information only, and discards the log and debugging information even if you have configured to output them to the SNMP module. |
To monitor the device running status, trap information is usually sent to the SNMP network management system (NMS). In this case, you need to configure to send traps to the SNMP module, and then set the trap sending parameters for the SNMP module to further process traps. For more information, see the chapter “SNMP configuration.”
To configure to output system information to the SNMP module:
|
Step |
Command |
Remarks |
|
1. Enter system view. |
system-view |
N/A |
|
2. Enable information center. |
info-center enable |
Optional. Enabled by default |
|
3. Name the channel with a specified channel number. |
info-center channel channel-number name channel-name |
Optional. See Table 2 for the default channel names. |
|
4. Configure the channel through which system information can be output to the SNMP module. |
info-center snmp channel { channel-number | channel-name } |
Optional. By default, system information is output to the SNMP module through channel 5 (known as snmpagent). |
|
5. Configure the output rules of the system information. |
info-center source { module-name | default } channel { channel-number | channel-name } [ debug { level severity | state state } * | log { level severity | state state } * | trap { level severity | state state } * ] * |
Optional. |
|
6. Configure the format of the time stamp. |
info-center timestamp { debugging | log | trap } { boot | date | none } |
Optional. The time stamp format for log, trap and debugging information is date by default. |
Outputting system information to the web interface
|
|
NOTE: If you configure to output log, trap, and debugging information through a channel that has been bound to the output destination web interface, you can view only the log information of specific types after you log in though the web interface. |
This feature allows you to control whether to output system information to the web interface and which system information can be output to the web interface. The web interface provides abundant search and sorting functions. If you configure to output the system information to the web interface, you can view system information by clicking corresponding tabs after logging in to the device through the web interface.
To output system information to the web interface:
|
Step |
Command |
Remarks |
|
1. Enter system view. |
system-view |
N/A |
|
2. Enable information center. |
info-center enable |
Optional. Enabled by default. |
|
3. Name the channel with a specified channel number. |
info-center channel channel-number name channel-name |
Optional. See Table 2 for default channel names. |
|
4. Configure the channel through which system information can be output to the web interface. |
info-center syslog channel { channel-number | channel-name } |
Optional. By default, system information is output to the web interface through channel 6. |
|
5. Configure the output rules of the system information. |
info-center source { module-name | default } channel { channel-number | channel-name } [ debug { level severity | state state }* | log { level severity | state state }* | trap { level severity | state state }* ]* |
Optional. |
|
6. Configure the format of the time stamp. |
info-center timestamp { debugging | log | trap } { boot | date | none } |
Optional. The time stamp format for log, trap and debugging information is date by default. |
Saving the system information to a log file
This feature enables the switch to save generated log information to a log file on the switch. You can specify the frequency with which the log file is saved or manually save the log file.
Logs are saved into the log file buffer. The system writes the logs from the log file buffer to the log file at the specified interval, which is usually set to 24 hours. You can also manually save the logs when the switch is not busy. After the logs in the log file buffer are saved into the log file successfully, the system clears the log file buffer.
· On switches that support a single log file: The log file has a specific capacity. When the capacity is reached, the system will delete the earliest messages and write new messages into the log file. The directory of the log file varies with the switch models. Typically, the log file is saved in the directory /logfile/logfile.log.
· On switches that support multiple log files: Each log file has a specific capacity. When the capacity is reached, the system will create a new log file to save new messages. The log files are named as logfile1.log, logfile2.log, and so on. When the number of log files reaches the upper limit, or the storage media has no space available, the system will delete the earliest log file and create a new one.
To set to save system information to a log file:
|
Step |
Command |
Remarks |
|
1. Enter system view. |
system-view |
N/A |
|
2. Enable information center. |
info-center enable |
Optional. Enabled by default. |
|
3. Enable the log file feature. |
info-center logfile enable |
Optional. Enabled by default. |
|
4. Configure the frequency with which the log file is saved. |
info-center logfile frequency freq-sec |
Optional. By default, the frequency with which the system saves the log file is 86400 seconds. |
|
5. Configure the maximum storage space reserved for a log file. |
info-center logfile size-quota size |
Optional. To ensure normal operation, set the size to a value between 1 MB and 10 MB. |
|
6. Configure the directory to save the log file. |
info-center logfile switch-directory dir-name |
Optional. By default, it is the log file directory under the root directory of the memory media, which varies with devices. |
|
7. Manually save the log buffer content to the log file. |
logfile save |
Optional. By default, the system saves the log file with the frequency defined by the info-center logfile frequency command. Available in any view. |
|
|
NOTE: The info-center logfile switch-directory command is always used when you back up or move files. The configuration becomes invalid at the system reboot or the active standby switchover. |
Configuring synchronous information output
Synchronous information output refers to the feature that if the user’s input is interrupted by system output such as log, trap, or debugging information, then after the completion of system output the system will display a command line prompt (a prompt in command editing mode, or a [Y/N] string in interaction mode) and your input so far.
This command is used in the case that your input is interrupted by a large amount of system output. With this feature enabled, you can continue your operations from where you were stopped.
To enable synchronous information output:
|
Step |
Command |
Remarks |
|
1. Enter system view. |
system-view |
N/A |
|
2. Enable synchronous information output. |
info-center synchronous |
Disabled by default. |
|
|
NOTE: · If system information, such as log information, is output before you input any information under the current command line prompt, the system will not display the command line prompt after the system information output. · If system information is output when you are inputting some interactive information (non Y/N confirmation information), the system displays your previous input in a new line but does not display the command line prompt. |
Disabling an interface from generating link up/down logging information
By default, all the interfaces generate link up/down logging information upon state changes. You may want to disable specific interfaces from generating such information in some cases, for example:
· You are only concerned with the states of some interfaces. In this case, you can use this function to disable other interfaces from generating link up/down logging information.
· An interface is unstable, and continuously outputs logging information. In this case, you can disable the interface from generating link up/down logging information.
To disable an interface from generating link up/down logging information:
|
Step |
Command |
Remarks |
|
1. Enter system view. |
system-view |
N/A |
|
2. Enter interface view. |
interface interface-type interface-number |
N/A |
|
3. Disable the interface from generating link up/down logging information. |
undo enable log updown |
By default, all interfaces are allowed to generate link up/down logging information when the interface state changes. |
|
|
NOTE: An interface configured with this feature does not output link up/down log information, and cannot be monitored. Therefore, H3C recommends that you use the default configuration in normal cases. |
Displaying and maintaining information center
|
Task |
Command |
Remarks |
|
Display information about information channels. |
display channel [ channel-number | channel-name ] [ | { begin | exclude | include } regular-expression ] |
Available in any view |
|
Display the information of each output destination. |
display info-center [ | { begin | exclude | include } regular-expression ] |
Available in any view |
|
Display the state of the log buffer and the log information recorded (standalone mode). |
display logbuffer [ reverse ] [ level severity | size buffersize | slot slot-number ] * [ | { begin | exclude | include } regular-expression ] |
Available in any view |
|
Display the state of the log buffer and the log information recorded (IRF mode). |
display logbuffer [ reverse ] [ level severity | size buffersize | chassis chassis-number slot slot-number ] * [ | { begin | exclude | include } regular-expression ] |
Available in any view |
|
Display a summary of the log buffer (standalone mode). |
display logbuffer summary [ level severity | slot slot-number ] * [ | { begin | exclude | include } regular-expression ] |
Available in any view |
|
Display a summary of the log buffer (IRF mode). |
display logbuffer summary [ level severity | chassis chassis-number ?slot slot-number ] * [ | { begin | exclude | include } regular-expression ] |
Available in any view |
|
Display the content of the log file buffer. |
display logfile buffer [ | { begin | exclude | include } regular-expression ] |
Available in any view |
|
Display the configuration of the log file. |
display logfile summary [ | { begin | exclude | include } regular-expression ] |
Available in any view |
|
Display the state of the trap buffer and the trap information recorded. |
display trapbuffer [ reverse ] [ size buffersize ] [ | { begin | exclude | include } regular-expression ] |
Available in any view |
|
Reset the log buffer. |
reset logbuffer |
Available in user view |
|
Reset the trap buffer. |
reset trapbuffer |
Available in user view |
Information center configuration examples
|
|
NOTE: By default, Ethernet, VLAN, and aggregate interfaces are down. To configure these types of interfaces, bring them up first with the undo shutdown command. |
Outputting log information to the console
Network requirements
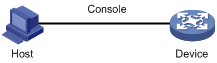
Configure the source modules ARP and IP on the device to output log information with a severity equal to or higher than informational to the console.
Figure 2 Network diagram
Configuration procedure
# Enable information center.
<Sysname> system-view
[Sysname] info-center enable
# Use channel console to output log information to the console (optional, console by default).
[Sysname] info-center console channel console
# Disable the output of log, trap, and debugging information of all modules on channel console.
[Sysname] info-center source default channel console debug state off log state off trap state off
|
|
NOTE: As the default system configurations for different channels are different, you need to disable the output of log, trap, and debugging information of all modules on the specified channel (console in this example) first and then configure the output rule as needed so that unnecessary information will not be output. |
# Configure the information output rule: allow log information of ARP and IP modules with severity equal to or higher than informational to be output to the console.
[Sysname] info-center source arp channel loghost log level informational state on debug state off trap state off
[Sysname] info-center source ip channel loghost log level informational state on debug state off trap state off
[Sysname] quit
# Enable the display of log information on a terminal. (Optional, this function is enabled by default.)
<Sysname> terminal monitor
Info: Current terminal monitor is on.
<Sysname> terminal logging
Info: Current terminal logging is on.
After the above configuration takes effect, if the specified module generates log information, the information center automatically sends the log information to the console, which displays the information.
Outputting log information to a UNIX log host
Network requirements
· Send log information to a UNIX log host with an IP address of 1.2.0.1/16.
· Log information with severity higher than or equal to informational will be output to the log host.
· The source modules are ARP and IP.
Figure 3 Network diagram

Configuration procedure
Before the configuration, make sure that Device and PC can reach each other.
1. Configure Device
# Enable information center.
<Device> system-view
[Device] info-center enable
# Specify the host with IP address 1.2.0.1/16 as the log host, use channel loghost to output log information (optional, loghost by default), and use local4 as the logging facility.
[Device] info-center loghost 1.2.0.1 channel loghost facility local4
# Disable the output of log, trap, and debugging information of all modules on channel loghost.
[Device] info-center source default channel loghost debug state off log state off trap state off
|
|
NOTE: To avoid outputting unnecessary information, disable the output of log, trap, and debugging information of all modules on the specified channel (loghost in this example), and then configure the output rule as needed. |
# Configure the information output rule: allow log information of ARP and IP modules with severity equal to or higher than informational to be output to the log host.
[Device] info-center source arp channel loghost log level informational state on trap state off
[Device] info-center source ip channel loghost log level informational state on trap state off
2. Configure the log host
The following configurations were performed on Solaris which has similar configurations to the UNIX operating systems implemented by other vendors.
a. Log in to the log host as a root user.
b. Create a subdirectory named Device under directory /var/log/, and create file info.log under the Device directory to save logs of Device.
# mkdir /var/log/Device
# touch /var/log/Device/info.log
c. Edit file syslog.conf under directory /etc/ and add the following contents.
# Device configuration messages
local4.info??? /var/log/Device/info.log
In the above configuration, local4 is the name of the logging facility used by the log host to receive logs. info is the information level. The UNIX system will record the log information with severity level equal to or higher than informational to file /var/log/Device/info.log.
|
|
NOTE: Be aware of the following issues while editing file /etc/syslog.conf: · Comments must be on a separate line and begin with the # sign. · No redundant spaces are allowed after the file name. · The logging facility name and the information level specified in the /etc/syslog.conf file must be identical to those configured on Device using the info-center loghost and info-center source commands; otherwise the log information may not be output properly to the log host. |
d. After log file info.log is created and file /etc/syslog.conf is modified, you need to issue the following commands to display the process ID of syslogd, kill the syslogd process and then restart syslogd using the –r option to make the modified configuration take effect.
# ps -ae | grep syslogd
147
# kill -HUP 147
# syslogd -r &
After the above configurations, the system will be able to record log information into the log file.
Outputting log information to a Linux log host
Network requirements
· Send log information to a Linux log host with an IP address of 1.2.0.1/16.
· Log information with severity equal to or higher than informational will be output to the log host.
· All modules can output log information.
Figure 4 Network diagram

Configuration procedure
Before the configuration, make sure that Device and PC can reach each other.
1. Configure Device
# Enable information center.
<Sysname> system-view
[Sysname] info-center enable
# Specify the host with IP address 1.2.0.1/16 as the log host, use channel loghost to output log information (optional, loghost by default), and use local5 as the logging facility.
[Sysname] info-center loghost 1.2.0.1 channel loghost facility local5
# Configure the information output rule: allow log information of all modules with severity equal to or higher than informational to be output to the log host.
[Sysname] info-center source default channel loghost log level informational state on debug state off trap state off
|
|
NOTE: Disable the output of unnecessary information of all modules on the specified channel in the output rule. |
2. Configure the log host
a. Log in to the log host as a root user.
b. Create a subdirectory named Device under directory /var/log/, and create file info.log under the Device directory to save logs of Device.
# mkdir /var/log/Device
# touch /var/log/Device/info.log
c. Edit the file syslog.conf under directory /etc/ and add the following contents.
# Device configuration messages
local5.info??? /var/log/Device/info.log
In the above configuration, local5 is the name of the logging facility used by the log host to receive logs. info is the information level. The Linux system will record the log information with severity level equal to or higher than informational to file /var/log/Device/info.log.
|
|
NOTE: Be aware of the following issues while editing file /etc/syslog.conf: · Comments must be on a separate line and begin with the # sign. · No redundant spaces are allowed after the file name. · The logging facility name and the information level specified in the /etc/syslog.conf file must be identical to those configured on the device using the info-center loghost and info-center source commands; otherwise the log information may not be output properly to the log host. |
d. After log file info.log is created and file /etc/syslog.conf is modified, you need to issue the following commands to display the process ID of syslogd, kill the syslogd process, and restart syslogd using the -r option to make the modified configuration take effect.
# ps -ae | grep syslogd
147
# kill -9 147
# syslogd -r &
|
|
NOTE: Make sure that the syslogd process is started with the -r option on a Linux log host. |
After the above configurations, the system will be able to record log information into the log file.
