- Table of Contents
-
- H3C iMC Database Installation Guide-5W103
- 01-MySQL 8.0.xx Installation and Configuration Guide (for Linux)
- 02-MySQL 8.0.xx Installation and Configuration Guide (for Windows)
- 03-Oracle 11g Installation and Configuration Guide
- 04-Oracle 11g R2 Installation and Configuration Guide
- 05-Oracle 12c Installation and Configuration Guide
- 06-Oracle 12c R2 Installation and Configuration Guide
- 07-Oracle 18c Installation and Configuration Guide
- 08-SQL Server 2016 Installation and Configuration Guide
- 09-SQL Server 2017 Installation and Configuration Guide
- 10-SQL Server 2019 Installation and Configuration Guide
- 11-SQL Server 2022 Installation and Configuration Guide
- 12-MariaDB 10.x.x Installation Guide (Linux)
- 13-MariaDB 10.x.x Installation Guide (Windows)
- Related Documents
-
| Title | Size | Download |
|---|---|---|
| 09-SQL Server 2017 Installation and Configuration Guide | 2.18 MB |
|
|
|
H3C Intelligent Management Center |
|
SQL Server 2017 |
|
Installation and Configuration Guide |
|
|
Software version: IMC PLAT 7.3 (E0708)
Document version: 5W101-20241206
Copyright © 2025 New H3C Technologies Co., Ltd. All rights reserved.
No part of this manual may be reproduced or transmitted in any form or by any means without prior written consent of New H3C Technologies Co., Ltd.
Except for the trademarks of New H3C Technologies Co., Ltd., any trademarks that may be mentioned in this document are the property of their respective owners.
The information in this document is subject to change without notice.
Preface
This preface includes the following topics about the documentation:
· Audience.
· Conventions.
Audience
This documentation is intended for:
· Network planners.
· Field technical support and servicing engineers.
· Network administrators working with the H3C Intelligent Management Center (IMC).
Conventions
The following information describes the conventions used in the documentation.
GUI conventions
|
Convention |
Description |
|
Boldface |
Window names, button names, field names, and menu items are in Boldface. For example, the New User window opens; click OK. |
|
> |
Multi-level menus are separated by angle brackets. For example, File > Create > Folder. |
Symbols
|
Convention |
Description |
|
|
An alert that calls attention to important information that if not understood or followed can result in personal injury. |
|
|
An alert that calls attention to important information that if not understood or followed can result in data loss, data corruption, or damage to hardware or software. |
|
|
An alert that calls attention to essential information. |
|
NOTE: |
An alert that contains additional or supplementary information. |
|
|
An alert that provides helpful information. |
Documentation feedback
You can e-mail your comments about product documentation to [email protected].
We appreciate your comments.
Contents
Turning off the Windows firewall
Registering the SQL Server license
Installing the SQL Server client
Modifying the maximum server memory for the SQL Server
Starting the SQL Server Browser service
Changing the SQL Server service startup account
SQL Server 2017 in IMC
Before installing IMC, install the SQL Server on a database server used for storing IMC data, or install it on the server on which you plan to install IMC.
This document provides installation and configuration procedures for Microsoft SQL Server 2017. For more information about using the database for IMC, see the H3C IMC deployment guides.
If you plan to install the database on a separate database server, follow these guidelines:
· Before installing IMC, install a SQL Server client on the same server as IMC. The client version must match the version of the SQL Server the database.
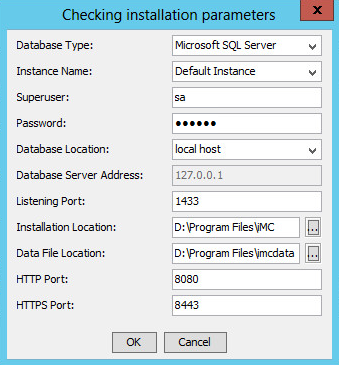
· Before installing IMC, create a data file folder for storing IMC data on the database server. You must specify the local path to the folder during the deployment of IMC components, as shown in Figure 1.
Figure 1 Database Configuration dialog box during IMC installation
|
|
NOTE: Use Microsoft SQL Server licensed installation software. Localized software or other unauthorized editions might cause a failure in database installation and operation. |
Preparing for installation
Before installing SQL Server 2017 and the SQL Server client, perform the following tasks:
· Turn off the Windows firewall on the SQL Server host to open TCP port 1443.
· Install .NET Framework 4.6 or higher if Windows Server 2017 is not preinstalled with .NET Framework 4.6. SQL Server 2017 works on .Net Framework 4.6.
Installing .NET Framework 4.6
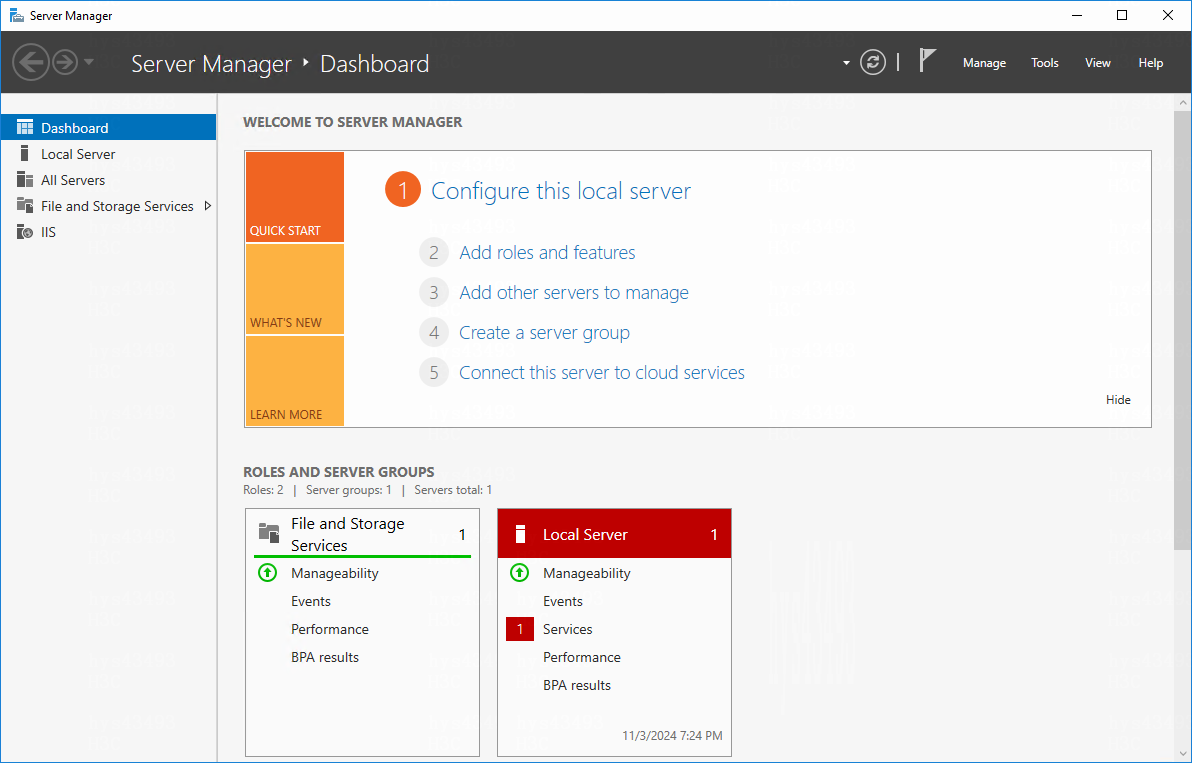
1. Select Start > Server Manager.
Figure 2 Server Manager page
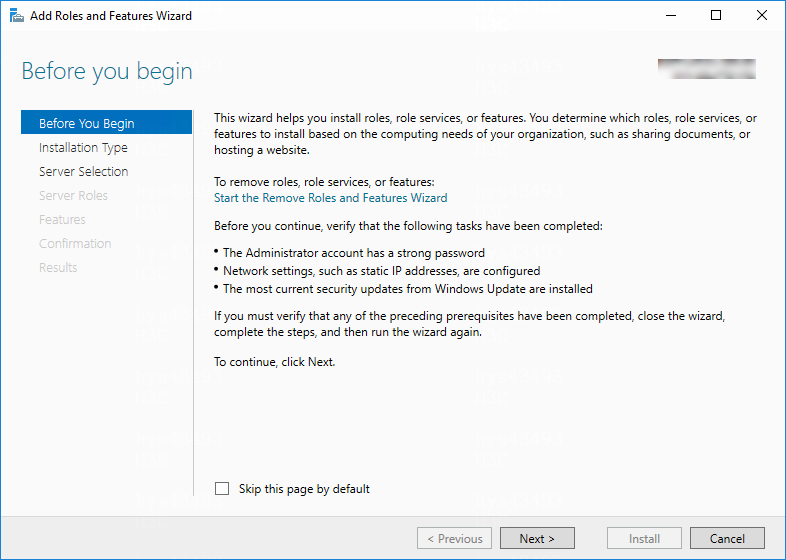
2. On the page, select Manage > Add Roles and Features.
Figure 3 Add Roles and Features Wizard
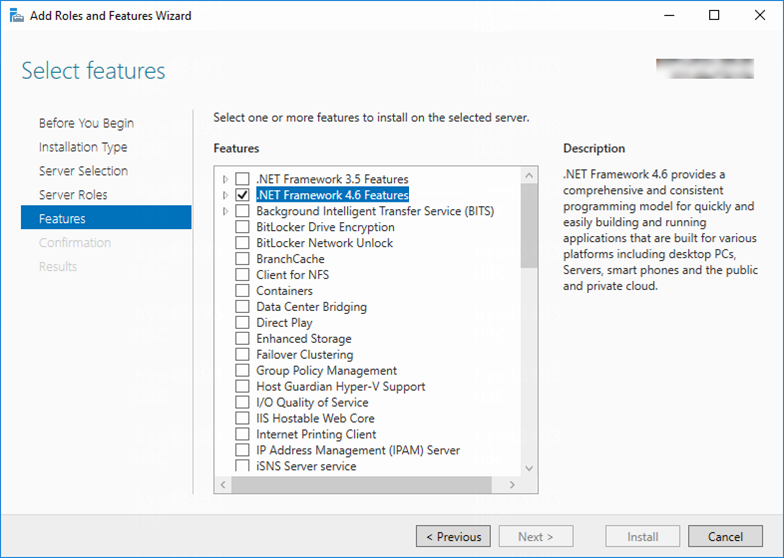
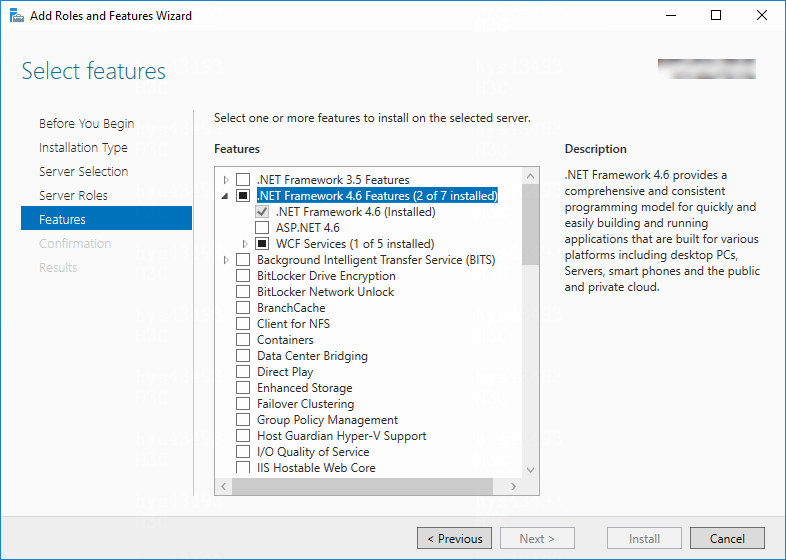
3. In the Add Roles and Features wizard, click Next until the Features page appears, and select .NET Framework 4.6 Features.
Figure 4 Selecting .NET Framework 4.6 Features
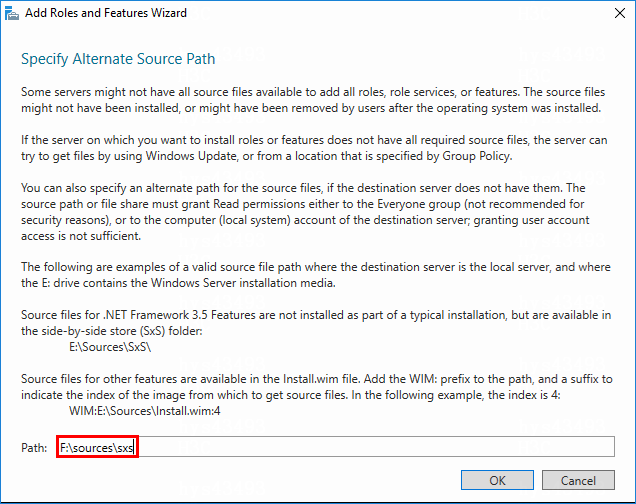
4. Click Next, and select Specify an alternate source path on the Confirmation page. Enter the alternate source path on the page that opens.
|
|
NOTE: The system sxs folder can be used as an alternate source path. If you do not specify an alternate source path, the installation might fail because source files fail to be found. |
Figure 5 Copying the alternate source path
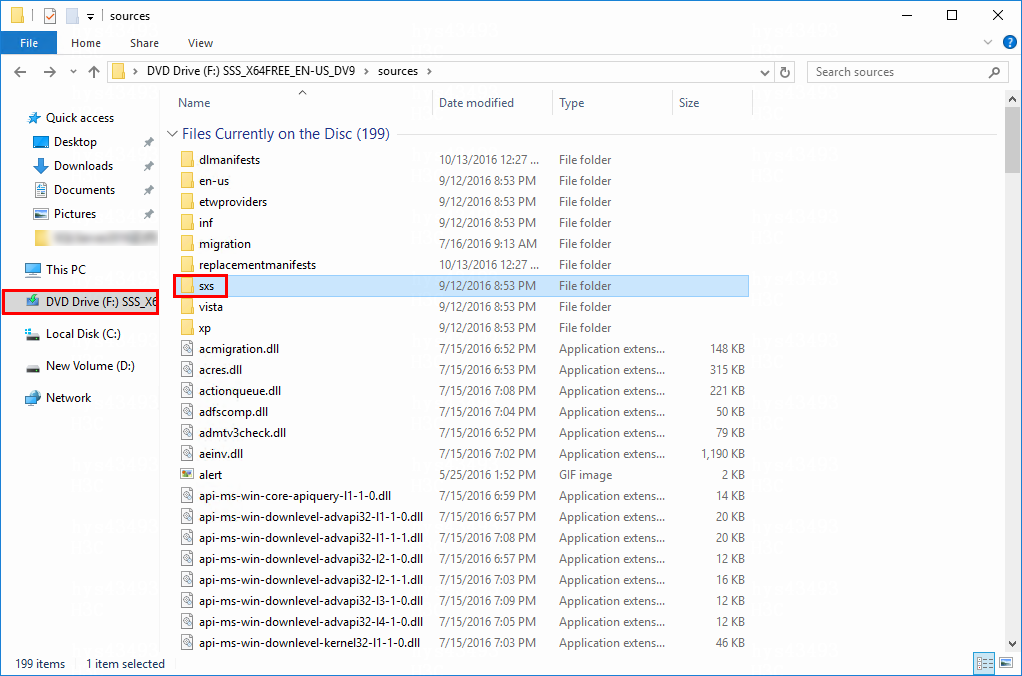
Figure 6 Pasting the alternate source path
5. Click OK to return to the Confirmation page, and click Install.
Figure 7 Installing .NET Framework 4.6
If .NET Framework 4.6 does not exist in the system, you can download it from the Microsoft website and install it directly.
Figure 8 Installing .NET Framework 4.6 directly
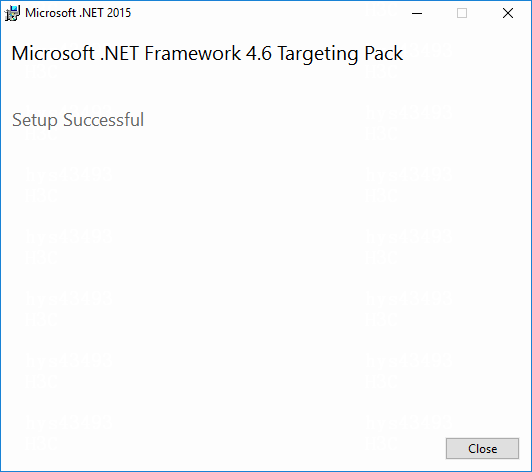
Figure 9 .NET Framework 4.6 installed successfully
Turning off the Windows firewall
1. Select Start > Control Panel > System and Security > Windows Firewall.
The Windows Firewall page opens, as shown in Figure 10.
Figure 10 Windows Firewall page
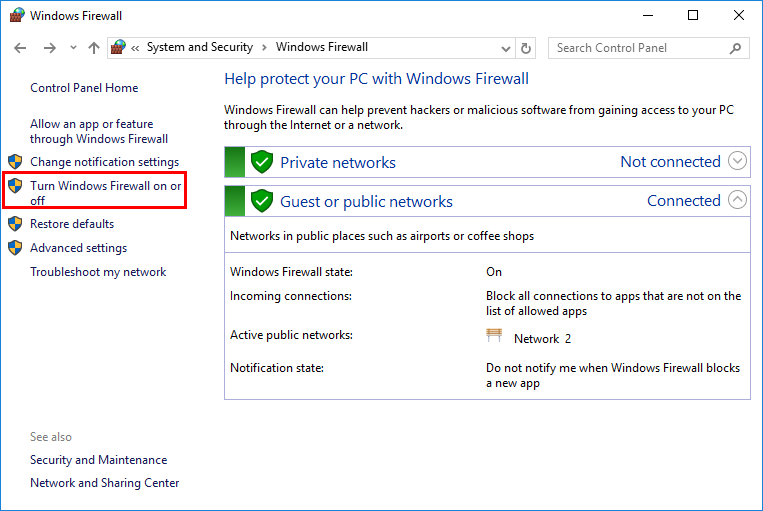
2. Select Turn Windows Firewall on or off.
The Customize Settings page opens, as shown in Figure 11.
Figure 11 Customize Settings page
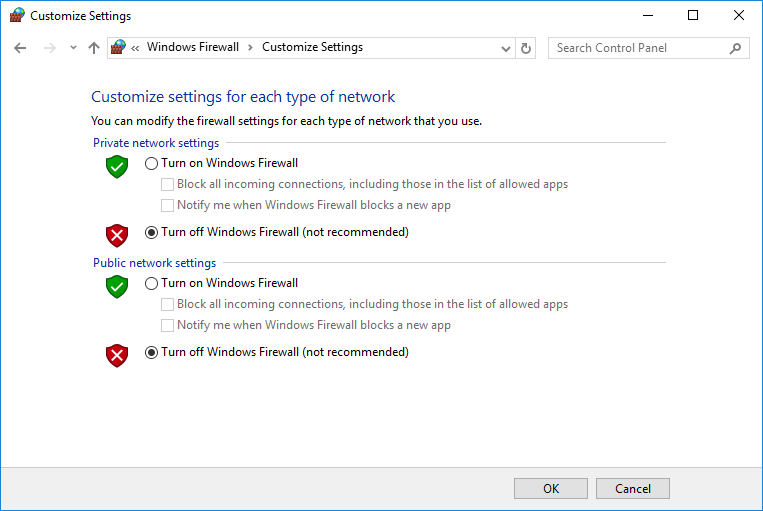
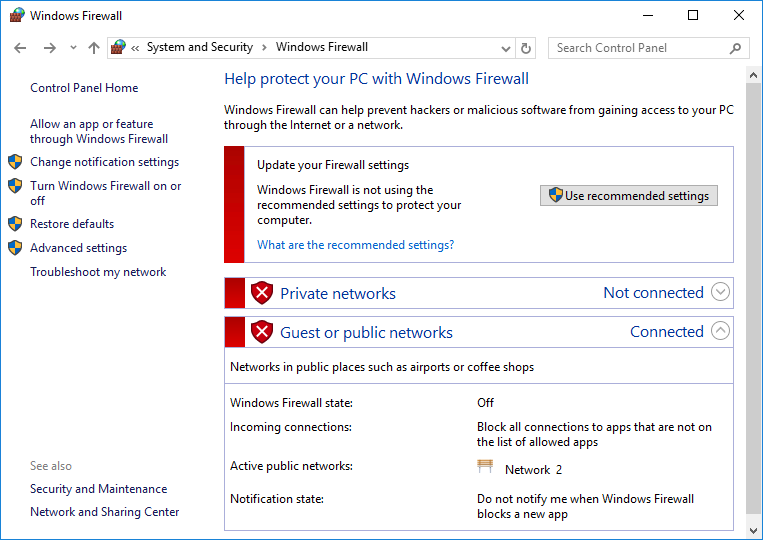
3. Select Turn off Windows Firewall (not recommended) for both Private network settings and Public network settings, and then click OK.
The Windows Firewall page displays the firewall status.
Figure 12 Disabling Windows firewall
Installing SQL Server 2017
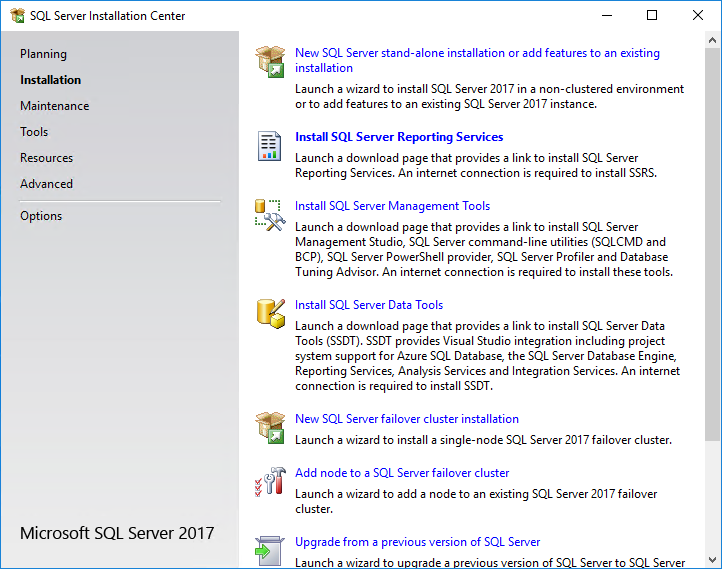
1. Run the installation program.
The SQL Server Installation Center wizard opens, as shown in Figure 13.
Figure 13 SQL Server Installation Center wizard
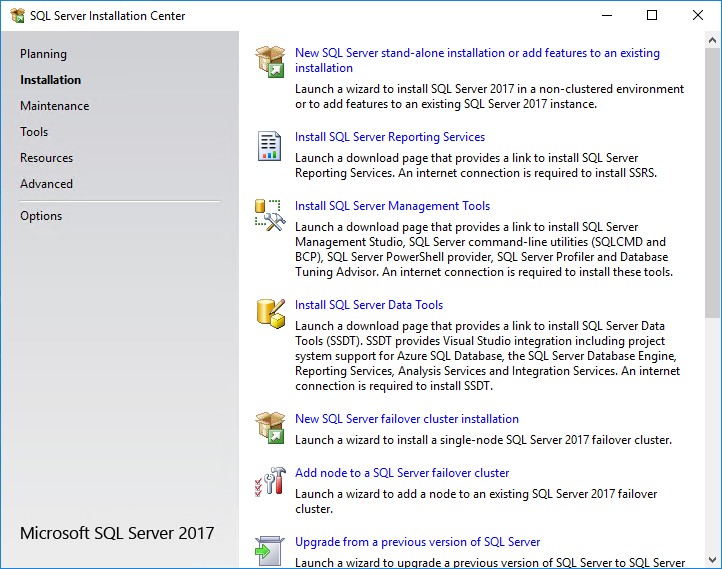
2. Select Installation from the navigation tree, and then select New SQL Server stand-alone installation or add features to an existing installation.
The Product Key page opens, as shown in Figure 14.
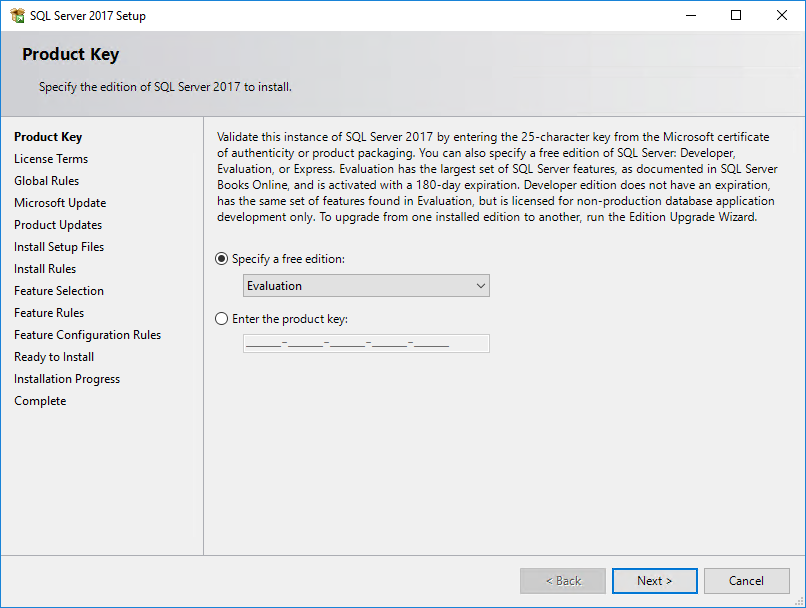
3. Enter the product key and then click Next.
The License Terms page opens, as shown in Figure 15.
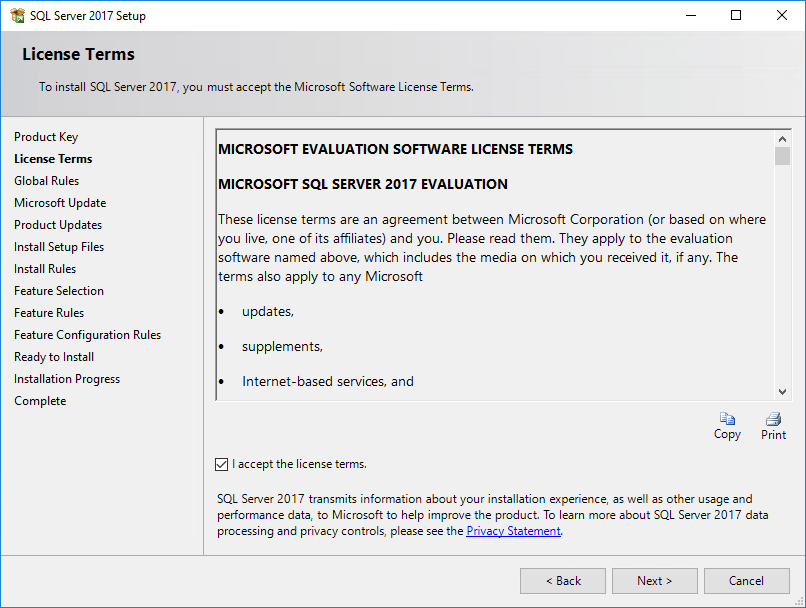
4. Select I accept the license terms and click Next.
The Global Rules page opens, as shown in Figure 16.
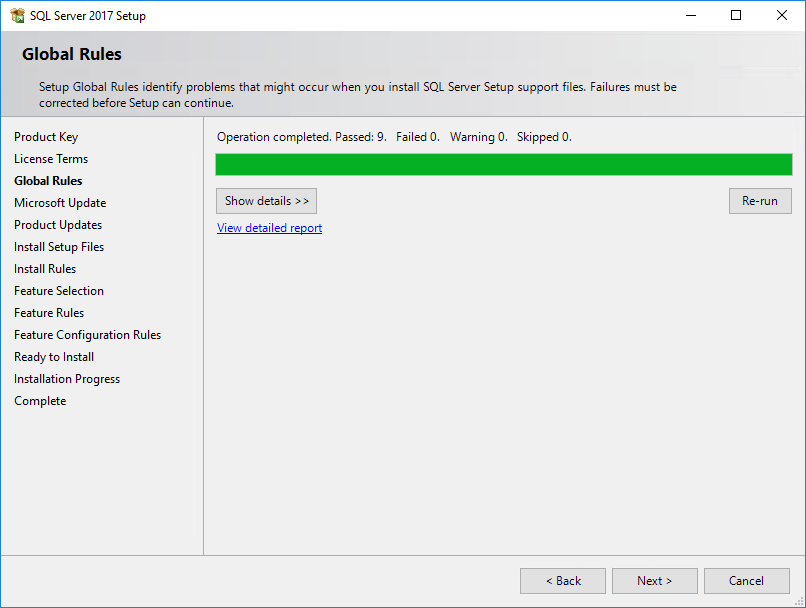
When the check has been passed, the Microsoft Update page opens, as shown in Figure 17.
Figure 17 Microsoft Update page

5. Update Microsoft if necessary, and then click Next.The Product Updates page opens.
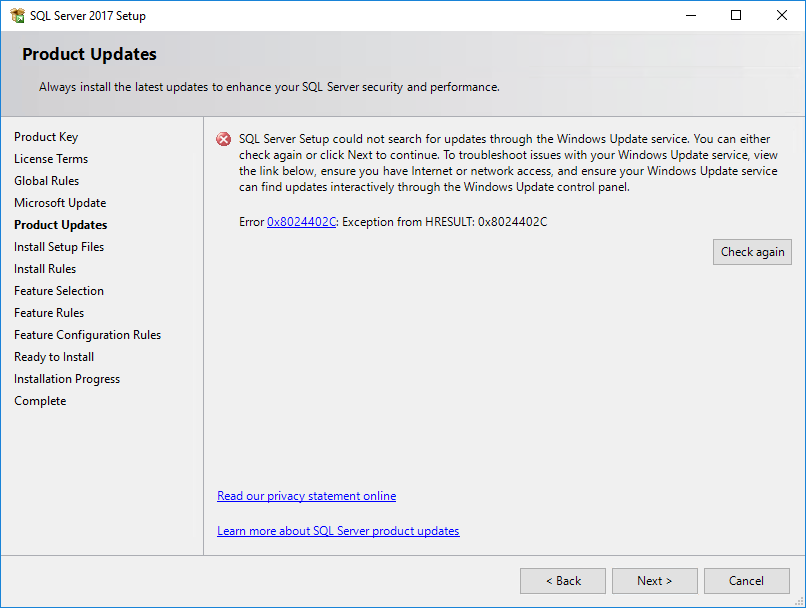
If the server is not connected to Internet, an error message will be displayed on the Product Updates page, as shown in Figure 18.
Figure 18 Product Updates page
6. Click Next to continue the installation.
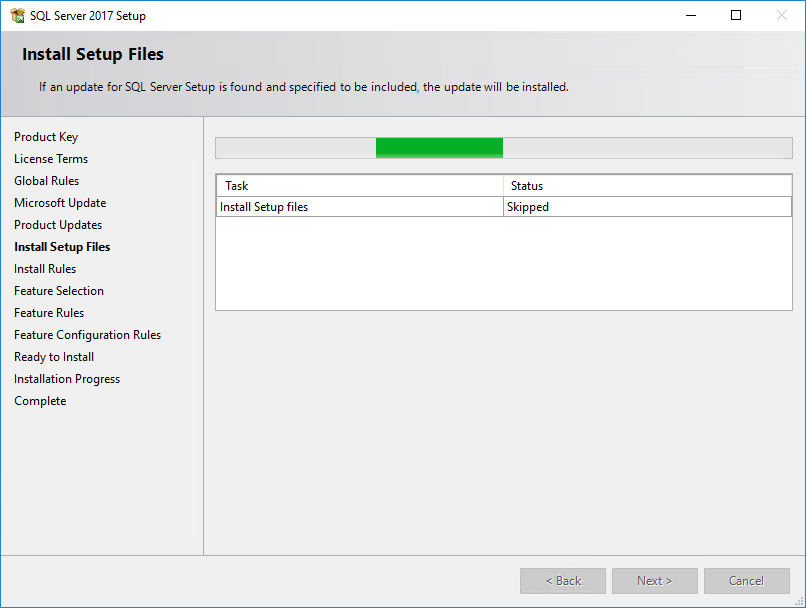
The Install Setup Files page opens, as shown in Figure 19.
Figure 19 Install Setup Files page
When the setup files are installed, the Installing Rules page opens,
7. Click Next.
The Feature Selection page opens, as shown in Figure 20.
Figure 20 Feature Selection page
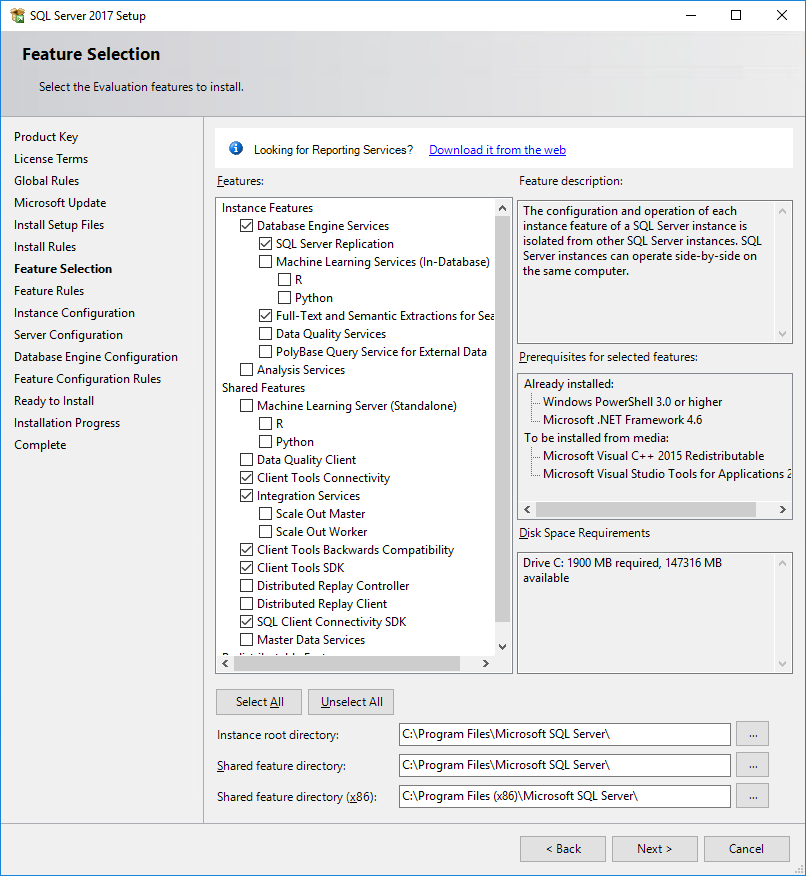
8. Select the features to install, and then specify a directory in the Instance root directory field.
The default instance root directory is C:\Program Files\Microsoft SQL Server. You can specify another drive with sufficient space for the directory. This example uses disk drive C. Only the drive letter in the directory can be modified.
9. Click Next.
The Feature Rules page opens, as shown in Figure 21.
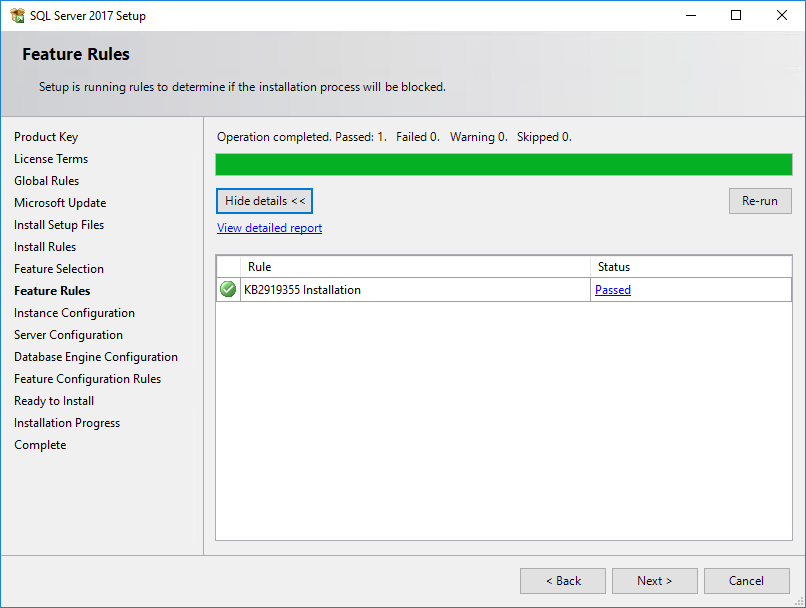
When the feature rules check is complete, the Instance Configuration page opens, as shown in Figure 22.
Figure 22 Instance Configuration page
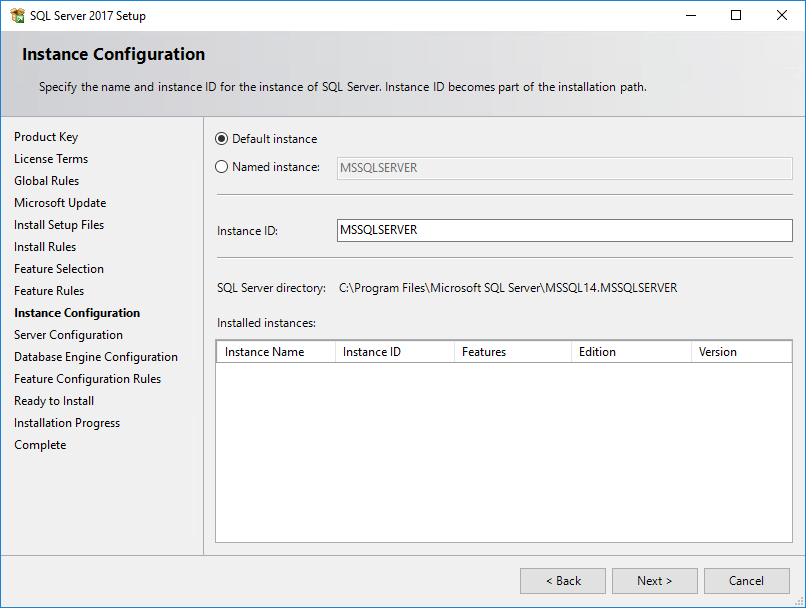
10. Install a default instance or a named instance of the SQL Server.
¡ To install the default instance, select Default instance and specify an instance ID. The default instance ID is MSSQLSERVER.
¡ To install a named instance, select Named Instance and specify an instance ID. You are required to provide the instance name during IMC installation.
In this example, select Default instance and use the default instance ID MSSQLSERVER.
11. Click Next.
The Server Configuration page opens, as shown in Figure 23.
Figure 23 Server Configuration page
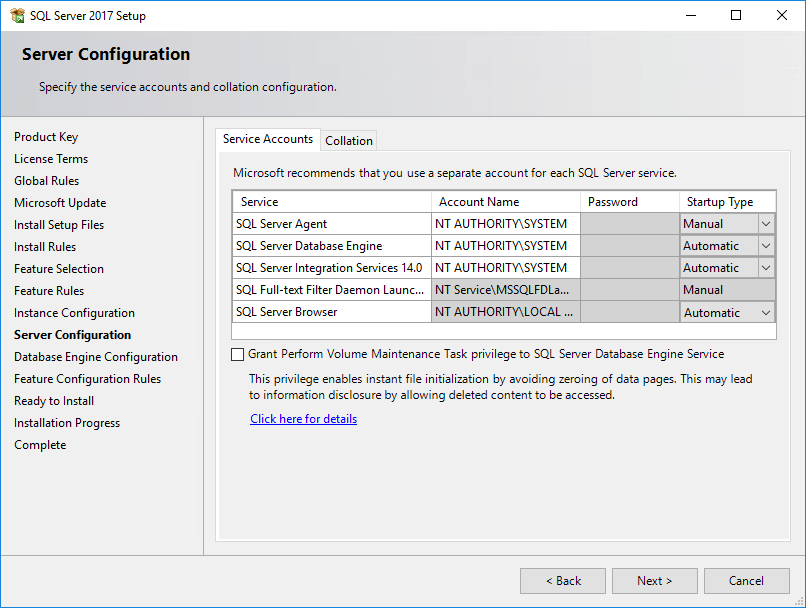
12. On the Service Accounts tab, set the account name to NT AUTHORITY\SYSTEM for SQL Server Agent, SQL Server Database Engine, and SQL Server Integration Services 14.0. If you selected Named instance for the SQL Server in Figure 22, set Startup Type for the SQL Server Browser service to Automatic.
13. Click the Collation tab, as shown in Figure 24.
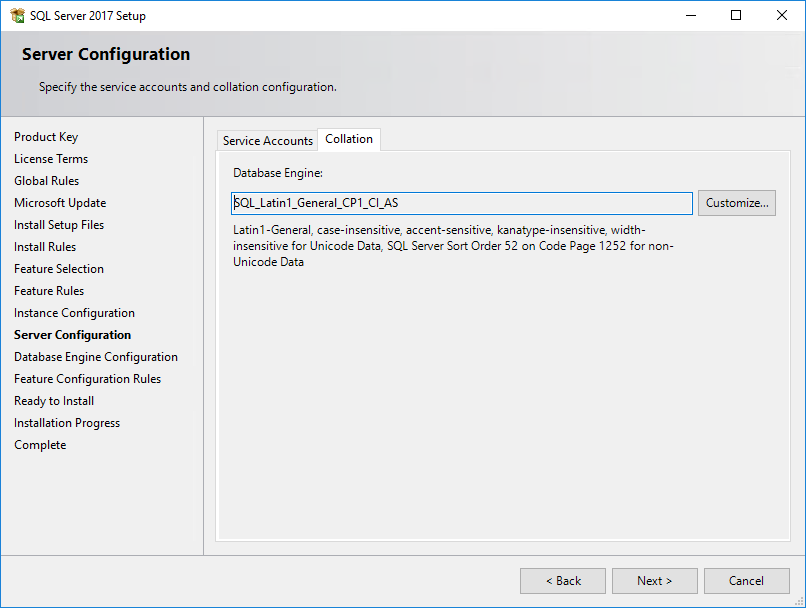
14. Use the default collation settings or SQL_Latin1_General_CP1_CI_AS, and then click Next.
The Database Engine Configuration page opens, as shown in Figure 25.
Figure 25 Database Engine Configuration page
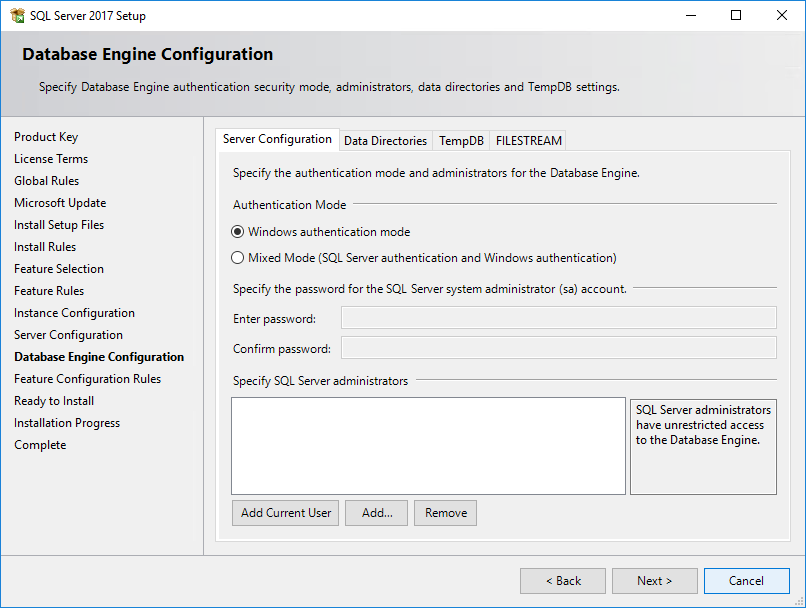
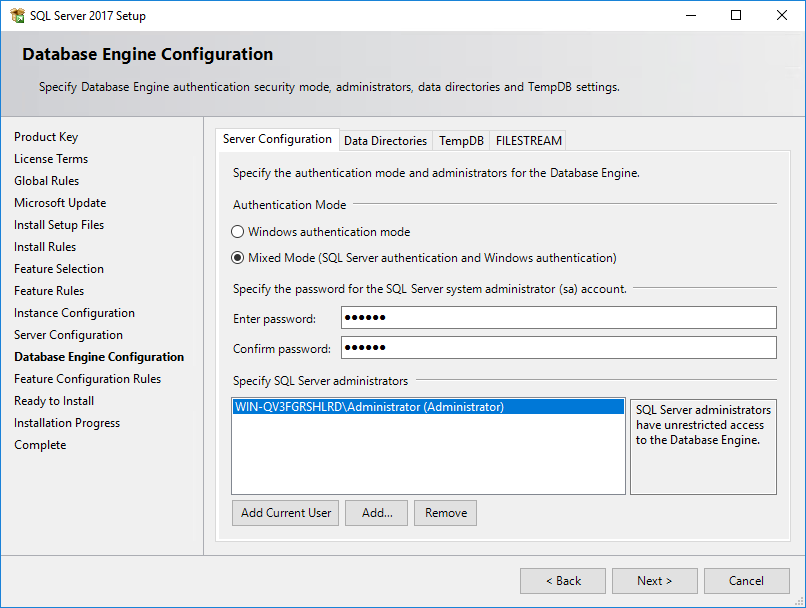
15. Under Authentication Mode, select Mixed Mode, enter the password for user sa, and add a SQL Server administrator, as shown in Figure 26.
¡ SQL Server 2017 has password complexity requirements. For more information, see the SQL Server 2017 online help.
¡ For IMC to identify the sa logon password during installation, make sure the password does not contain any of the following characters:
- Left angle bracket (<)
- Right angle bracket (>)
- Vertical bar (|)
- Tab (\t)
¡ If the password of user sa must contain any of the previous characters, create a superuser with sa user privileges before the IMC installation. Make sure the password of the superuser does not contain any of the previous characters. For information about creating a database superuser, see "Creating a superuser."
Figure 26 Specifying SQL Server administrators
16. Click the Data Directories tab, and set the data directories after negotiation with the SQL server administrator, as shown in Figure 27.
Figure 27 Data Directories tab

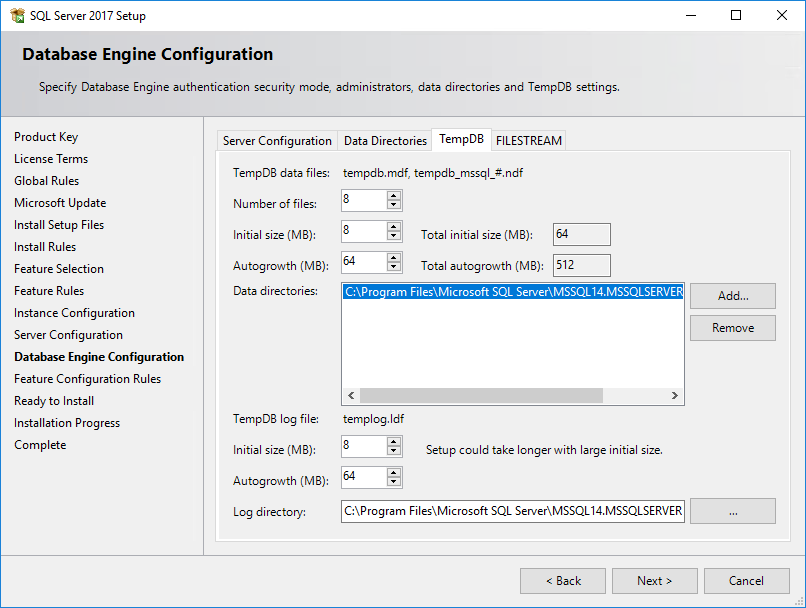
17. Click the TempDB tab, and set the TempDB file after negotiation with the SQL server administrator, as shown in Figure 28.
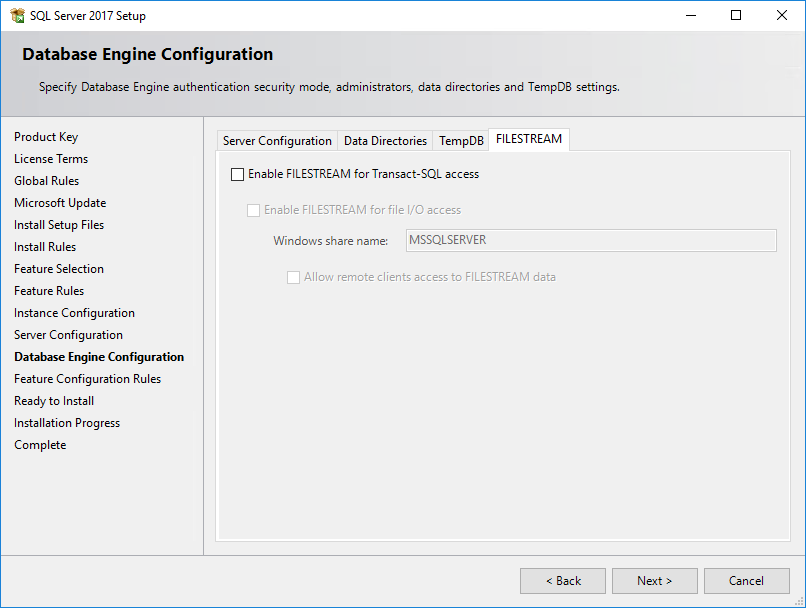
18. Use the default settings on the FILESTREAM tab, as shown in Figure 29.
19. Click Next.
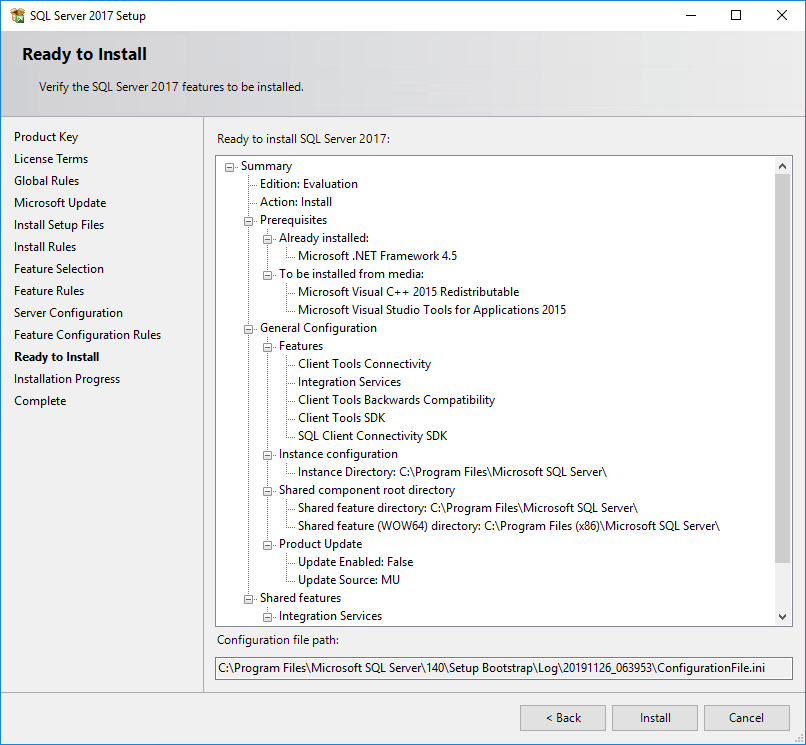
The Ready to Install page opens, as shown in Figure 30.
Figure 30 Ready to Install page
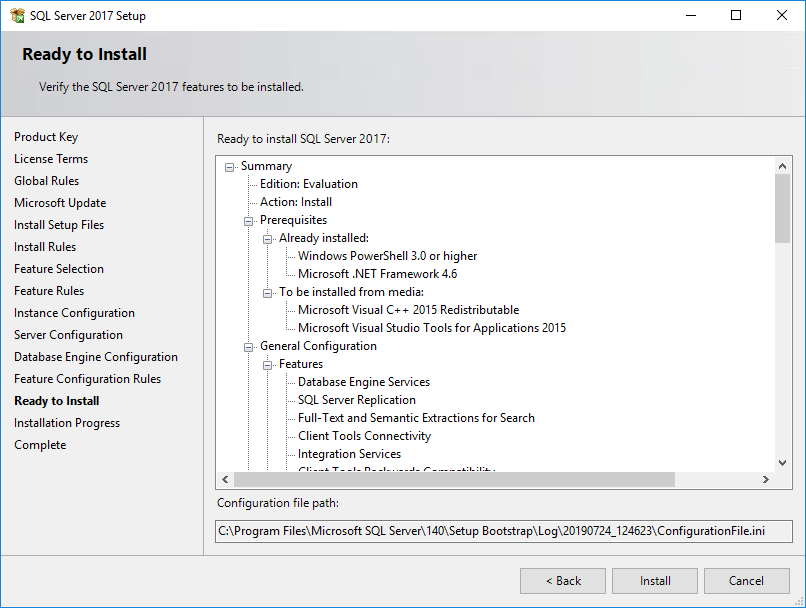
20. Click Install.
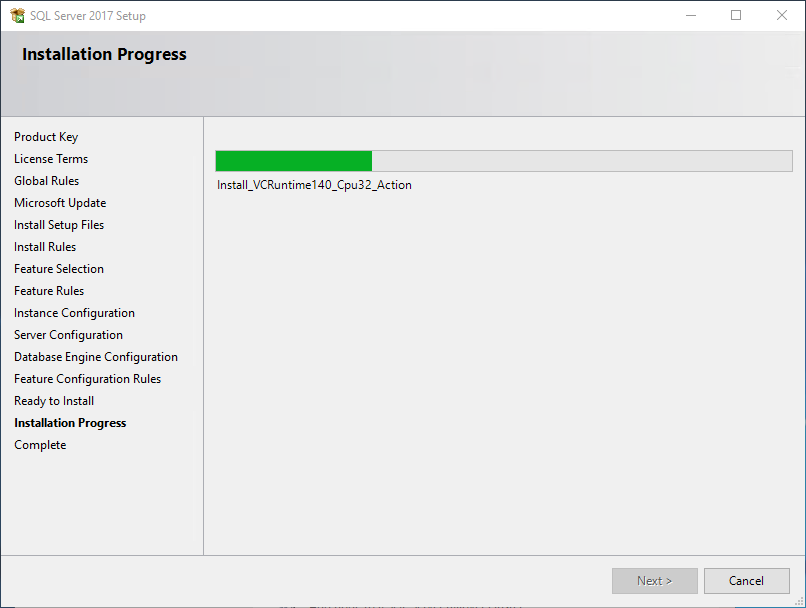
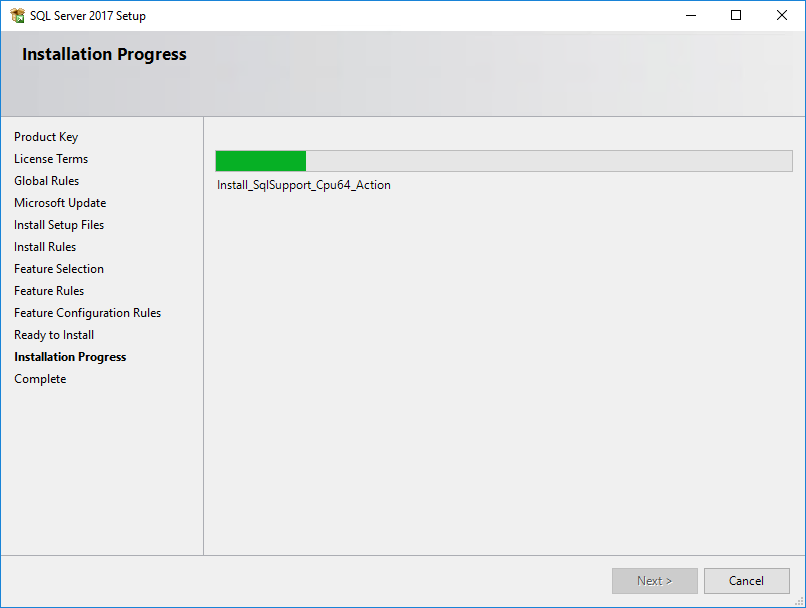
The Installation Progress page opens, as shown in Figure 31.
Figure 31 Installation Progress page
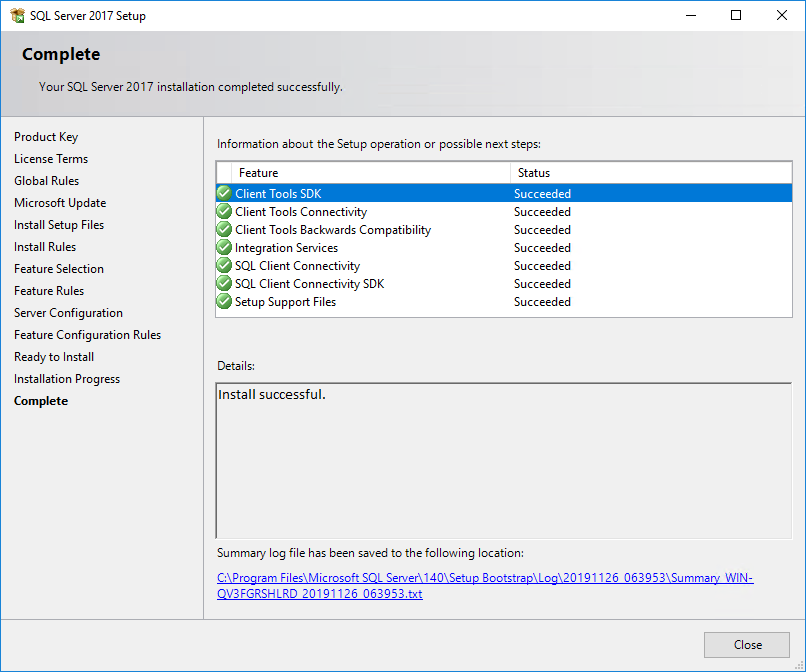
When the installation is complete, the Complete page opens, as shown in Figure 32.
Figure 32 Complete page
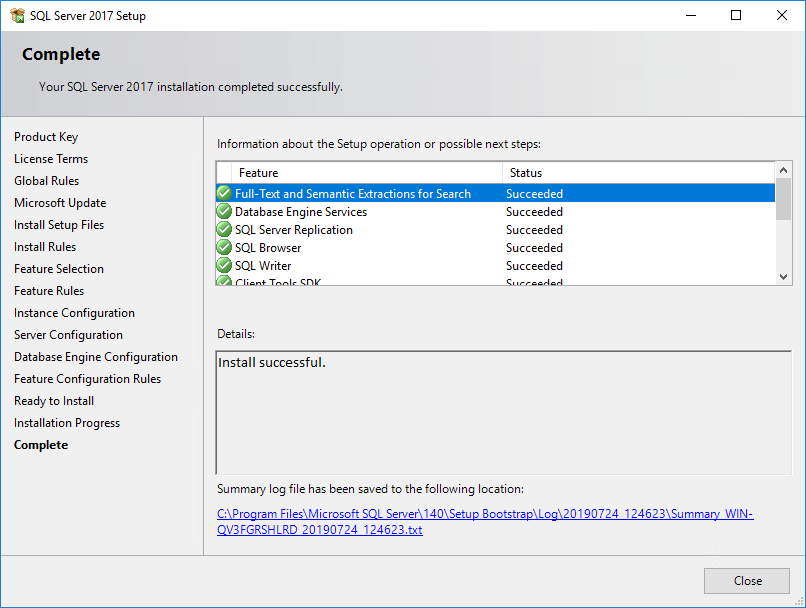
21. Click Close.
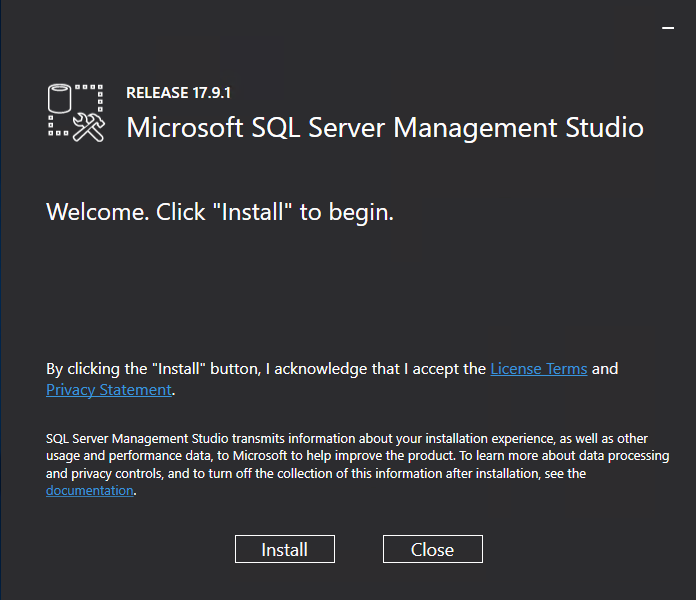
Installing SSMS
The SQL Server 2017 installation package does not provide the Microsoft SQL Server Management Studio (SSMS). Install SSMS after you finish installing SQL Server 2017. In this guide, SSMS 17.9.1 is installed.
Downloading SSMS
1. Click Install SQL Server Management Tools, as shown in Figure 33.
Figure 33 SQL Server Installation Center wizard
2. Download the SMSS installation package.
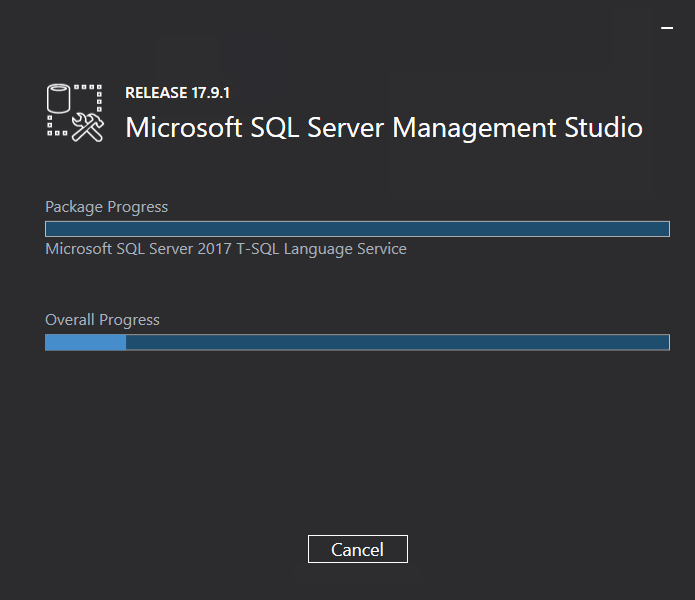
Installing SSMS
1. Double-click the SSMS installation package.
The installation dialog box opens, as shown in Figure 34.
Figure 34 Installation dialog box
2. Click Install.
Figure 35 Installation progress
After the installation completes, the confirmation dialog box opens, as shown in Figure 36.
Figure 36 Confirmation dialog box
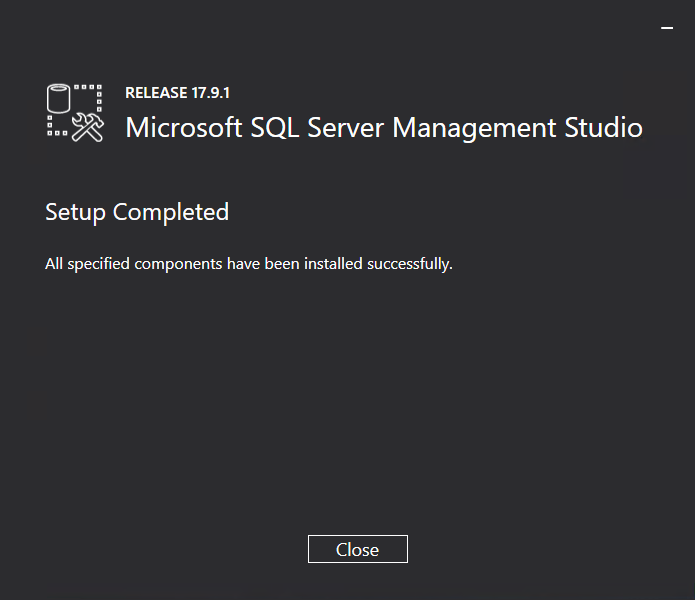
3. Click Close.
Registering the SQL Server license
The SQL Server supports the following license registration modes:
· Per User licensing—Used to register the SQL Server 2017 Developer and Parallel Data Warehouse.
· Per Processor licensing—Used to register the SQL Server 2017 Developer and Parallel Data Warehouse. The number of Per Processor licenses is determined by the number of processors on a SQL server. You must buy a Per Processor license for each processor on a server on which the SQL server component is installed. With Per Processor licensing, the number of SQL servers and IMC servers is not relevant. Per Processor licensing is applicable to networks that contain several SQL servers and IMC servers. Figure 37 displays an example of Per Processor licensing for SQL Server 2008 R2.
Figure 37 Per Processor licensing

|
|
NOTE: The number of Per Processor licenses is not determined by the number of kernels in a processor. |
· Server/CAL licensing—The number of Server/CAL licenses is determined by the number of SQL servers and IMC servers. You must buy a server license for each SQL server and a CAL license for each IMC server. Server/CAL licensing is applicable to networks that contain few SQL servers and IMC servers. Figure 38 displays an example of Server/CAL licensing for SQL Server 2008 R2.
Figure 38 Server/CAL licensing
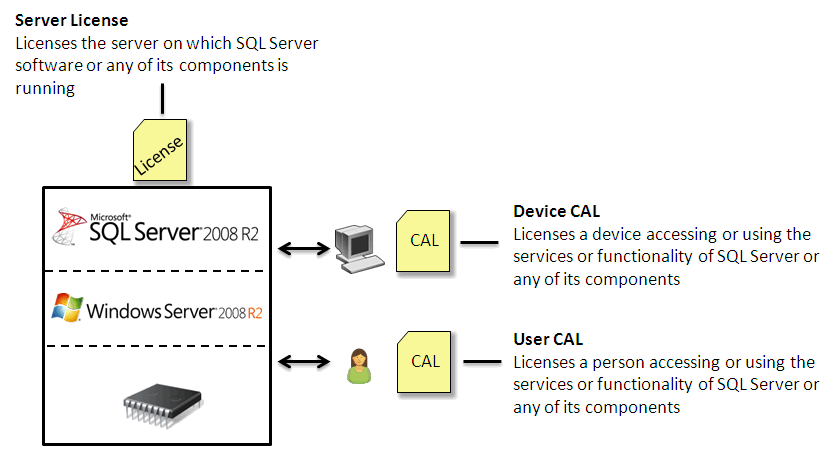
Before choosing a license registration mode, determine the IMC deployment environment:
· If IMC is deployed in centralized mode, buy a CAL license for the IMC server only.
· If IMC is deployed in distributed mode, buy a CAL license for each IMC server that must access the SQL Server.
For more information about SQL Server license registration, see the related Microsoft documentation.
|
|
NOTE: The license registration modes apply to the Standard and Enterprise editions of SQL Server 2008/2008 R2/2012/2014/2016/2017. You do not need to buy a license for other editions such as the Express edition. |
Installing the SQL Server client
Installation procedure
|
|
IMPORTANT: You must install the SQL Server client on all IMC servers (including subordinate servers). |
To install the SQL Server client:
1. Run the SQL Server 2017 installation program.
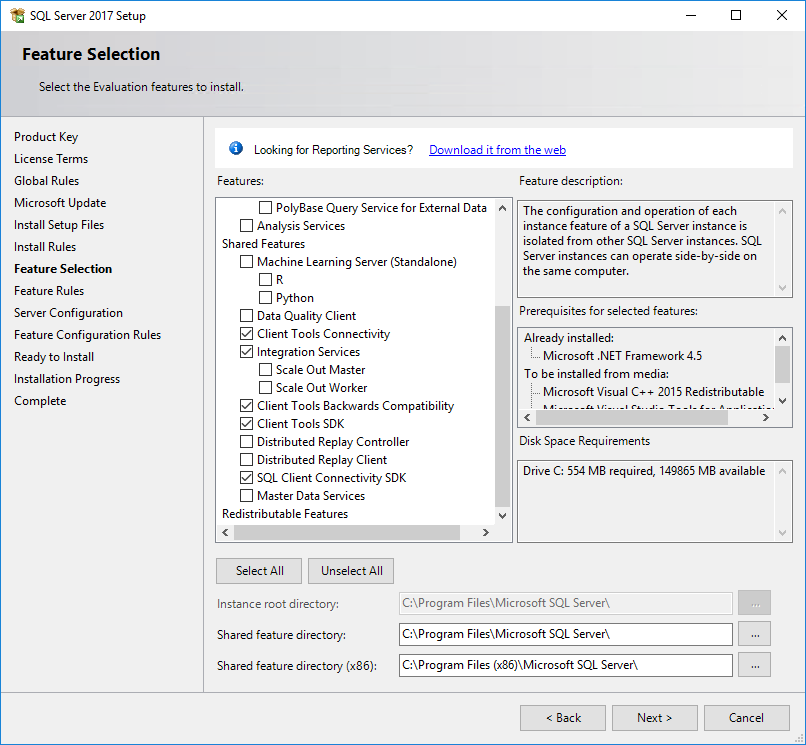
2. In the Feature Selection page, select the features as shown in Figure 39.
For information about accessing the Feature Selection page, see "Installing SQL Server ."
Figure 39 Feature Selection page
3. Click Next.
The Feature Rules page opens.
When the feature rules check is complete, the Feature Configuration Rules page opens.
When the feature configuration rules check is complete, the Ready to Install page opens, as shown in Figure 40.
Figure 40 Ready to Install page
4. Click Install.
The Installation Progress page opens, as shown in Figure 41.
Figure 41 Installation Progress page
When the installation is complete, the Complete page opens, as shown in Figure 42.
Figure 42 Complete page
5. Click Close.
6. Restart the operating system.
Installing SMSS
If IMC uses a remote database server, install both a SQL Server client (same version as that on the database server) and SMSS on the IMC server. For more information about installing SMSS, see "Installing SSMS."
Testing connectivity
To test the connectivity between the client and the SQL Server database:
1. Select Run from the Start menu, and then enter cmd in the Run dialog box.
2. In the CMD window, enter one of the following commands:
¡ For the default instance:
osql –S 192.168.7.194 –U sa –P iMC123
¡ For a named instance:
osql –S 192.168.7.194\instancename –U sa –P iMC123
In these commands, 192.168.7.194 is the IP address of the SQL Server database, sa and iMC123456 are the username and password of the default superuser, and instancename represents the named instance.
3. Verify that you can connect to the SQL Server database.
Configuring SQL Server 2017
The following information describes the procedures to configure the SQL Server database.
Configuring TCP/IP properties
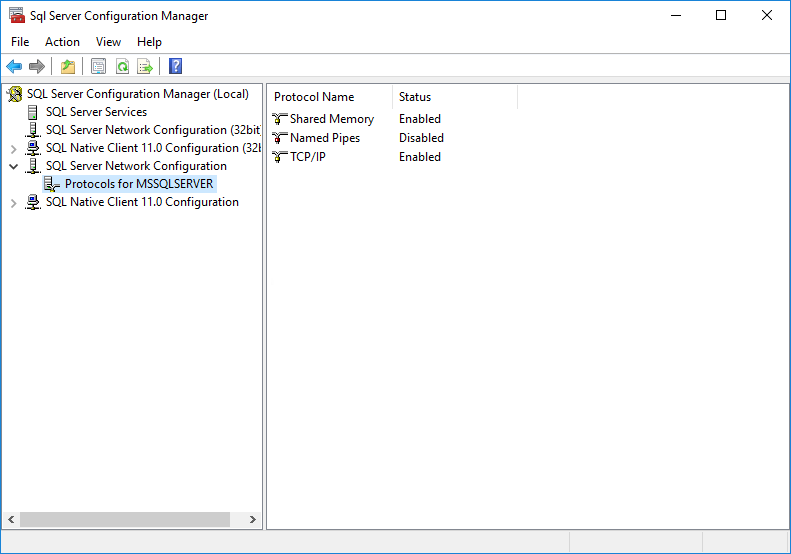
1. Select Start > SQL Server 2017 Configuration Manager.
The SQL Server Configuration Manager opens.
2. From the navigation tree, select SQL Server Network Configuration > Protocols for MSSQLSERVER, as shown in Figure 43.
Figure 43 SQL Server Configuration Manager
3. Right-click TCP/IP and select Properties from the shortcut menu.
The TCP/IP Properties dialog box opens, as shown in Figure 44.
Figure 44 TCP/IP Properties dialog box
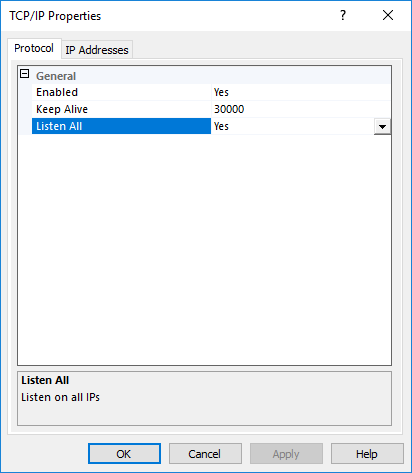
4. On the Protocol tab, make sure Yes is selected for Listen All.
5. Click the IP Addresses tab, select Yes for the Enabled option of each IP address, and set TCP Port to 1433, as shown in Figure 45.

6. Click OK.
The system displays a message that indicates the database service must be restarted to validate the configuration, as shown in Figure 46.
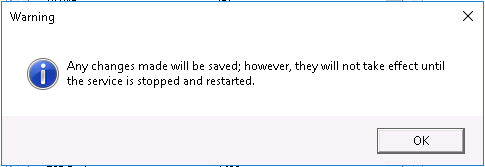
7. Click OK.
8. Restart the SQL Server service. For more information, see "Restarting the SQL Server service."
|
|
NOTE: · When Yes is selected for Listen All on the Protocol tab, the SQL Server automatically updates IP address settings after an IP address is changed. If you selected No, you must manually update the IP addresses. · You can enable the Named Pipes property in the same way. · In distributed deployment, make sure you configure all database servers to use the same listening port. |
Modifying the maximum server memory for the SQL Server
To ensure the optimum performance, the SQL Server is preemptive and uses a default maximum server memory of 2147483647 MB. When IMC and the SQL Server are installed on the same server, you must reduce the maximum server memory for the SQL Server. As a best practice, set the maximum server memory to half the server's physical memory.
To modify the maximum server memory for the SQL Server:
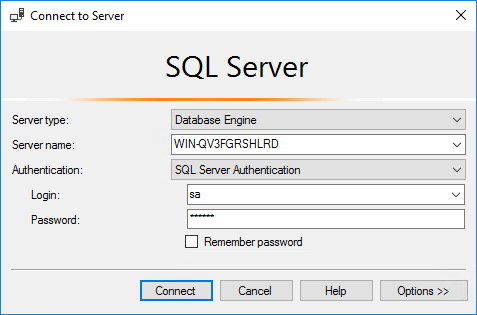
1. Select Start > Microsoft SQL Server Management Studio 17.
2. In the Connect to Server dialog box, configure the following parameters, as shown in Figure 47:
a. Select SQL Server Authentication for the Authentication field.
b. Enter sa in the Login field.
c. Enter the password in the Password field.
Figure 47 Database login dialog box
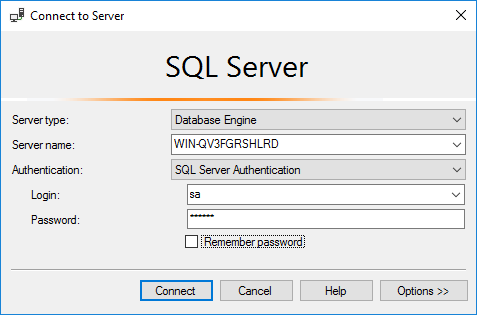
3. Click Connect.
4. Right-click the server name and select Properties from the shortcut menu.
The Server Properties page opens, as shown in Figure 48.
Figure 48 Server Properties page

5. Select Memory in the navigation tree, set the maximum server memory to half the server's physical memory, and click OK. This example uses 2048 MB.
Figure 49 Setting memory options for the SQL Server

6. Restart the operating system to validate the modification.
Starting the SQL Server Browser service
To enable IMC to connect to a named instance of SQL Server 2017, you must start the SQL Server Browser service after the SQL Server installation is complete.
If you set Startup Type for the SQL Server Browser service to Automatic during the SQL Server installation process, you do not need to start the SQL Server Browser service after the installation is complete.
To start the SQL Server Browser service:
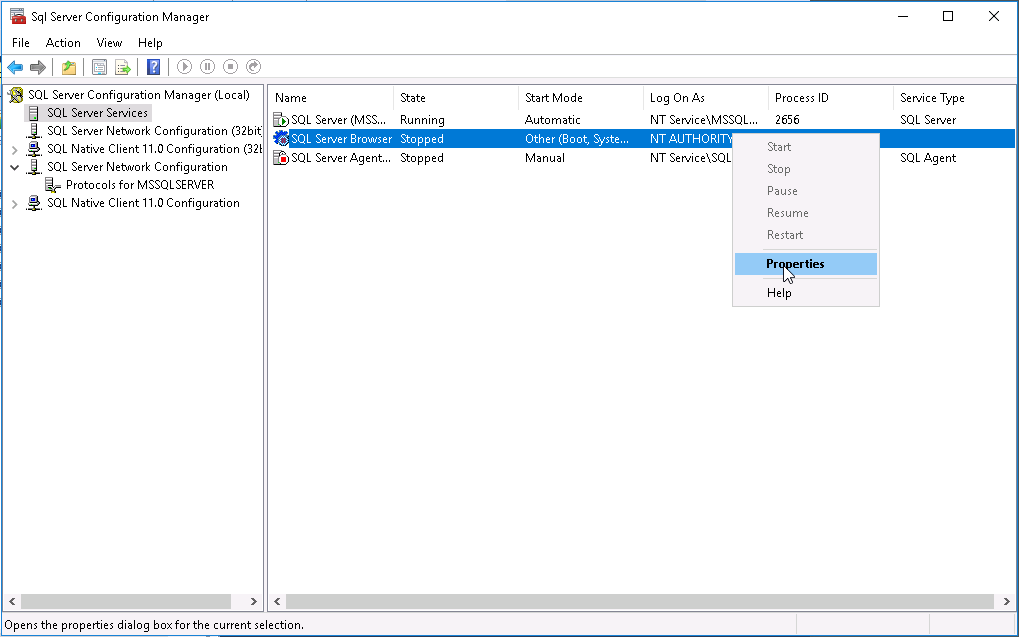
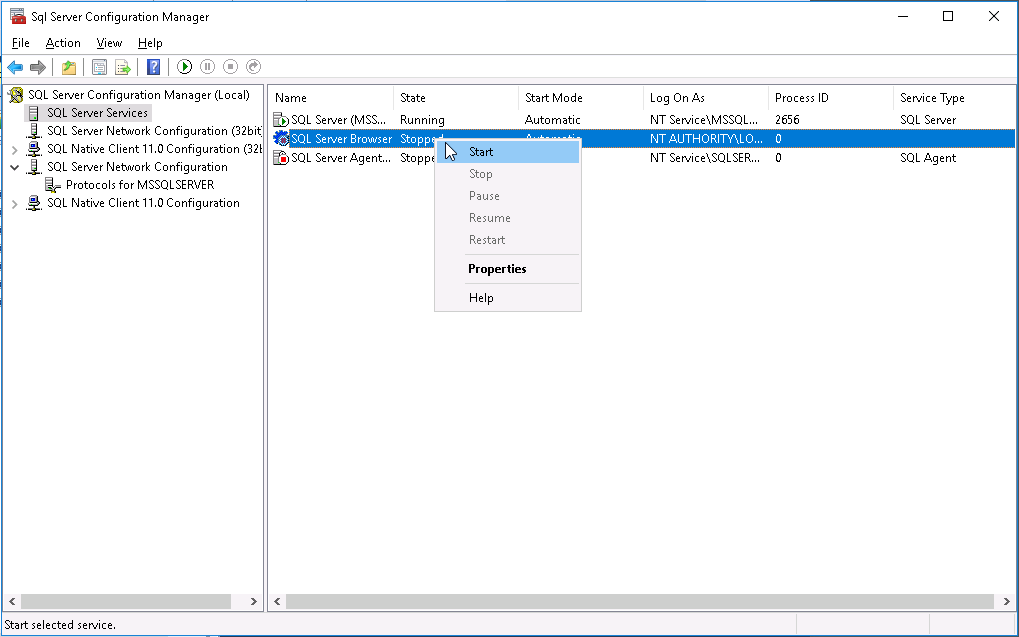
1. Select Start > SQL Server 2017 Configuration Manager.
2. Select SQL Server Services from the navigation tree, right-click SQL Server Browser on the main pane, and then select Properties from the shortcut menu.
Figure 50 Launching the SQL Server Browser Properties dialog box
3. Click the Service tab and then select Automatic for Start Mode.
Figure 51 Setting the service start mode to Automatic
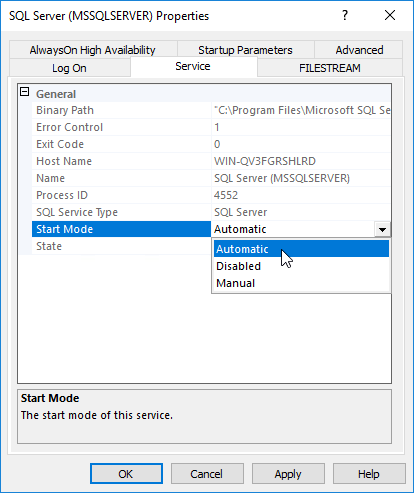
4. Click OK.
The dialog box closes.
5. Right-click SQL Server Browser, and then select Start from the shortcut menu.
Figure 52 Starting the SQL Server Browser service
Changing the SQL Server service startup account
When you specify a superuser for IMC to use a remote SQL Server database, that user must have write permissions to all the disks on the database server. To ensure these user capabilities, you must configure the SQL Server service to start up using the built-in local system account.
To configure the SQL Server service to start up using the built-in local system account:
1. Select Start > All Programs > Microsoft SQL Server 2017 > SQL Server 2017 Configuration Manager.
2. From the navigation tree, select SQL Server Services.
The main pane displays the services installed by SQL Server.
3. Right-click SQL Server (MSSQLSERVER), and then select Properties from the shortcut menu.
4. Click the Log On tab.
Figure 53 Log On tab
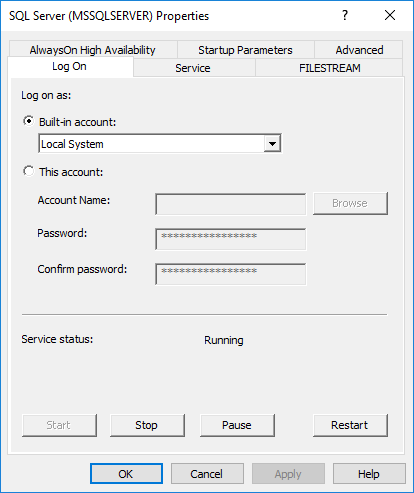
5. Make sure Local System is selected for the Built-in account list.
6. Click OK.
7. Restart the SQL Server service to validate the configuration.
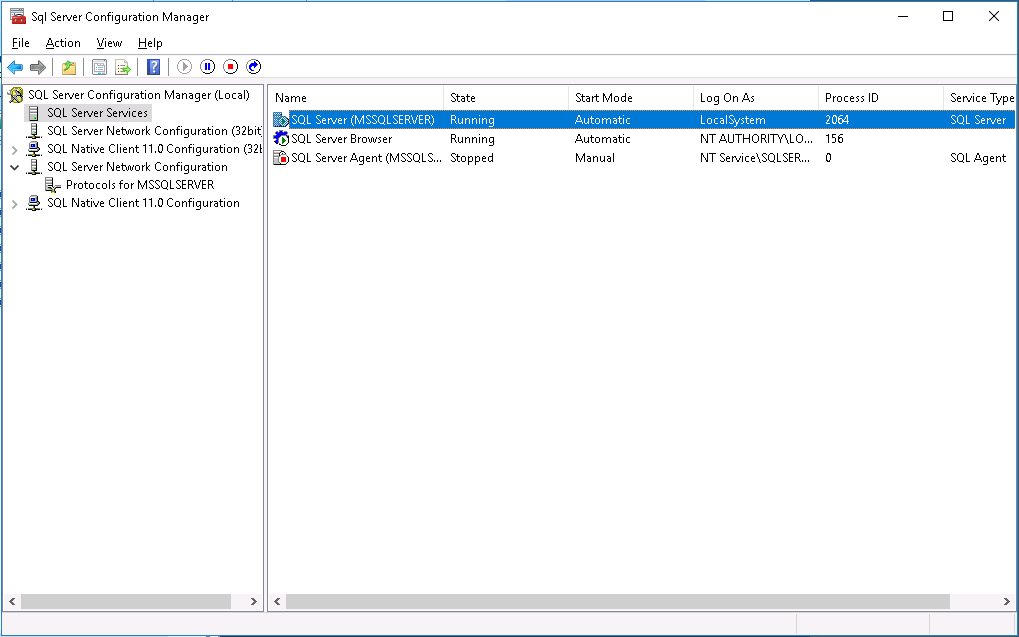
Restarting the SQL Server service
1. Select Start > All Programs > Microsoft SQL Server 2017 > SQL Server Configuration Manager.
2. From the navigation tree, select SQL Server Services.
3. Right-click SQL Server (MSSQLSERVER) on the main pane.
4. Click the Restart service icon ![]() on the toolbar, as shown in Figure 54.
on the toolbar, as shown in Figure 54.
Figure 54 Restarting the SQL Server service
Creating a superuser
The SQL Server database has a default superuser named sa. To specify another user for database access during IMC installation, first create a login user and grant administrator privilege to the user on the SQL Server.
To create a superuser:
1. Select Start > Microsoft SQL Server Management Studio 17.
The database login dialog box opens, as shown in Figure 55.
Figure 55 Login dialog box
2. Select SQL Server Authentication for Authentication, select a login username, enter the password, and then click Connect.
The Microsoft SQL Server Management Studio page opens, as shown in Figure 56.
Figure 56 Microsoft SQL Server Management Studio page
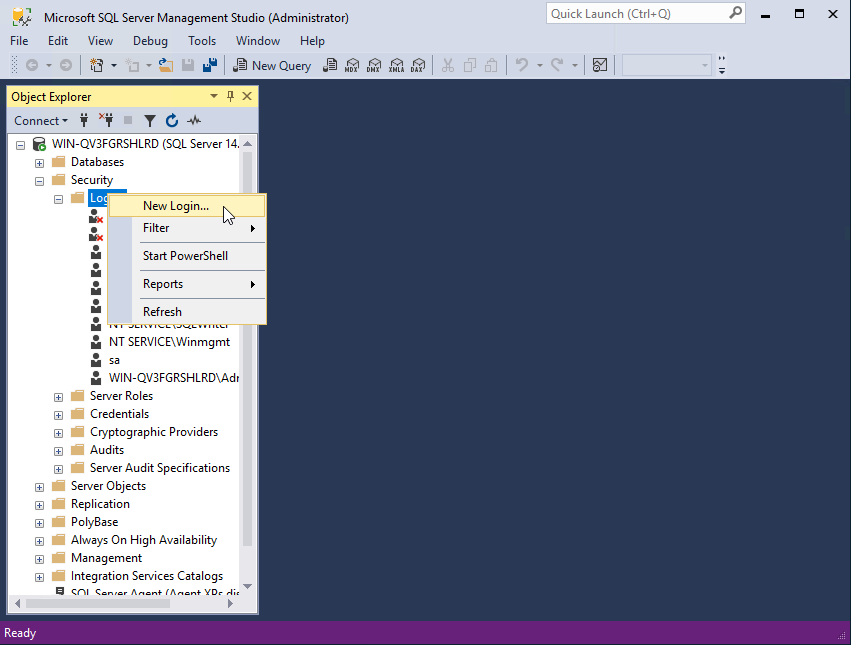
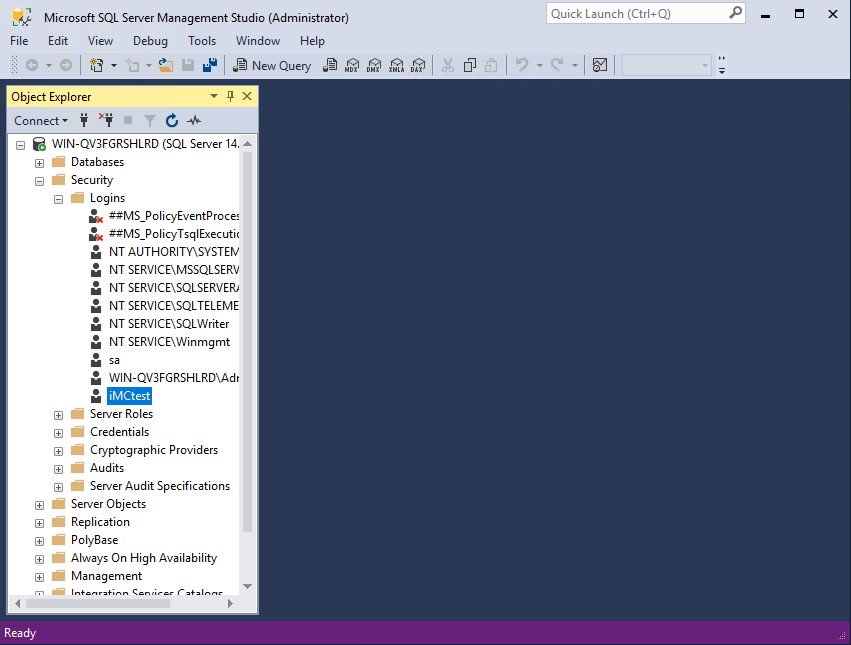
3. Expand the Security node in the navigation tree, right-click Logins, and select New Login from the shortcut menu.
The Login - New page opens, as shown in Figure 57.
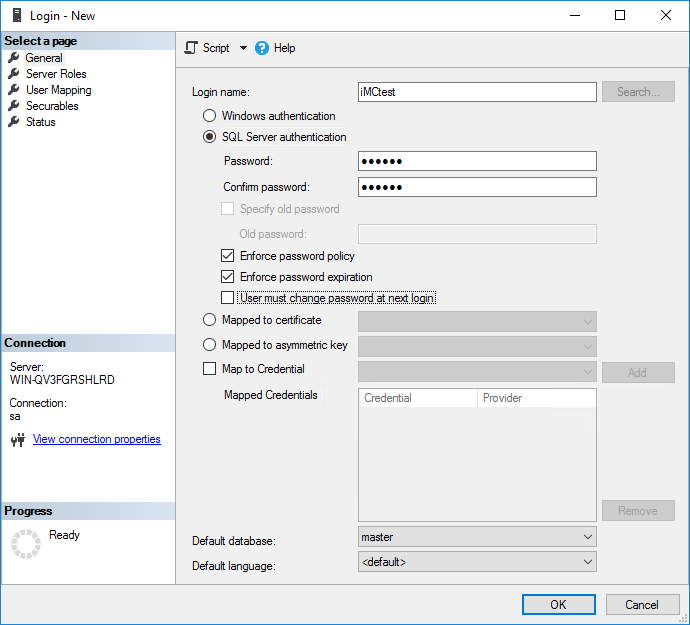
4. On the General page, enter the login name, click SQL Server authentication, enter the password, and then clear User must change password at next login. This example uses iMCtest as the login name.
For IMC to correctly identify the password, make sure the password does not contain any of the following characters:
¡ Left angle racket (<)
¡ Right angle bracket (>)
¡ Vertical bar (|)
¡ Tab (\t)
5. From the navigation tree, select Server Roles.
Figure 58 Setting server roles
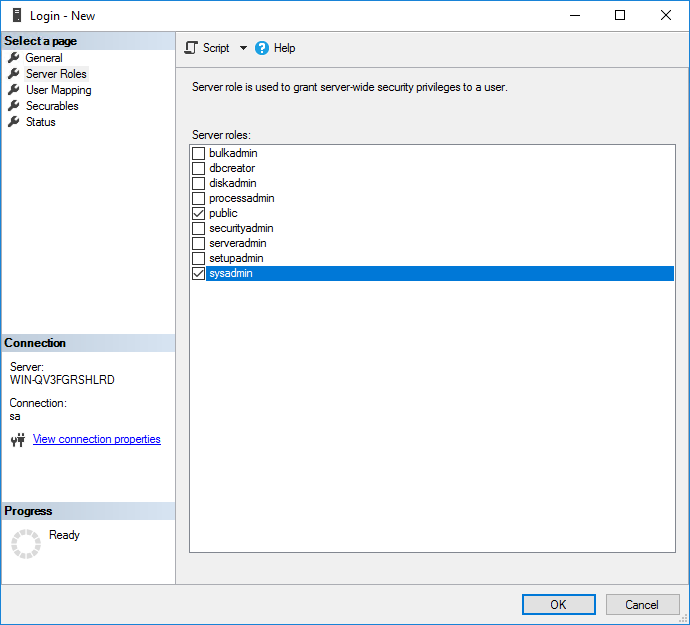
6. Select public and sysadmin and click OK.
The user is granted database administrator privileges and is displayed under the Security > Logins node in the navigation tree of Microsoft SQL Server Management Studio, as shown in Figure 59.
Figure 59 Viewing the new user
Uninstalling SQL Server 2017
1. Select Start > Control Panel > Programs and Features.
2. Select Microsoft SQL Server 2017 (64-bit), and then click Uninstall.
3. Follow the same procedure to uninstall other programs shown in Figure 60.
Figure 60 Uninstalling SQL Server 2017

FAQ
Does changing the computer name affect the database? How do I restore the database?
Changing the name of the computer running the SQL Server might cause database operations to fail.
Perform the following steps to update the computer name saved in the database. In this example, the old computer name is SERVER_1, and the new computer name is SERVER_2.
1. Open the CMD window and execute the following scripts (the login username is sa, and the password is iMCpass):
osql -Usa -PiMCpass
select @@SERVERNAME
go
The old computer name SERVER_1 is displayed in the interface.
2. Execute the following commands to modify the computer name saved in the database:
sp_dropserver @server=‘SERVER_1’, @droplogins=NULL
go
sp_addserver @server=‘SERVER_2’, @local='local', @duplicate_ok= 'duplicate_OK'
go
exit
The old computer name SERVER_1 is deleted, and the new computer name SERVER_2 is added.
3. Restart the SQL Server service in the Windows Service Manager to restore the database.
During IMC installation, the following message is displayed: MS SQLServer is not Installed Correctly, MSSOLSERVER Service Does not Exist. How do I resolve the issue?
The MSSQLSERVER string is the default instance name of the Microsoft SQL Server. This message indicates that you have selected the default instance, but the instance does not exist. If you do not select the default instance, but you specify the instance name ABC, MSSQL$ABC is displayed.
To resolve the issue, check the default instance name in the SQL Server Configuration Manager, and specify the correct instance name during IMC installation.
During IMC installation, the following message is displayed: Database Service MSSQLSERVER Is not Configured to Be Started with Local System. How do I resolve the issue?
To create the database file for IMC, the MSSQLSERVER service must start with the local system and must have write privileges to any local disk. Otherwise, IMC cannot be installed.
For the configuration procedure, see "Changing the SQL Server service startup account."
During IMC installation, the following message is displayed: The ADO 1.5 Component Is not Found in Current System. How do I resolve the issue?
IMC uses ADO 1.5 to connect the database. ADO 1.5 is provided by the operating system.
This message indicates that ADO 1.5 is corrupted. To resolve the issue, reinstall ADO on the host.
During IMC installation, the following message is displayed: Provider Cannot Be Found. How do I resolve the issue?
This message indicates that MDAC is not installed on the server, or that the MDAC installation is corrupted. MDAC corruption typically occurs when application programs attempt to install a partial version of MDAC.
To resolve the issue, download the installation program mdac_typ.exe from the Microsoft website, and then reinstall MDAC. If the MDAC installation fails, perform the following steps:
1. In Windows Explorer, open the C:\WINDOWS\inf folder. (This folder might be hidden.)
2. Right-click the mdac.inf file and select Install.
You can select files from the Service Pack CD or the current operating system.
¡ To select files from the Service Pack CD, locate the i386 directory on the CD drive. For example, if the CD drive is D, select the directory D:\i386.
¡ To select files from the current operating system, click Browse, select a file, and click Retry.
The following files must be located during installation:
- File name: adcjavas.inc
Location: C:\Program Files\Common Files\System\msadc
- File name: adojavas.inc
Location: C:\Program Files\Common Files\System\ado
- File name: msdadc.dll
Location: C:\Program Files\Common Files\System\ole db
- File name: dao360.dll
Location: C:\Program Files\Common Files\Microsoft shared\dao
- File name: handler.reg
Location: C:\Program Files\Common Files\System\msadc
- File name: oledbjvs.inc
Location: C:\Program Files\Common Files\System\ole db
- File name: MDACRdMe.htm
Location: If you cannot locate this file, change the name of the file MDACReadme.htm to MDACRdMe.htm.
3. When the installation is complete, reboot the operating system.
|
|
NOTE: The MDAC installation is successful if no error message is displayed. |
4. If the problem persists, use the MDAC Component Checker to identify MDAC installation problems:
a. Download the MDAC Component Checker cc_pkg.exe from the Microsoft website.
b. Decompress the file to the C:\ComponentChecker directory.
c. In the Component Checker dialog box, select the first option, and then click OK
Figure 61 Component Checker dialog box

After performing the analysis, mismatch information is displayed under File Details. This information indicates potential problems with the MDAC installation.
Figure 62 Mismatch information under File Details
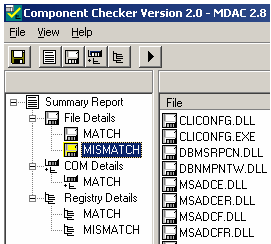
d. Click MISMATCH and view the files in the main pane. These file versions are different from the MDAC version. The Mismatch Field column displays expected file versions. The File Version column displays actual file versions.
5. If the version mismatch information cannot be resolved through MDAC installation, copy files to the corresponding directories.
a. Locate the mdacxpak.cab file from the decompressed file mdac_typ.exe. Use WinZip to decompress the mdacxpak.cab file, which contains most of the important MDAC files.
b. Copy the decompressed files to the corresponding paths displayed in MISMATCH.
c. Reboot the operating system.
6. If you still cannot resolve the issue, reinstall the operating system and databases, or contact Hewlett Packard Enterprise Support.
During IMC installation, the following message is displayed: "Failed to run bcp.exe, Database tools not installed or Windows not restarted" after MS SQL Server installed. How do I resolve the issue?
IMC requires using the bcp.exe tool to access a remote database server.
To resolve the issue, install the client tool on the SQL Server client, as shown in Figure 63. Restart Windows for the client software bcp.exe to take effect after the installation.
Figure 63 Feature Selection page

How do I update database passwords for IMC?
After the database password of an IMC component is changed using the database management tool, execute pwdmgr.bat to update the password in the file server-addr.xml on the IMC server. The file is located in directory \common\conf in the IMC installation path. It stores database passwords of all IMC components in ciphertext.
The following example uses 192.168.20.107 as the IP address of the database. The dbpassword string represents the new database password of the imc_config user. The config_db string represents the database name. The database IP address and name can be retrieved from the file server-addr.xml.
Figure 64 Updating database passwords for IMC
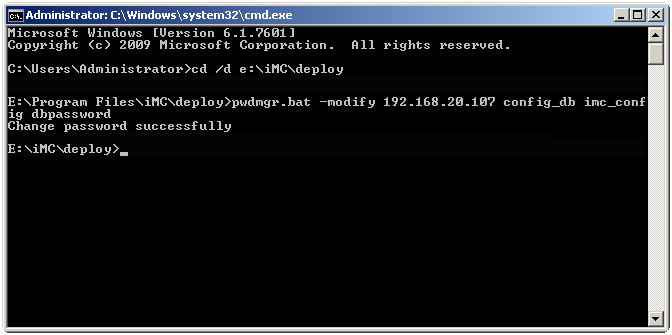
If IMC is deployed in distributed mode, you must update the database password on every IMC server.
Why can't I install SQL Server on a Microsoft Gold Standard server?
To install SQL Server on a Microsoft Gold Standard server, make sure you are a system user with the proper privileges.
|
Local policy object display name |
User privilege |
|
Backup files and directories |
SeBackupPrivilege |
|
Debug programs |
SeDebugPrivilege |
|
Manage auditing and security log |
SeSecurityPrivilege |
