- Table of Contents
- Related Documents
-
| Title | Size | Download |
|---|---|---|
| 01-Text | 2.67 MB |
Installing the required software packages
Copying the installation programs to the Linux server
Starting and stopping the MySQL service
Creating a remote root user account
Configuring parameters in the my.cnf file
Enabling batch data import from files
Configuring database backup (optional)
Overview
This document describes how to install and configure the MySQL 8.0 database in 64-bit Red Hat Enterprise Linux 8.3 before you install IMC.
The installation procedures for MySQL databases of other versions might vary. For information about installing databases of other versions, see their respective installation and configuration guides. Perform all procedures in this document as a Linux root user, unless instructed to do otherwise.
This document uses the mysql-community-server-8.0.17-1.el7.x86_64.rpm and mysql-community-client-8.0.17-1.el7.x86_64.rpm installation programs as examples. The installation procedures for the MySQL server of other versions might vary. For information about installing the MySQL server of other versions, see their respective installation and configuration guides.
Prerequisites
Before installing the MySQL 8.0 database, install the required software packages and remove the built-in MariaDB.
Installing the required software packages
For correct installation of IMC in Red Hat Enterprise Linux 8.3, you must install also the required 32-bit software packages. For more information, see Red Hat Enterprise Linux Server 8.1 Installation Guide.
Removing the built-in MariaDB
Before you install the MySQL 8.0 database, you must remove the built-in MariaDB built in Red Hat Enterprise Linux 8.3.
1. Query the installed MariaDB and related programs.
rpm –qa | grep mariadb
2. Remove the software packages.
rpm –e software package name
3. Remove the components depended on MariaDB if a message about the components dependent on MariaDB is displayed.
rpm –e --nodeps software package name
4. Query the installed MySQL database and related programs.
rpm –qa | grep mysql
rpm –qa | grep MySQL
5. Remove the software package.
rpm –e ––nodeps software package name
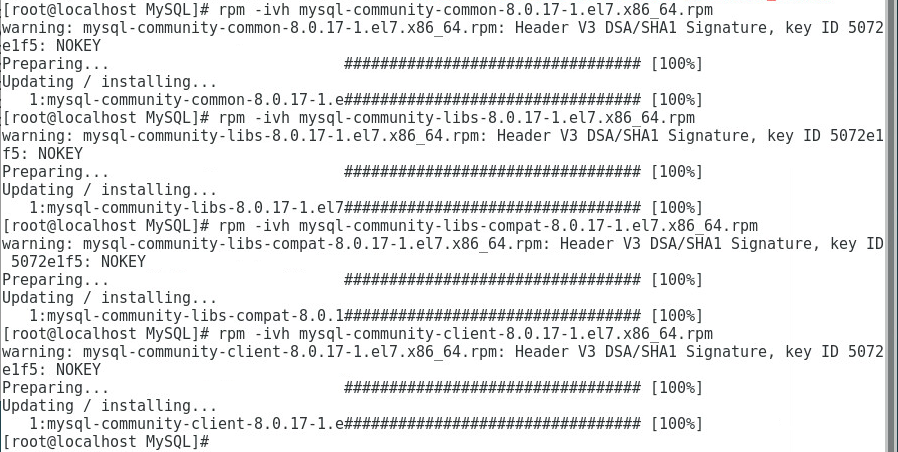
Copying the installation programs to the Linux server
Before installing the MySQL database, copy the installation programs to the Linux server.
This document uses the installation programs mysql-community-server-8.0.17-1.el7.x86_64.rpm and mysql-community-client-8.0.17-1.el7.x86_64.rpm, as shown in Figure 1.
Figure 1 MySQL installation programs on Linux

Because mysql-community-client-8.0.17-1.el7.x86_64.rpm depends on mysql-community-common-8.0.17-1.el7.x86_64.rpm, mysql-community-libs-compat-8.0.17-1.el7.x86_64.rpm and mysql-community-libs-8.0.17-1.el7.x86_64.rpm, you must install programs in the following order:
1. mysql-community-common-8.0.17-1.el7.x86_64.rpm.
2. mysql-community-libs-8.0.17-1.el7.x86_64.rpm.
3. mysql-community-libs-compat-8.0.17-1.el7.x86_64.rpm
4. mysql-community-client-8.0.17-1.el7.x86_64.rpm.
If the database and IMC are installed on the same server, install mysql-community-client-8.0.17-1.el7.x86_64.rpm first and then install mysql-community-server-8.0.17-1.el7.x86_64.rpm on the IMC server.
If IMC is installed on a server other than the database server, install programs in the following order:
1. Install mysql-community-client-8.0.17-1.el7.x86_64.rpm on the IMC server.
2. Install mysql-community-client-8.0.17-1.el7.x86_64.rpm on the database server.
3. Install mysql-community-server-8.0.17-1.el7.x86_64.rpm on the database server.
Installation
In the following procedures, root user refers to the MySQL database root user, not the Linux root user, unless specified otherwise.
Installing the MySQL client
The MySQL client provides tools for MySQL management and user interaction, for example, mysqladmin and mysql. You must install the MySQL client on the IMC server to communicate with the MySQL server (locally or remotely).
Go to the directory where the MySQL installation programs are located and install the MySQL client, as shown in Figure 2.
rpm –ivh mysql-community-common-8.0.17-1.el7.x86_64.rpm,
rpm –ivh mysql-community-libs-8.0.17-1.el7.x86_64.rpm,
rpm –ivh mysql-community-libs-compat-8.0.17-1.el7.x86_64.rpm,
rpm –ivh mysql-community-client-8.0.17-1.el7.x86_64.rpm,
Figure 2 Installing the MySQL client
Installing the MySQL server
1. Go to the directory where the MySQL installation programs are located, and install the MySQL server, as shown in Figure 3.
rpm -ivh mysql-community-common-8.0.17-1.el7.x86_64.rpm,
rpm –ivh mysql-community-libs-8.0.17-1.el7.x86_64.rpm,
rpm –ivh mysql-community-libs-compat-8.0.17-1.el7.x86_64.rpm,
rpm -ivh mysql-community-client-8.0.17-1.el7.x86_64.rpm,
rpm -ivh mysql-community-server-8.0.17-1.el7.x86_64.rpm,
Figure 3 Installing the MySQL server

|
|
IMPORTANT: The lower_case_table_names parameter is not modifiable after the MySQL server is initialized. Before you start the MySQL service for the first time, add lower_case_table_names = 1 under [mysqld] in the my.cnf file. For more information, see "Configuring parameters in the my.cnf file." |
2. Start the MySQL service after the installation is complete.
systemctl start mysqld
3. Verify that the MySQL service has started (3306 is the default port).
netstat –nat | grep 3306
Figure 4 shows that the MySQL service has started.
Figure 4 Checking the MySQL service status

Verifying the connectivity
IMC with a local database
The MySQL server is installed on the IMC server. Run the following command and enter the root user password at the prompt Enter password:
mysql –u root –p
The root user password is randomly generated during the MySQL server installation. To view the password, see "Changing the MySQL password."
If the MySQL command line interface is displayed, the MySQL client was installed successfully, as shown in Figure 5.
Figure 5 Verifying the MySQL client installation

IMC with a remote database
The IMC server is installed with the MySQL client only. Run the following command and enter the new root user password at the prompt Enter password:
mysql -h 10.114.119.79 –u root -p
Before verifying the MySQL client installation, make sure a remote root user account has been created on the MySQL server. For information about how to create a remote root user account, see "Creating a remote root user account."
Figure 6 Verifying the connection between the MySQL client and server
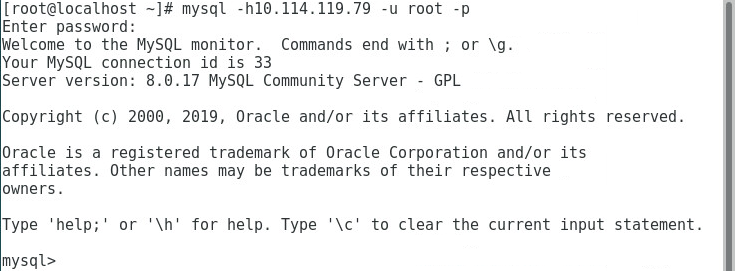
In the output, 10.114.119.79 is the IP address of the MySQL server, and root is the remote root user account. The root user password is randomly generated during the MySQL server installation. To view the password, see "Changing the MySQL password."
The prompt mysql indicates that the client has connected successfully to the MySQL server.
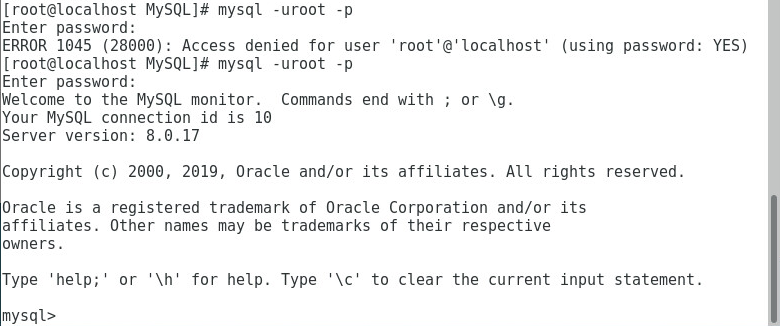
Changing the MySQL password
The MySQL server randomly generates a temporary password for the root user during the installation and stores the password in the /var/log//mysqld.log file. At the first startup of the MySQL service, you must modify the password. Otherwise, the MySQL service cannot run correctly.
To modify the password:
1. Query the temporary password in the log file, as shown in Figure 7.
sudo grep 'temporary password' /var/log/mysqld.log

2. Log in to the database with the temporary password.
mysql –u root –p
3. Enter the temporary password at the prompt Enter password.
The prompt mysql is displayed, as shown in Figure 8.
Figure 8 Entering the MySQL command line interface
4. Change the root user password. This example uses iMC_123456 as the new password.
alter user 'root'@'localhost' identified with mysql_native_password by 'iMC_123456';
For the password to be recognized during IMC installation, make sure the password of the root user does not include spaces, tabs (\t), or any characters in Table 1.
According to the default password policy in MySQL 8.0, the root password must contain a minimum of eight characters that include uppercase and lowercase letters, digits, and special characters.
Figure 9 shows that the password has been changed successfully.
Figure 9 Changing the root user password
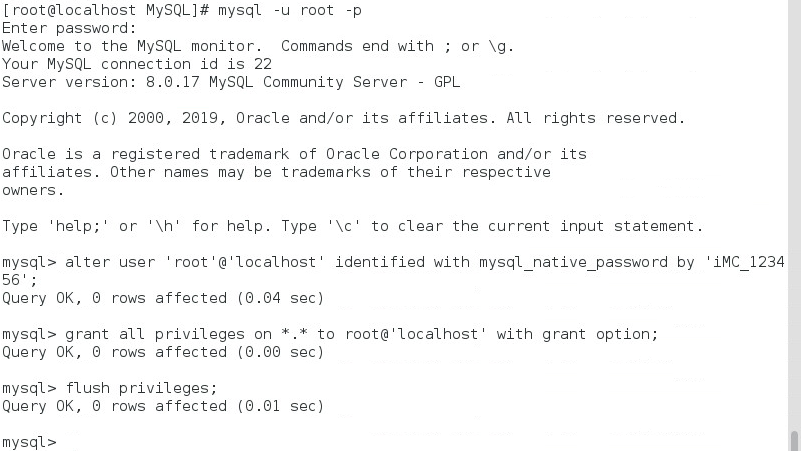
Table 1 Invalid special characters for the root user password
|
Character name |
Symbol |
|
Ampersand |
& |
|
Apostrophe |
' |
|
At sign |
@ |
|
Back quote |
` |
|
Backslash |
\ |
|
Caret |
^ |
|
Dollar sign |
$ |
|
Exclamation point |
! |
|
Left angle bracket |
< |
|
Left parenthesis |
( |
|
Quotation marks |
" |
|
Right angle bracket |
> |
|
Right parenthesis |
) |
|
Semicolon |
; |
|
Slash |
/ |
|
Vertical bar |
| |
Startup and stop
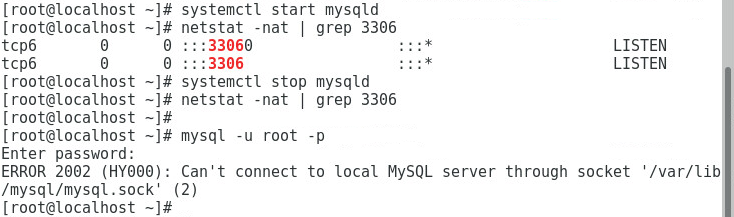
Starting and stopping the MySQL service
MySQL is configured automatically as the system service after the MySQL server is installed.
You can start or stop the MySQL service as a common system service.
systemctl start mysqld
systemctl stop mysqld
Figure 10 Start and stop commands
Configuring the MySQL server
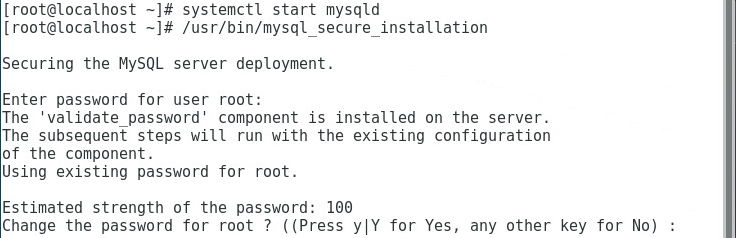
Setting security options
1. Run the mysql_secure_installation program.
/usr/bin/mysql_secure_installation
2. Enter the root user password to set security options, such as setting a root user password, removing anonymous users, and removing a test database, as shown in Figure 11.
Figure 11 Setting the root user password
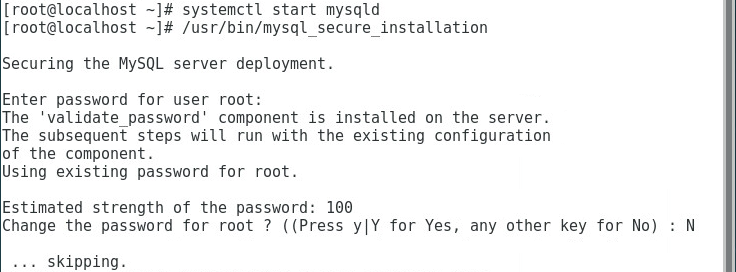
3. Enter N when the system asks you to change the root password, as shown in Figure 12.
Figure 12 Choosing not to change the root user password
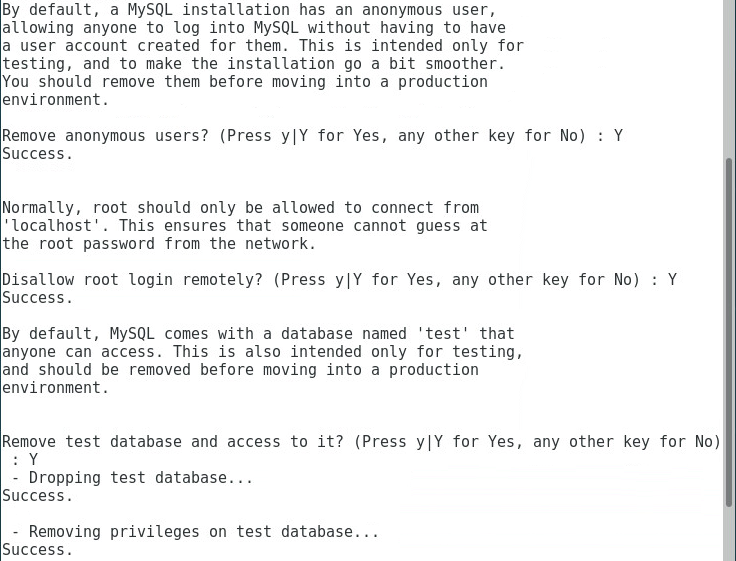
4. Remove anonymous users and the database named test, as shown in Figure 13.
If you want to use IMC with a local database, you must disable remote root login.
Figure 13 Configuring anonymous users, remote access, and the test database
5. When installing IMC to use a remote database, you must create a remote root user account.
For information about how to create a remote root user account, see "Creating a remote root user account."
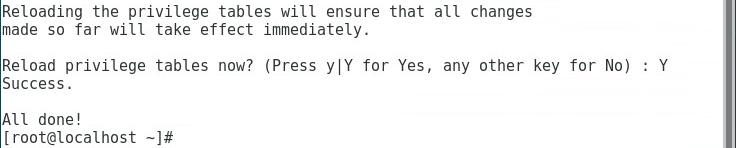
6. Reload the privilege tables to make the changes take effect, as shown in Figure 14.
Figure 14 Reloading the privilege tables
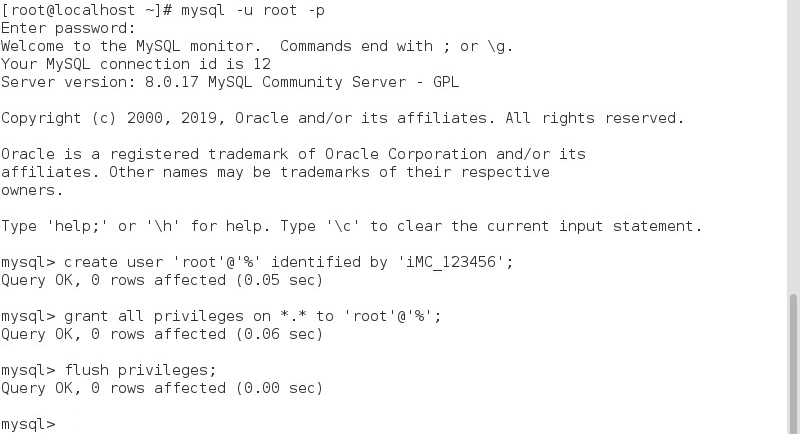
Creating a remote root user account
By default, the MySQL server has only one local root user account. If you want to use IMC with a remote database, install MySQL client and configure a remote root user account on the database server.
To create a remote root user account:
1. Log in to MySQL.
mysql –u root –p
2. Enter the new MySQL password.
3. Alter database users.
create user 'root'@'%' identified by 'iMC_123456'; //iMC_123456 is the password of remote user root. Please set the password as needed.
alter user 'root'@'%' identified with mysql_native_password by 'iMC_123456';
4. Create a remote root user account.
grant all privileges on *.* to root@'%' with grant option;
5. Refresh privileges.
flush privileges;
Figure 15 Creating a remote root user account
|
|
IMPORTANT: For the password to be recognized during IMC installation, make sure the password of the root user does not include spaces, tabs (\t), or any characters in Table 1. According to the default password policy in MySQL 8.0, the root password must contain a minimum of eight characters that include uppercase and lowercase letters, digits, and special characters. |
Configuring parameters in the my.cnf file
The default configuration file /etc/my.cnf determines the performance and behavior of the MySQL server and defines the path for saving MySQL files. Before you configure the my.cnf file, stop the MySQL service. Restart the MySQL service after you finish the file configuration.
To configure parameters in the my.cnf file:
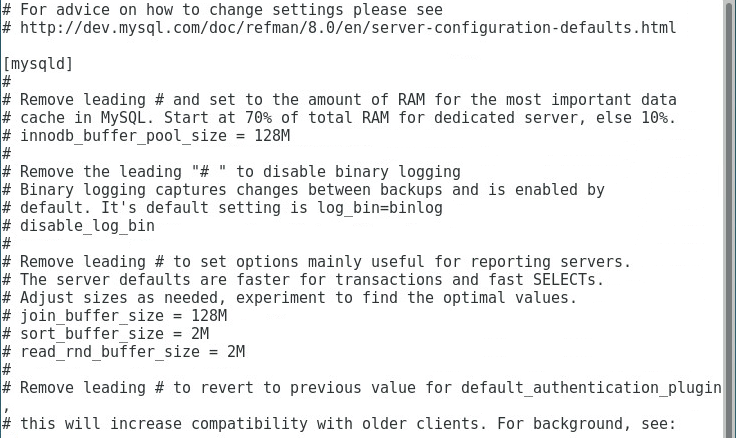
1. Stop the MySQL service and open the my.cnf file, as shown in Figure 16.
Figure 16 Opening the my.cnf file
![]()
2. Enter i to enter edit mode, as shown in Figure 17.
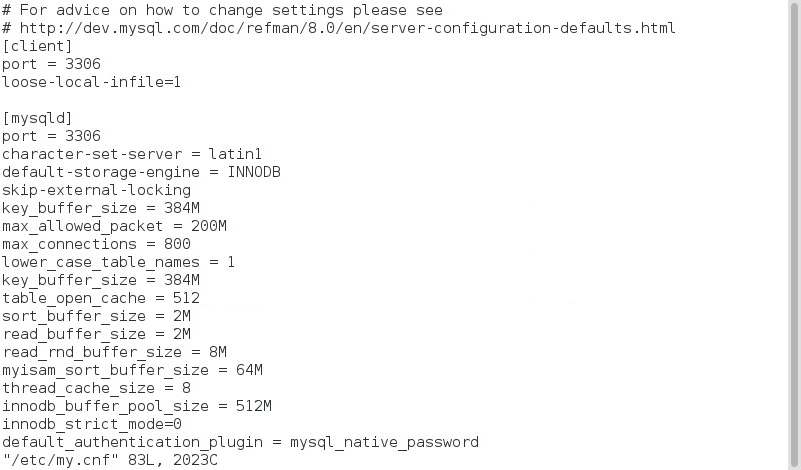
3. Add parameters under [mysqld], as shown in Figure 18. Table 2 describes the parameters that you can configure in the my.cnf file.
|
|
IMPORTANT: For regions that use different daylight hours between summer and winter, set the default time zone according to the actual time zone. For specific time zone settings, access the website https://dev.mysql.com/doc/refman/8.0/en/time-zone-support.html. |
[client]
port= 3306
loose-local-infile=1
[mysqld]
port= 3306
character-set-server = latin1
default-storage-engine = INNODB
skip-external-locking
key_buffer_size = 384M
max_allowed_packet = 200M
max_connections = 800
lower_case_table_names = 1
key_buffer_size = 384M
table_open_cache = 512
sort_buffer_size = 2M
read_buffer_size = 2M
read_rnd_buffer_size = 8M
myisam_sort_buffer_size = 64M
thread_cache_size = 8
innodb_buffer_pool_size = 512M
innodb_strict_mode = 0
default_authentication_plugin = mysql_native_password
default-time-zone = '+8:00'
local_infile=1
[mysqldump]
quick
max_allowed_packet = 200M
[mysql]
no-auto-rehash
default_character_set=latin1
local_infile=1
[myisamchk]
key_buffer_size = 128M
sort_buffer_size = 128M
read_buffer = 2M
write_buffer = 2M
[mysqlhotcopy]
interactive-timeout
Figure 18 Adding parameters under [mysqld]
|
Parameter |
Description |
|
max_connections |
Maximum number of connections permitted by the MySQL server. You can modify this number based on the number of deployed IMC components. For the maximum number allowed for each component or subcomponent, see IMC Getting Started Guide. |
|
character-set-server |
Character set required by the MySQL database. The character set for English is latin1. |
|
default-storage-engine |
MySQL database engine types: · MyISAM · InnoDB · MEMORY · MERGE |
|
innodb_buffer_pool_size |
Size of the InnoDB buffer pool. |
|
innodb_strict_mode |
Mode that affects the handling of syntax errors for CREATE TABLE, ALTER TABLE and CREATE INDEX statements: · 0—InnoDB ignores conflicting clauses and creates the table or index, with only a warning in the message log. · 1—InnoDB returns errors rather than warnings for certain conditions. |
|
lower_case_table_names |
Indicates whether a table name is case sensitive. · 0—Yes · 1—No |
|
max_allowed_packet |
Maximum allowed size for a packet. |
|
default-time-zone |
Sets the default server time zone. Named time zones can be used only if the time zone information tables in the MySQL database have been created and populated, for example, Europe/Helsinki. |
|
local_infile |
Whether to allow using the load data local infile command for data import and export. · 0—Disallowed · 1—Allowed |
|
transaction_isolation |
Transaction isolation level. Check whether the transaction_isolation parameter exists under [mysqld] when installing EIA: · If that parameter does not exist, add transaction_isolation=READ-COMMITTED under [mysqld]. · If that parameter exists, change the value to READ-COMMITTED. |
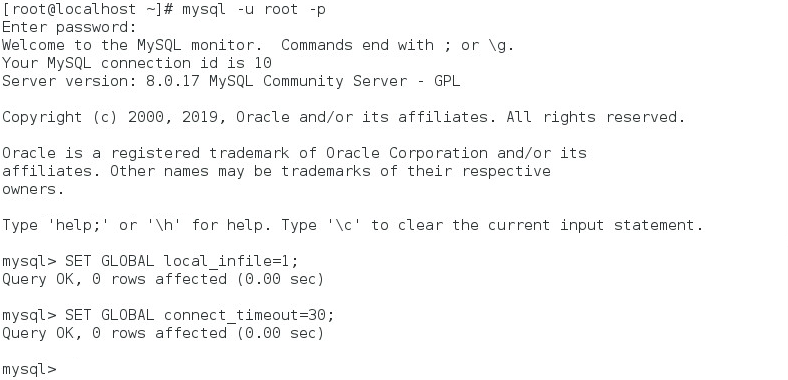
Enabling batch data import from files
Perform this task on the MySQL server and client.
1. Access the database.
mysql –u root –p
2. Enter the root password and then press Enter.
3. Execute the following scripts to enable batch data import from files.
SET GLOBAL local_infile=1;
SET GLOBAL connect_timeout=30;
Figure 19 Enabling batch data import from files
Configuring database backup (optional)
If you use the mysqldump utility to perform database backup, you might find no data or small data quantity during data backup. To resolve this issue, you can edit the database configuration file /etc/my.cnf.
1. Execute the vi /etc/my.cnf command to enter the Visual interface (vi) .
systemctl stop mysqld
2. Press i to enter the edit mode, and edit the parameters.
[mysqldump]
Single-transaction
3. Press ESC to return to general mode.
4. Press wq to save your configuration and quit vi.
Changing the log and database file directory (optional)
Change the log and database file directory as needed.
1. Stop the MySQL service.
systemctl stop mysqld
2. Create a path for storing logs and database files. The directory is /data/mysql_data in this example.
mkdir –p /data/mysql_data
3. Copy all files from the default directory to the new directory, and then change the access permissions of the files.
cp –R /var/lib/mysql/* /data/mysql_data/
chmod -R 777 /data/mysql_data/
4. Add the new directory to the [mysqld] section in the my.cnf file of the MySQL database.
vi /etc/my.cnf
datadir=/data/mysql_data
5. Add parameters above and below the [mysqld] section to specify the socket file for logging in to the MySQL database.
Above the [mysqld] section:
[mysql]
[client]
Below the [mysqld] section:
socket = /data/mysql_data/mysql.sock
6. Save the my.cnf file, and then quit the vi editor.
7. Start the MySQL service.
systemctl start mysqld
Uninstallation
IMC with a local database
1. Stop the MySQL service.
systemctl stop mysqld
2. Uninstall the MySQL database, as shown in Figure 20.
rpm -qa | grep mysql
rpm –e –-nodeps mysql-community -server-8.0.17-1.el7.x86_64
rpm –e –-nodeps mysql-community -client-8.0.17-1.el7.x86_64
rpm –e –-nodeps mysql-community -libs-8.0.17-1.el7.x86_64
rpm –e –-nodeps mysql-community-libs-compat-8.0.17-1.el7.x86_64.rpm
rpm –e –-nodeps mysql-community -common-8.0.17-1.el7.x86_64
You can use the following command to query the component name:
rpm -qa | grep mysql
Figure 20 Uninstalling the MySQL database
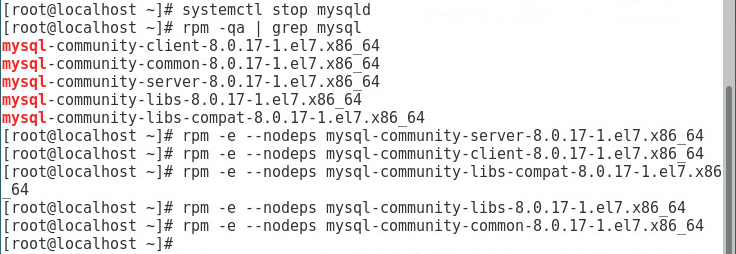
3. Manually remove the database files in the default directory /var/lib/mysql after uninstallation.
rm -rf /var/lib/mysql
After the directory is removed, the MySQL database is removed successfully.
IMC with a remote database
Uninstall the MySQL database, as shown in Figure 21.
rpm -qa | grep mysql
rpm –e –-nodeps mysql-community -client-8.0.17-1.el7.x86_64
rpm –e –-nodeps mysql-community -libs-8.0.17-1.el7.x86_64
rpm –e –-nodeps mysql-community-libs-compat-8.0.17-1.el7.x86_64.rpm
rpm –e –-nodeps mysql-community -common-8.0.17-1.el7.x86_64
Figure 21 Uninstalling the MySQL database

FAQ
Why do garbled characters appear in the database table?
During the installation of the MySQL server and client, configure a correct database character set that matches the operating system language. If they do not match, garbled characters might appear in the database table.
If you use an English operating system, set the character set to latin1. For more information, see Table 2.
If your operating system language is different, see the related MySQL documentation for the correct character set.
How do I update the database password for the IMC server?
If the password of the account that IMC uses to connect to a database is changed, the IMC server will fail to connect to the database. To resolve this problem, modify the database user password saved in IMC:
1. Execute the /opt/iMC/deploy/instInfoMgr.sh –modify dbAdminPwd=yourpassword command to modify the database password on the IMC server. For example, change the password to iMC123456, as shown in Figure 22.
Figure 22 Changing the database password on the IMC server

2. Click the Environment tab in the Intelligent Deployment Monitoring Agent window, and then click Refresh in the Database Space Usage area.
