- 产品与解决方案
- 行业解决方案
- 服务
- 支持
- 合作伙伴
- 新华三人才研学中心
- 关于我们


05-软件升级配置举例
本章节下载: 05-软件升级配置举例 (433.26 KB)
目 录
本文档介绍软件升级的典型配置举例。
本文档不严格与具体软、硬件版本对应,如果使用过程中与产品实际情况有差异,请参考相关产品手册,或以设备实际情况为准。
本文档中的配置均是在实验室环境下进行的配置和验证,配置前设备的所有参数均采用出厂时的缺省配置。如果您已经对设备进行了配置,为了保证配置效果,请确认现有配置和以下举例中的配置不冲突。
本文档假设您已了解软件升级和FTP/TFTP的特性。
如图1所示,Switch和文件服务器通过交换机相连,Switch作为TFTP客户端,文件服务器作为TFTP服务器。现要求:通过TFTP方式将存储在文件服务器上的文件switch.ipe下载到TFTP客户端,为Switch升级软件版本。

为了使交换机在重启后使用新版本软件,需要指定下次启动时所用的主用启动文件为升级后的软件版本。
表1 适用产品及版本
|
产品 |
软件版本 |
|
S12500G-AF系列交换机 |
Release 7639P01及以上版本 |
|
S10500X系列交换机 |
Release 7639P01及以上版本 |
|
S12500-XS系列交换机 |
Release 7639P01及以上版本 |
|
S7600E-X系列交换机 |
Release 7639P01及以上版本 |
|
S7500X-X系列交换机 |
Release 7639P01及以上版本 |
|
S10500系列交换机 |
Release 7639P01及以上版本 |
|
S7600-X系列交换机 |
Release 7639P01及以上版本 |
|
S12500-S系列交换机 |
Release 7639P01及以上版本 |
|
S7500E-X系列交换机 |
Release 7639P01及以上版本 |
|
S7500E系列交换机 |
Release 7639P01及以上版本 |
|
S7500X系列交换机 |
Release 7639P01及以上版本 |
|
S7600系列交换机 |
Release 7639P01及以上版本 |
|
S7000ET系列交换机 |
Release 7639P01及以上版本 |
· 当设备剩余的存储空间不够,请使用delete /unreserved file-url命令删除部分暂时不用的文件后再执行升级软件操作。
· 软件升级时需要重启设备,建议使用save命令保存设备的当前配置。
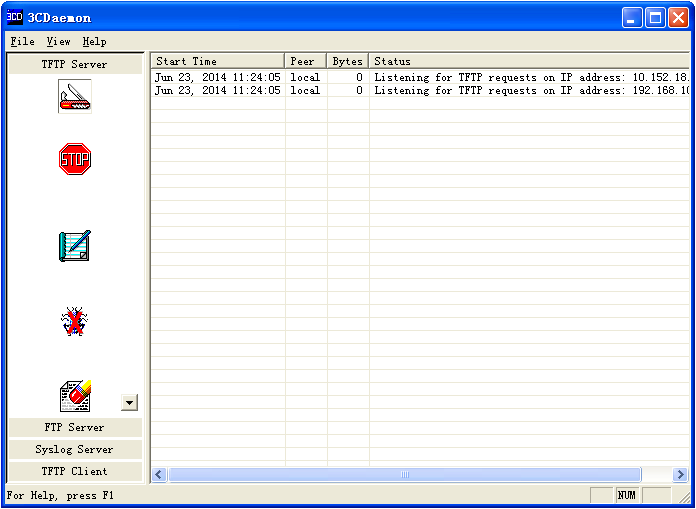
# 配置文件服务器的IP地址为192.168.100.14/24,与Switch路由可达,具体配置方法略。
# 启动文件服务器上的TFTP服务器功能(以3CDaemon软件为例),设置TFTP服务器下载路径等参数,并开启服务。
图2 配置TFTP服务器
# 配置Switch管理口的IP地址。
<Switch> system-view
System View: return to User View with Ctrl+Z.
[Switch] interface m-gigabitethernet 0/0/0
[Switch-M-GigabitEthernet0/0/0] ip address 192.168.100.66 255.255.255.0
[Switch-M-GigabitEthernet0/0/0] quit
[Switch] quit
# 在Switch 上ping TFTP服务器地址,能够ping通。
<Switch> ping 192.168.100.14
Ping 192.168.100.14 (192.168.100.14): 56 data bytes, press CTRL_C to break
56 bytes from 192.168.100.14: icmp_seq=0 ttl=64 time=10.701 ms
56 bytes from 192.168.100.14: icmp_seq=1 ttl=64 time=2.678 ms
56 bytes from 192.168.100.14: icmp_seq=2 ttl=64 time=2.282 ms
56 bytes from 192.168.100.14: icmp_seq=3 ttl=64 time=1.617 ms
56 bytes from 192.168.100.14: icmp_seq=4 ttl=64 time=1.701 ms
--- Ping statistics for 192.168.100.14 ---
5 packet(s) transmitted, 5 packet(s) received, 0.0% packet loss
round-trip min/avg/max/std-dev = 1.617/3.796/10.701/3.474 ms
# 执行save命令保存交换机当前配置信息。
<Switch> save
The current configuration will be written to the device. Are you sure? [Y/N]:y
Please input the file name(*.cfg)[flash:/startup.cfg]
(To leave the existing filename unchanged, press the enter key):
flash:/startup.cfg exists, overwrite? [Y/N]:y
Validating file. Please wait...
Saved the current configuration to mainboard device successfully.
# 使用TFTP方式将文件服务器上的软件版本switch.ipe文件下载到Switch上,以缺省文件名switch.ipe保存。
<Switch> tftp 192.168.100.14 get switch.ipe
% Total % Received % Xferd Average Speed Time Time Time Current
Dload Upload Total Spent Left Speed
100 58.7M 100 58.7M 0 0 1193k 0 0:00:50 0:00:50 --:--:-- 1127k
# 指定Switch下次启动时所用的主用启动文件为switch.ipe。
<Switch> boot-loader file flash:/switch.ipe slot 1 main
Verifying the file flash:/switch.ipe on slot 1.....Done.
Images in IPE:
boot.bin
system.bin
This command will set the main startup software images. Continue? [Y/N]:y
Add images to slot 1.
Decompressing file switch.bin to flash:/boot.bin.........Done.
Decompressing file switch.bin to flash:/system.bin.................................Done.
The images that have passed all examinations will be used as the main startup software images at the next reboot on slot 1.
# 重启设备。
<Switch> reboot
# 设备重启后,使用display version命令查看设备版本信息。
<Switch> display version
H3C Comware Software, Version 7.1.070, Release xxxx
Copyright (c) 2004-2019 New H3C Technologies Co., Ltd. All rights reserved.
H3C Switch uptime is 0 weeks, 0 days, 0 hours, 19 minutes
Last reboot reason : User reboot
Boot image: flash:/boot.bin
Boot image version: 7.1.070, Release xxxx
Compiled Jun 18 2019 17:52:09
System image: flash:/system.bin
System image version: 7.1.070, Release xxxx
Compiled Jun 18 2019 17:52:09
……略……
# 显示本次启动和下次启动所采用的启动软件包的名称。
<Switch> display boot-loader
Software images on slot 1:
Current software images:
flash:/boot.bin
flash:/system.bin
Main startup software images:
flash:/boot.bin
flash:/system.bin
Backup startup software images:
None
#
interface M-GigabitEthernet0/0/0
ip address 192.168.100.66 255.255.255.0
#
如图3所示,Switch和文件服务器通过交换机相连,Switch作为FTP客户端,文件服务器作为FTP服务器。现要求:
· 通过FTP方式为Switch升级软件版本,将存储在文件服务器上的文件switch.ipe下载到FTP客户端。
· 配置FTP客户端登录FTP服务器的用户名为123456,密码为123456。

为了使交换机在重启后使用新软件版本,需要指定下次启动时所用的主用启动文件为升级后的软件版本。
表2 适用产品及版本
|
产品 |
软件版本 |
|
S12500G-AF系列交换机 |
Release 7639P01及以上版本 |
|
S10500X系列交换机 |
Release 7639P01及以上版本 |
|
S12500-XS系列交换机 |
Release 7639P01及以上版本 |
|
S7600E-X系列交换机 |
Release 7639P01及以上版本 |
|
S7500X-X系列交换机 |
Release 7639P01及以上版本 |
|
S10500系列交换机 |
Release 7639P01及以上版本 |
|
S7600-X系列交换机 |
Release 7639P01及以上版本 |
|
S12500-S系列交换机 |
Release 7639P01及以上版本 |
|
S7500E-X系列交换机 |
Release 7639P01及以上版本 |
|
S7500E系列交换机 |
Release 7639P01及以上版本 |
|
S7500X系列交换机 |
Release 7639P01及以上版本 |
|
S7600系列交换机 |
Release 7639P01及以上版本 |
|
S7000ET系列交换机 |
Release 7639P01及以上版本 |
· 当设备剩余的内存空间不够,请使用delete /unreserved file-url命令删除部分暂时不用的文件后再执行升级软件操作。
· 确保主机和Switch的FTP用户名、密码及文件名等参数保持一致。
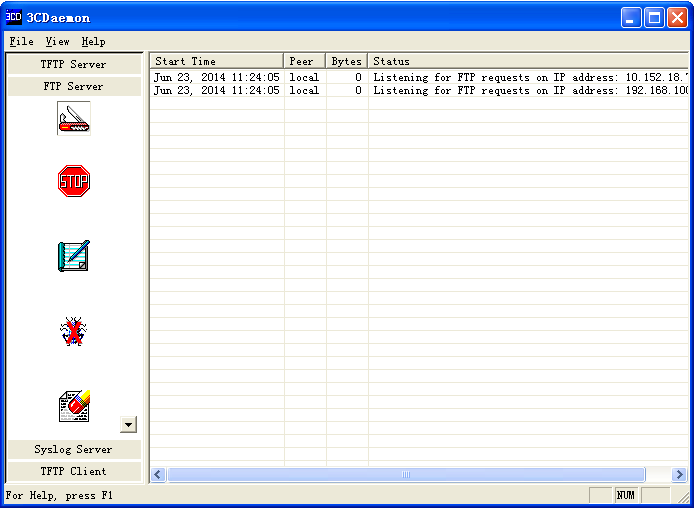
# 配置文件服务器的IP地址为192.168.100.14/24,使得与Switch路由可达,具体配置方法略。
# 启动文件服务器上的FTP功能(以3CDaemon软件为例),设置FTP服务器下载路径、FTP用户名和密码,并开启FTP服务。
图4 配置FTP服务器
# 配置Switch接口IP地址。
<Switch> system-view
System View: return to User View with Ctrl+Z.
[Switch] interface m-gigabitethernet 0/0/0
[Switch-M-GigabitEthernet0/0/0] ip address 192.168.100.66 255.255.255.0
[Switch-M-GigabitEthernet0/0/0] quit
[Switch] quit
# 在Switch上ping文件服务器地址,能够ping通。
<Switch> ping 192.168.100.14
Ping 192.168.100.14 (192.168.100.14): 56 data bytes, press CTRL_C to break
56 bytes from 192.168.100.14: icmp_seq=0 ttl=64 time=10.701 ms
56 bytes from 192.168.100.14: icmp_seq=1 ttl=64 time=2.678 ms
56 bytes from 192.168.100.14: icmp_seq=2 ttl=64 time=2.282 ms
56 bytes from 192.168.100.14: icmp_seq=3 ttl=64 time=1.617 ms
56 bytes from 192.168.100.14: icmp_seq=4 ttl=64 time=1.701 ms
--- Ping statistics for 192.168.100.14 ---
5 packet(s) transmitted, 5 packet(s) received, 0.0% packet loss
round-trip min/avg/max/std-dev = 1.617/3.796/10.701/3.474 ms
# 执行save命令保存交换机当前配置信息。
<Switch> save
The current configuration will be written to the device. Are you sure? [Y/N]:y
Please input the file name(*.cfg)[flash:/startup.cfg]
(To leave the existing filename unchanged, press the enter key):
flash:/startup.cfg exists, overwrite? [Y/N]:y
Validating file. Please wait...
Configuration is saved to mainboard device successfully.
# 以用户名123456、密码123456登录FTP服务器。
<Switch> ftp 192.168.100.14
Connected to 192.168.100.14 (192.168.100.14).
220 3Com 3CDaemon FTP Server Version 2.0
User (192.168.100.14:(none)): 123456
331 User name ok, need password
Password:
230 User logged in
Remote system type is UNIX.
Using binary mode to transfer files.
# 将文件switch.ipe从FTP服务器下载到Switch上。
ftp> get switch.ipe
227 Entering passive mode (192,168,100,14,8,86)
125 Using existing data connection
226 Closing data connection; File transfer successful.
50445056 bytes received in 53.6 seconds (1.25 Mbyte/s)
ftp> quit
# 指定Switch下次启动时所用的主用启动文件为switch.ipe。
<Switch> boot-loader file flash:/switch.ipe slot 1 main
Verifying the file flash:/switch.ipe on slot 1.....Done.
Images in IPE:
boot.bin
system.bin
This command will set the main startup software images. Continue? [Y/N]:y
Add images to slot 1.
Decompressing file switch.bin to flash:/boot.bin.........Done.
Decompressing file switch.bin to flash:/system.bin.................................Done.
The images that have passed all examinations will be used as the main startup software images at the next reboot on on slot 1.
# 重启设备。
<Switch> reboot
# 设备重启后,使用display version命令查看设备版本信息。
<Switch> display version
H3C Comware Software, Version 7.1.070, Release xxxx
Copyright (c) 2004-2019 New H3C Technologies Co., Ltd. All rights reserved.
H3C Switch uptime is 0 weeks, 0 days, 0 hours, 19 minutes
Last reboot reason : User reboot
Boot image: flash:/boot.bin
Boot image version: 7.1.070, Release xxxx
Compiled Jun 18 2019 17:52:09
System image: flash:/system.bin
System image version: 7.1.070, Release xxxx
Compiled Jun 18 2019 17:52:09
……略……
# 显示本次启动和下次启动所采用的启动软件包的名称。
<Switch> display boot-loader
Software images on slot 1:
Current software images:
flash:/boot.bin
flash:/system.bin
Main startup software images:
flash:/boot.bin
flash:/system.bin
Backup startup software images:
None
#
interface M-GigabitEthernet0/0/0
ip address 192.168.100.66 255.255.255.0
#
如图5所示,Switch和文件服务器通过交换机相连,Switch作为FTP服务器,文件服务器作为FTP客户端。
现要求:
· 通过FTP方式为Switch升级软件版本,将存储在FTP客户端上的文件switch.ipe上传到FTP服务器。
· 配置FTP客户端登录FTP服务器的用户名为abc,密码为123456。

为了使交换机在重启后使用新软件版本,需要指定下次启动时所用的主用启动文件为升级后的软件版本。
表3 适用产品及版本
|
产品 |
软件版本 |
|
S12500G-AF系列交换机 |
Release 7639P01及以上版本 |
|
S10500X系列交换机 |
Release 7639P01及以上版本 |
|
S12500-XS系列交换机 |
Release 7639P01及以上版本 |
|
S7600E-X系列交换机 |
Release 7639P01及以上版本 |
|
S7500X-X系列交换机 |
Release 7639P01及以上版本 |
|
S10500系列交换机 |
Release 7639P01及以上版本 |
|
S7600-X系列交换机 |
Release 7639P01及以上版本 |
|
S12500-S系列交换机 |
Release 7639P01及以上版本 |
|
S7500E-X系列交换机 |
Release 7639P01及以上版本 |
|
S7500E系列交换机 |
Release 7639P01及以上版本 |
|
S7500X系列交换机 |
Release 7639P01及以上版本 |
|
S7600系列交换机 |
Release 7639P01及以上版本 |
|
S7000ET系列交换机 |
Release 7639P01及以上版本 |
· 当设备剩余的内存空间不够,请使用delete /unreserved file-url命令删除部分暂时不用的文件后再执行升级软件操作。
· 确保主机和Switch的FTP用户名、密码及文件名等参数保持一致。
· 在Switch和主机之间进行FTP传输,需要选择binary方式传输文件。
# 配置Switch接口IP地址。
<Switch> system-view
System View: return to User View with Ctrl+Z.
[Switch] interface m-gigabitethernet 0/0/0
[Switch-M-GigabitEthernet0/0/0] ip address 192.168.100.66 255.255.255.0
[Switch-M-GigabitEthernet0/0/0] quit
# 在Switch上添加一个FTP用户abc,并设置其认证密码为123456。
[Switch] local-user abc
[Switch-luser-manage-abc] password simple 123456
# 配置用户角色为network-admin。
[Switch-luser-manage-abc] authorization-attribute user-role network-admin
# 为保证FTP客户端仅使用授权的用户角色network-admin,删除缺省用户角色network-operator。
[Switch-luser-manage-abc] undo authorization-attribute user-role network-operator
# 配置服务类型为FTP。
[Switch-luser-manage-abc] service-type ftp
[Switch-luser-manage-abc] quit
# 启动Switch的FTP服务功能。
[Switch] ftp server enable
[Switch] quit
# 执行save命令保存交换机当前配置信息。
<Switch> save
The current configuration will be written to the device. Are you sure? [Y/N]:y
Please input the file name(*.cfg)[flash:/startup.cfg]
(To leave the existing filename unchanged, press the enter key):
flash:/startup.cfg exists, overwrite? [Y/N]:y
Validating file. Please wait...
Saved the current configuration to mainboard device successfully.
# 配置文件服务器的IP地址为192.168.100.14/24,使得到Switch路由可达,具体配置方法略。
# 从文件服务器登录FTP server,本例以Windows命令提示符界面为例。
C:\Documents and Settings\Administrator> ftp 192.168.100.66
Connected to 192.168.100.66.
220 FTP service ready.
# 以用户名abc、密码123456登录FTP服务器。
User (192.168.100.66:(none)): abc
331 Password required for abc.
Password:
230 User logged in.
# 使用lcd命令,将FTP客户端本地的工作路径切换到软件版本所在的目录下。
ftp> lcd E:\
Local directory now E:\
# 将传输模式设置为binary方式。
ftp> binary
200 TYPE is now 8-bit binary
# 将本地switch.ipe文件上传到FTP服务器上,缺省以文件名switch.ipe保存。
ftp> put switch.ipe
200 PORT command successful
150 Connecting to port 2903
226 File successfully transferred
ftp: 发送 50445056 字节,用时 1.05Seconds 67282.77Kbytes/sec.
# 使用ls命令查看FTP服务器上是否有文件。
ftp> ls switch.ipe
200 PORT command successful
150 Connecting to port 3391
switch.ipe
226 1 matches total
ftp: 收到 24 字节,用时 0.00Seconds 24000.00Kbytes/sec.
# 终止与FTP Server的连接,并退回到用户视图。
ftp> bye
# 指定Switch下次启动时所用的主用启动文件为switch.ipe。
<Switch> boot-loader file flash:/switch.ipe slot 1 main
Verifying the IPE file and the images.....Done.
Verifying the file flash:/switch.ipe on slot 1.....Done.
Images in IPE:
boot.bin
system.bin
This command will set the main startup software images. Continue? [Y/N]:y
Add images to slot 1.
Decompressing file switch.bin to flash:/boot.bin.........Done.
Decompressing file switch.bin to flash:/system.bin.................................Done.
The images that have passed all examinations will be used as the main startup software images at the next reboot on slot 1.
# 重启设备。
<Switch> reboot
# 设备重启后,使用display version命令查看设备版本信息。
<Switch> display version
H3C Comware Software, Version 7.1.070, Release xxxx
Copyright (c) 2004-2019 New H3C Technologies Co., Ltd. All rights reserved.
H3C Switch uptime is 0 weeks, 0 days, 0 hours, 19 minutes
Last reboot reason : User reboot
Boot image: flash:/boot.bin
Boot image version: 7.1.070, Release xxxx
Compiled Jun 18 2019 17:52:09
System image: flash:/system.bin
System image version: 7.1.070, Release xxxx
Compiled Jun 18 2019 17:52:09
……略……
# 显示本次启动和下次启动所采用的启动软件包的名称。
<Switch> display boot-loader
Software images on slot 1:
Current software images:
flash:/boot.bin
flash:/system.bin
Main startup software images:
flash:/boot.bin
flash:/system.bin
Backup startup software images:
None
#
interface M-GigabitEthernet0/0/0
ip address 192.168.100.66 255.255.255.0
#
local-user abc class manage
password hash $h$6$YMVbbwFL/vviWcQu$+CuTbYCehNZtZo5RCXiadpYbXYWa2omt5TUtEh3UPCg3fZjxYCp5WzbuE2GoowVi2YA/BK+mnSZJZqi5jRDuCg==
service-type ftp
authorization-attribute user-role network-admin
#
ftp server enable
#
如图6所示,文件服务器与Device的管理以太网接口M-GigabitEthernet0/0/0相连,Host通过串口线连接Device的Console口。现由于设备问题,不能正常启动Device。
现要求:使用BootWare菜单升级Device的软件版本。

表4 适用产品及版本
|
产品 |
软件版本 |
|
S12500G-AF系列交换机 |
Release 7639P01及以上版本 |
|
S10500X系列交换机 |
Release 7639P01及以上版本 |
|
S12500-XS系列交换机 |
Release 7639P01及以上版本 |
|
S7600E-X系列交换机 |
Release 7639P01及以上版本 |
|
S7500X-X系列交换机 |
Release 7639P01及以上版本 |
|
S10500系列交换机 |
Release 7639P01及以上版本 |
|
S7600-X系列交换机 |
Release 7639P01及以上版本 |
|
S12500-S系列交换机 |
Release 7639P01及以上版本 |
|
S7500E-X系列交换机 |
Release 7639P01及以上版本 |
|
S7500E系列交换机 |
Release 7639P01及以上版本 |
|
S7500X系列交换机 |
Release 7639P01及以上版本 |
|
S7600系列交换机 |
Release 7639P01及以上版本 |
|
S7000ET系列交换机 |
Release 7639P01及以上版本 |
· 确保在文件服务器上开启TFTP服务器功能。
· 当设备剩余的存储空间不够,请使用delete /unreserved file-url命令删除部分暂时不用的文件后,再执行升级软件操作。
· 将交换机的升级启动文件拷贝到文件服务器上,并正确设置TFTP服务器的访问路径。
# 使用串口线,从主机连至Device备用主控板的Console口。
# 通过超级终端或PuTTY等终端仿真程序与设备建立连接。这些程序的详细介绍和使用方法请参见该程序的使用指导。打开终端仿真程序后,请按如下要求设置终端参数:
· 波特率:9600
· 数据位:8
· 停止位:1
· 奇偶校验:无
· 流量控制:无
# 配置文件服务器的IP地址为192.168.100.14/24,具体配置步骤略。
# 启动文件服务器的TFTP服务器,设置TFTP服务器下载路径等参数,并开启服务。
(1) 升级备用主控板
# 使用直通线从TFTP服务器连接到备用主控板的管理以太网接口M-GigabitEthernet 0/0/0上(已使用串口线从主机连接至Device备用主控板的Console口)。
# 忽略对备用主控板进行启动软件包版本一致性检查(即不检查备用主控板的版本是否与主用主控板的启动软件包版本一致)。
<Device> system-view
[Device] version check ignore
# 将设备的当前配置保存到指定文件。
[Device] save
The current configuration will be written to the device. Are you sure? [Y/N]:y
Please input the file name(*.cfg)[flash:/startup.cfg]
(To leave the existing filename unchanged, press the enter key):
flash:/startup.cfg exists, overwrite? [Y/N]:y
Validating file. Please wait...
Saved the current configuration to mainboard device successfully.
[Device] quit
# 重启设备的备用主控板。
<Device> reboot slot 7
# 交换机上加电重启的过程中,在配置终端的屏幕上将显示:
System is Starting....
Press Ctrl+D to access BASIC-BOOTWARE MENU
Press Ctrl+T to access BOOTWARE DIAG-TEST MENU
Booting Normal Extend Bootware
****************************************************************************
* *
* BootWare, Version 1.23 *
* *
****************************************************************************
Compiled Date : Aug 26 2020
Memory Type : DDR4 SDRAM
Memory Size : 16384MB
Memory Speed : 2133MHz
flash Size : 7296MB
CPLD 1 Version : 4.0
CPLD 2 Version : 4.0
CPLD 3 Version : 2.0
PCB 1 Version : Ver.A
PCB 2 Version : Ver.A
BootWare Validating...
Press Ctrl+B to access EXTENDED-BOOTWARE MENU...
# 当出现“Press Ctrl+B to access EXTENDED-BOOTWARE MENU”时,键入<Ctrl+B>,系统提示:
Password recovery capability is enabled.
Note: The current operating device is flash
Enter < Storage Device Operation > to select device.
==========================<EXTENDED-BOOTWARE MENU>==========================
|<1> Boot System |
|<2> Enter Serial SubMenu |
|<3> Enter Ethernet SubMenu |
|<4> File Control |
|<5> Restore to Factory Default Configuration |
|<6> Skip Current System Configuration |
|<7> BootWare Operation Menu |
|<8> Skip Authentication for Console Login |
|<9> Storage Device Operation |
|<0> Reboot |
============================================================================
Ctrl+Z: Access EXTENDED ASSISTANT MENU
Ctrl+C: Display Copyright
Ctrl+F: Format File System
Enter your choice(0-9):
# 在BootWare菜单下键入<3>,进入以太网口子菜单,系统显示如下:
Enter your choice(0-9): 3
==========================<Enter Ethernet SubMenu>==========================
|Note:the operating device is flash |
|<1> Download Image Program To SDRAM And Run |
|<2> Update Main Image File |
|<3> Update Backup Image File |
|<4> Download Files(*.*) |
|<5> Modify Ethernet Parameter |
|<0> Exit To Main Menu |
|<Ensure The Parameter Be Modified Before Downloading!> |
============================================================================
Enter your choice(0-5):
# 在以太网口子菜单下键入<5>就可以进入以太网口配置菜单,并按照如下方式分别配置Load File Name、Target File Name、Server IP Address、Local IP Address、Subnet Mask、Gateway IP Address:
![]()
· Load File Name:待升级Device的启动软件包的名称,该文件位于TFTP服务器的工作目录下。
· Target File Name:启动软件包上传至Device的存储介质后的文件名。
· Server IP Address:TFTP服务器的IP地址。
· Local IP Address:Device连接文件服务器的端口IP地址。
· Subnet Mask:子网掩码。
· Gateway IP Address:网关地址,当TFTP服务器与待升级的Device不在同一网段时,必须配置该地址。
Enter your choice(0-5): 5
==========================<ETHERNET PARAMETER SET>==========================
|Note: '.' = Clear field. |
| '-' = Go to previous field. |
| Ctrl+D = Quit. |
============================================================================
· 使用TFTP方式下载软件版本:
Protocol (FTP or TFTP) :tftp
· 加载软件版本new.ipe:
Load File Name : new.ipe
:
Target File Name : new.ipe
:
· 输入TFTP服务器地址:
Server IP Address :192.168.1.100 192.168.100.14
· 输入Device管理IP地址(只需要和TFTP服务器路由可达,这里以192.168.100.66为例):
Local IP Address :192.168.1.1 192.168.100.66
· 输入子网掩码255.255.255.0:
Subnet Mask :255.255.255.0
Gateway IP Address :0.0.0.0
# 按下Enter键,进入如下界面:
==========================<Enter Ethernet SubMenu>==========================
|Note:the operating device is flash |
|<1> Download Image Program To SDRAM And Run |
|<2> Update Main Image File |
|<3> Update Backup Image File |
|<4> Download Files(*.*) |
|<5> Modify Ethernet Parameter |
|<0> Exit To Main Menu |
|<Ensure The Parameter Be Modified Before Downloading!> |
============================================================================
# 在以太网口配置子菜单下,键入<2>为升级主启动文件:
Enter your choice(0-5): 2
Loading.....................................................................
............................................................................
............................................................................
.................................................Done.
227301376 bytes downloaded!
Image file BOOT-test.bin is self-decompressing...
Saving file flash:/BOOT-test.bin ..........................
........................................................Done.
Image file SYSTEM-test.bin is self-decompressing...
Saving file flash:/SYSTEM-test.bin .........................................
............................................................................
............................................................................
............................................................................
............Done.
==========================<Enter Ethernet SubMenu>==========================
|Note:the operating device is flash |
|<1> Download Image Program To SDRAM And Run |
|<2> Update Main Image File |
|<3> Update Backup Image File |
|<4> Download Files(*.*) |
|<5> Modify Ethernet Parameter |
|<0> Exit To Main Menu |
|<Ensure The Parameter Be Modified Before Downloading!> |
============================================================================
# 键入<0>,返回BootWare主菜单:
Enter your choice(0-5): 0
==========================<EXTENDED-BOOTWARE MENU>==========================
|<1> Boot System |
|<2> Enter Serial SubMenu |
|<3> Enter Ethernet SubMenu |
|<4> File Control |
|<5> Restore to Factory Default Configuration |
|<6> Skip Current System Configuration |
|<7> BootWare Operation Menu |
|<8> Skip Authentication for Console Login |
|<9> Storage Device Operation |
|<0> Reboot |
============================================================================
Ctrl+Z: Access EXTENDED ASSISTANT MENU
Ctrl+C: Display Copyright
Ctrl+F: Format File System
Enter your choice(0-9):
# 键入<1>,进入引导系统:
Enter your choice(0-9): 1
Loading the main image files...
Loading file flash:/SYSTEM-test.bin........................
............................................................................
............................................................................
.........................Done.
Loading file flash:/BOOT-test.bin..........................
....Done.
Image file flash:/BOOT-test.bin is self-decompressing......
....................................................Done.
System image is starting...
Line aux1 is available.
Press ENTER to get started.
(2) 升级主用主控板
# 从TFTP服务器使用串口线连接至Device主用主控板的Console口,使用直通线连接到主用主控板的管理以太网接口上,升级方式与升级备用主控板一致,此处不再重复。
# 设备重启后,使用display version命令查看设备版本信息。
<Device> display version
H3C Comware Software, Version 7.1.070, Release 7595
Copyright (c) 2004-2020 New H3C Technologies Co., Ltd. All rights reserved.
H3C S12508G-AF uptime is 0 weeks, 0 days, 0 hours, 4 minutes
Last reboot reason : USER reboot
Boot image: flash:/BOOT-R7595.bin
Boot image version: 7.1.070, Release 7595
Compiled Aug 04 2020 11:00:00
System image: flash:/SYSTEM-R7595.bin
System image version: 7.1.070, Release 7595
Compiled Aug 04 2020 11:00:00
……略……
# 显示设备主用主控板本次启动和下次启动所采用的启动软件包的名称。
<Device> display boot-loader slot 6
Software images on slot 6:
Current software images:
flash:/BOOT-test.bin
flash:/SYSTEM-test.bin
Main startup software images:
flash:/BOOT-test.bin
flash:/SYSTEM-test.bin
Backup startup software images:
flash:/BOOT-old.bin
flash:/SYSTEM-old.bin
# 显示设备备用主控板本次启动和下次启动所采用的启动软件包的名称。
<Device> display boot-loader slot 7
Software images on slot 7:
Current software images:
flash:/BOOT-test.bin
flash:/SYSTEM-test.bin
Main startup software images:
flash:/BOOT-test.bin
flash:/SYSTEM-test.bin
Backup startup software images:
flash:/BOOT-old.bin
flash:/SYSTEM-old.bin
无
如7.1 图7所示,Switch和文件服务器通过交换机相连,Switch作为TFTP客户端,文件服务器作为TFTP服务器。现要求:通过TFTP方式将存储在文件服务器上的文件feature-t0001016.ipe下载到TFTP客户端,将Switch上的Feature特性从T0001015版本升级到兼容版本T0001016。
图7 Feature包升级组网图

通过激活T0001016版本的Feature包并确认软件包更改。
表5 适用产品及版本
|
产品 |
软件版本 |
|
S12500G-AF系列交换机 |
Release 7639P01及以上版本 |
|
S10500X系列交换机 |
Release 7639P01及以上版本 |
|
S12500-XS系列交换机 |
Release 7639P01及以上版本 |
|
S7600E-X系列交换机 |
Release 7639P01及以上版本 |
|
S7500X-X系列交换机 |
Release 7639P01及以上版本 |
|
S10500系列交换机 |
Release 7639P01及以上版本 |
|
S7600-X系列交换机 |
Release 7639P01及以上版本 |
|
S12500-S系列交换机 |
Release 7639P01及以上版本 |
|
S7500E-X系列交换机 |
Release 7639P01及以上版本 |
|
S7500E系列交换机 |
Release 7639P01及以上版本 |
|
S7500X系列交换机 |
Release 7639P01及以上版本 |
|
S7600系列交换机 |
Release 7639P01及以上版本 |
|
S7000ET系列交换机 |
Release 7639P01及以上版本 |
· 当设备剩余的内存空间不够,请使用delete /unreserved file-url命令删除部分暂时不用的文件后再执行升级软件操作。
· 确保服务器和Switch的TFTP用户名、密码及文件名等参数保持一致。
# 配置文件服务器的IP地址为192.168.100.14/24,与Switch路由可达,具体配置方法略。
# 启动文件服务器上的TFTP服务器功能(以3CDaemon软件为例),设置TFTP服务器下载路径等参数,并开启服务。
图8 配置TFTP服务器

# 配置Switch管理口的IP地址。
<Switch> system-view
System View: return to User View with Ctrl+Z.
[Switch] interface m-gigabitethernet 0/0/0
[Switch-M-GigabitEthernet0/0/0] ip address 192.168.100.66 255.255.255.0
[Switch-M-GigabitEthernet0/0/0] quit
[Switch] quit
# 在Switch 上ping TFTP服务器地址,能够ping通。
<Switch> ping 192.168.100.14
Ping 192.168.100.14 (192.168.100.14): 56 data bytes, press CTRL_C to break
56 bytes from 192.168.100.14: icmp_seq=0 ttl=64 time=10.701 ms
56 bytes from 192.168.100.14: icmp_seq=1 ttl=64 time=2.678 ms
56 bytes from 192.168.100.14: icmp_seq=2 ttl=64 time=2.282 ms
56 bytes from 192.168.100.14: icmp_seq=3 ttl=64 time=1.617 ms
56 bytes from 192.168.100.14: icmp_seq=4 ttl=64 time=1.701 ms
--- Ping statistics for 192.168.100.14 ---
5 packet(s) transmitted, 5 packet(s) received, 0.0% packet loss
round-trip min/avg/max/std-dev = 1.617/3.796/10.701/3.474 ms
# 执行save命令保存交换机当前配置信息。
<Switch> save
The current configuration will be written to the device. Are you sure? [Y/N]:y
Please input the file name(*.cfg)[flash:/startup.cfg]
(To leave the existing filename unchanged, press the enter key):
flash:/startup.cfg exists, overwrite? [Y/N]:y
Validating file. Please wait...
Saved the current configuration to mainboard device successfully.
# 从TFTP server下载包含新版本Feature软件包的IPE文件。
<Sysname> tftp 192.168.100.14 get feature-t0001016.ipe
% Total % Received % Xferd Average Speed Time Time Time Current
Dload Upload Total Spent Left Speed
100 256 100 256 0 0 764 0 --:--:-- --:--:-- --:--:-- 810
Writing file...Done.
# 解压缩IPE文件。
<Sysname> install add flash:/feature-t0001016.ipe flash:
Verifying the file flash:/feature-t0001016.ipe on slot 1...Done.
Decompressing file feature-t0001016.bin to flash:/feature-t0001016.bin.......................Done.
# 查看升级前激活的软件包。
<Sysname> display install active
Active packages on slot 1:
flash:/boot-t0001015.bin
flash:/system-t0001015.bin
flash:/feature-t0001015.bin
# 显示Feature软件包的升级效果。
<Sysname> install activate feature flash:/feature-t0001016.bin slot 1 test
Verifying the file flash:/feature1-t0001016.bin on slot 1...Done.
Upgrade summary according to following table:
flash:/feature-t0001016.bin
Running Version New Version
Test 0001015 Test 0001016
Upgrade Way: Service Upgrade
Influenced service according to following table on slot 1:
flash:/feature-t0001016.bin
Feature
以上显示信息表明,feature-t0001016.bin的升级方式是增量升级,升级过程中Feature模块会重启。
![]()
Upgrade Way表示兼容升级策略,取值可能为:
· Service Upgrade:表示服务级增量升级,仅对本业务模块有影响,对系统以及其他业务模块没有影响。
· File Upgrade:表示文件级增量升级,仅对系统内的、用户不可见的程序文件进行升级,对系统以及业务模块没有影响。
· Reboot:表示通过重启方式升级,本策略用于版本间的差异仍属于兼容范围内,但无法进行增量和容器重启升级时。该方式通过重启本设备加载新软件来完成升级,因此,升级过程会到导致业务中断。
# 激活新版本的Feature软件包,从而对Feature特性进行升级。
<Sysname> install activate feature flash:/feature-t0001016.bin slot 1
Verifying the file flash:/feature-t0001016.bin on slot 1...Done.
Upgrade summary according to following table:
flash:/feature-t0001016.bin
Running Version New Version
Test 0001015 Test 0001016
Upgrade Way: Service Upgrade
Upgrading software images to compatible versions. Continue? [Y/N]:y
This operation might take several minutes, please wait...Done.
# 查看升级后激活的软件包。
<Sysname> display install active
Active packages on slot 1:
flash:/boot-t0001015.bin
flash:/system-t0001015.bin
flash:/feature-t0001016.bin
# 确认软件包更改。
<Sysname> install commit
This operation will take several minutes, please wait...........................Done.
The current software images have been saved as the startup software images.
Current software images on slot 1:
flash:/boot-t0001015.bin
flash:/system-t0001015.bin
flash:/feature-t0001016.bin
无
不同款型规格的资料略有差异, 详细信息请向具体销售和400咨询。H3C保留在没有任何通知或提示的情况下对资料内容进行修改的权利!


 售前咨询
售前咨询


 售后咨询
售后咨询

 人工在线咨询


